Stop beads, or top coat plaster beads are a way of dividing large areas of skim plastering into smaller, more manageable segments. Skim plaster goes off very quickly and for the amateur plasterer, laying on and trowelling up more than about 4 square metres in one go is difficult.
Top coat plaster is not very forgiving either and even when its painted the little bumps, hollows, ridges and scrapes can be seen very easily, so for a great finish it’s imperative that everything is totally flat, level and smooth.
With this in mind, in this guide you will learn all about plastering stop beads and how they are used. Angle beads being used to divide up a wall for plastering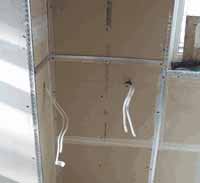
What is a Stop Bead in Plastering?
A stop bead is a thin metal galvanised strip with a perforated strip that is fixed to the wall before skim plastering to both divide up a wall area into more manageable plastering chunks and also provide a neat, square and level edge to plaster up to.
In the image below you can see stop beads being used to divide up a wall into smaller sections. Working with skim plaster is quite hard work, especially if you are new to plastering and in general you only have around 20 minutes to work with it until it’s too dry and stuck forever, whether it’s flat or not.
Trying to take on an area that’s too large before you are skilled enough at plastering to get it flat and smooth before it cures is a recipe for disaster, so dividing up the space using stop beads is a great way to go and will allow you to hone your skills. Stop bead being used to divide up plastering area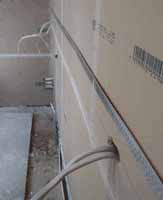
Likewise, even if you are a professional plasterer, getting a crisp, straight edge can be a little tricky at times and for the sake of fixing a leveled stop bead in place where you want to stop, this can save a huge amount of hassle. They take so little time to fix and make such a difference to the finish, there is little point not using them.
You may be thinking; can plastering stop beads be used vertically and on corners? In answer, no they can’t really, but there are specialist beads for this job called plasterers angle beads, more can be found about these in our project here. Plaster stop beads being used to create level stop line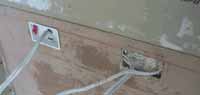
Stop beads can also be used vertically at the end of walls. If, for example, you wanted to turn a chimney alcove into a cupboard you may have a timber frame on one side of the alcove which you could plaster up to.
As you probably know, plaster does not stick too well to timber so placing a stop bead on the wall, up against the frame will allow you to plaster right up to the frame without the plaster cracking every time you open the cupboard doors and move the frame.
Similarly, you may want to make a feature out of an old cottage door frame and rather than cover up the joint between frame and wall with the normal architrave, a stop bead can be used to allow you to see all of the old frame.
Ideas like this can make all the difference to the presentation of a job but use the simplest means possible to get a great result.
Types of Plastering Stop Beads
If you are new to plastering it’s important to know the different types of stop beads and when they should be used.
Standard Plasterers Stop Bead
If you have ever seen a plasterers stop bead then you will be familiar with its appearance, if not then a standard stop bead is effectively a metal perforated strip with a rigid metal edge to it. The metal perforated strip is used for fixing the stop bead to a given surface and the rigid edge forms the stop edge that is plastered up to. Standard galvanised plasterers stop bead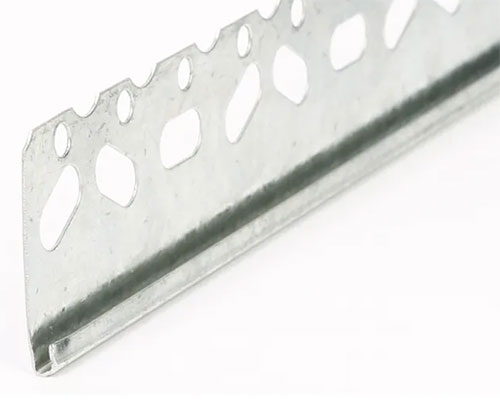
The rigid edge should generally be no more than 3mm in depth as this should be the final finished depth of a coat of skim plaster (final finished coat of plaster on top of scratch coat plaster etc.). Anything deeper and this will generally be a rendering stop bead, more on this below.
As we have mentioned above, plastering stop beads should be made from galvanise coated steel. The galvanise coating, which is a protective layer of zinc, is applied to the bare steel and ensures that the stop bead is resistant to moisture so it won’t rust in the wall.
In some very rare cases, internal stop beads can be made from stainless steel, but this material is generally reserved for external rendering stop beads and is also a fair bit more expensive than the traditional galvanise coated steel.
Despite the fact that we have said that plastering stop beads are 2-3mm in depth, it is possible to use the taller 10mm plus beads meant for rendering for plastering is you are building up several coats of plaster (scratch coat, skim coat etc.).
Rendering Stop Beads
There is a very close tie between plastering and rendering, in fact the process for laying both plaster and render on walls is exactly the same and uses pretty much all the same tools, the only real difference is that plastering is internal and rendering is external.
Rendering is essentially the process of covering an external brick or block-built wall with a protective waterproof coating, similar to plaster to prevent water and moisture ingress into the bricks or blocks.
Although we’re not dealing with rendering stop beads in this guide, it’s important to mention them so that you know the difference between the 2 types.
Unlike plaster, render is laid on a lot thicker, normally around 13mm or so and due to this the stop beads that are used have a much taller stop edge.
In terms of construction material for rendering stop beads they come in either stainless steel or PVC material. Stainless steel is always used over galvanised as externally it will need to be much more resistant to water and moisture damage whereas simple galvanised will eventually succumb to the elements and rust.
Stainless steel rendering stop beads are a little different in appearance to plastering stop beads. Other than the fact that the stop edge is much taller, the perforated fixing edge tends to be made from a metal mesh lath.
This is due to the fact that quite often rendering stop beads are fixed in place using dollops of render as opposed to nails ro screws and the lath is easier and more effective to fix. Stainless steel rendering stop bead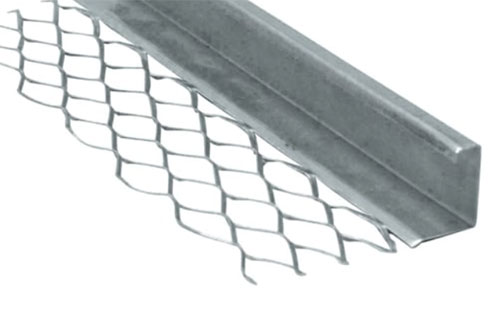
As stainless steel is quite expensive, over recent years PVC plastic rendering beads have become available. They are as easy and effective to use as stainless steel but are a fair bit cheaper. PVC rendering bead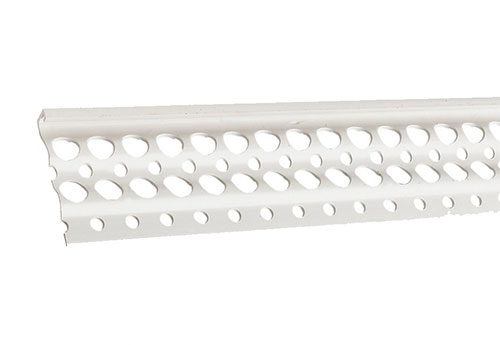
How to Cut Stop Beads to Length
Plastering stop beads are available in several different lengths; 2.4m and 3m for galvanised coated and for larger 10mm plus depth stop beads, up to 3m in length.
Due to their lengths, quite often they need to be cut down to a shorter length to fit on to walls etc.
To cut a section of metal plastering stop bead to length, simply measure and mark the cutting point and then use a hacksaw or a pair of tin snips to cut it to length.
Always wear gloves when doing this job, especially when using tin snips and the edges that are left are very sharp and can easily cut you! Tin snips for cutting plastering stop bead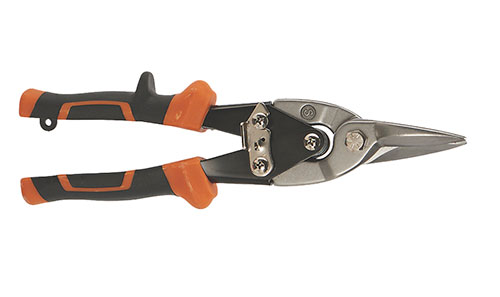
How do you Install a Stop Bead?
Now that you know about the different types of stop bead, which one you need and how you cut them to length, the next job is to look at how they are fixed in place.
Fixing top coat stop beads is easy and can be done in 2 different ways. They can be nailed on or stuck in place.
To nail them in place simply align the stop bead and level it up where it needs to be fixed and then using special short galvanised nails, nail through the perforated edge into the timber stud beneath the plasterboard and the bead will be fixed firmly in place. Stop bead fixed around window reveal using galvanised nails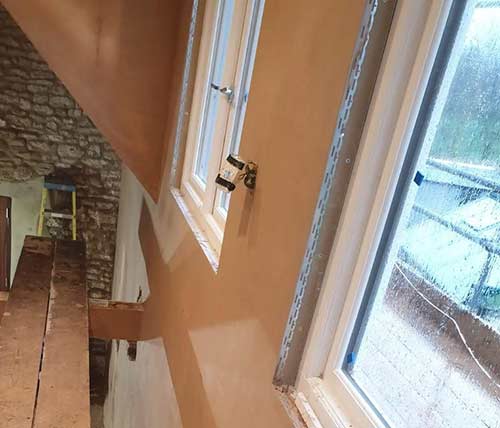
Stop beads can also be stuck to plasterboard surfaces using with a small amount of skim plaster. This is the method that many pros use as it avoids the cost of using nails.
To fix a plastering stop bead in place using skim plaster, first mark a straight line where you want to fix using a straight edge and pencil.
Place a small "dollop" of skim on that line every 900mm or so using a trowel of plasters float.
Next, push the bead into the line of dollops and hold for 3 or 4 minutes while the plaster begins to set.
Finally, once held in place, cut off any plaster which is beyond the depth level of the bead using a trowel taking care not to nudge or move it.
Which ever method you use to fix your stop bead in place is entirely up to you, but as said, using skim plaster is a bit tricky if you are new to this method.
Once your stop bead is secured to the wall you can also run some scrim tape over the perforated stip. This will help it to remain slightly flexible if the stop bead is fixed in an area that is subject to movement which could cause the plaster to crack.
This is a bit of a contentious point as many professional plasterers don’t do this and simply plaster over the strip with no issues.
Tips for Using Plaster Stop Beads
As you can see form above, using a plaster stop beads is fairly straightforward, they’re just fixed to the walls surface and then lay your plaster on accordingly, however to ensure all goes smoothly you should remember these following points:
- Galvanised plaster stop beads are for indoor use, whereas stainless or PVC are for exterior use
- When cutting plaster stop beads use tin snips or a hacksaw and always wear gloves as cut edges are sharp
- Whether plastering or rendering, do not mix different stop beads together e.g. galvanised and stainless steel, always use a single material type throughout the whole job
- Plaster beads can be fixed to a walls surface using nails and a skim plaster mix
- Only ever use galvanised nails when fixing stop beads in place to prevent them rusting once plastered over
- Although plastering and rendering share many similarities they are different in that plastering is internal and rendering is external
- There are different types of stop bead so ensure you are using the correct type (e.g. plastering, rendering, internal, external etc.)
To get the best finish possible and allow yourself time to practice and get the feel for it when you are starting out in the world of plastering it’s essential that you don’t take on more than you can handle and using stop beads is a great way to achieve this.
Likewise if you are a professional plasterer or have practiced to the point you are now proficient, stop beads are a must to use whenever you want to get a crisp and straight edge.