Dry lining or drywall as it is called in the States is the term used to describe covering a structure with a dry product which is attached to the structure.
Traditionally surfaces were covered with a wet sand and cement render or plaster. Dry lining now refers mainly to covering internal walls with plasterboard. The plasterboard is either stuck on the walls or fixed to a timber, or steel frame which is attached to the walls.
Dry lining has several advantages over the wet finish in that it can be installed much more quickly, especially in the case where it is stuck to the walls using a mix of plaster as adhesive. This method is called dot and dab.
The fact that dry lining is lighter than its wet counterparts means that the finished construction is lighter and further more less moisture is introduced into the building structure.
Dry lining partitions also means that properties can be changed to suit the changing needs of a family more quickly.
Dry lining also allows (in the majority of cases) greater use of insulative materials to keep the property warm and meet the increasingly demanding specifications of the Insulation Building Regulations. Conservation of fuel and power are most Governments buzzwords these days.
Plasterboard also comes in many varieties which, without changing methods of construction too much, allow for the introduction of soundproofing, greater fire protection, moisture protection and the protection offered when warm vapour is not allowed to get into voids and condense on colder surfaces.
Condensation is one of the most frequent causes of damage in properties and should be safeguarded against as often as possible. Finally a huge advantage of dry lining is, if it is properly prepared, it is considerably easier to decorate than plaster.
The disadvantages of dry lining are that it is more difficult to fix things to and easier to damage. It is also, without the introduction of the correct products, terrible at sound insulation.
There are any number of plasterboard fixings available now and with a little forward planning when building a new plasterboard wall or partition additional timbers can be inserted to carry the heaviest of loads.
Battens on wall
Most people involved with DIY will turn to dry lining as a means of warming their properties and preventing the damage caused by moisture. In older houses with solid walls, the appearance of damp in the colder months is common. This is most often caused by condensation.
Condensation can be combated in a huge way by reading our project and using simple ventilation methods to change the air in a room frequently.
For the longer term, the walls can be well insulated using dry lining. This involves either fixing timbers to the walls, fitting insulation between the battens then fixing and decorating plasterboard, or placing dabs of plaster on the walls and pushing plasterboard onto them.
The battening can be done using 25 x 50mm treated sawn battens with a 25mm thick polystyrene "batts" in between. A vapour barrier needs to be introduced and this can be done by either fixing a polythene sheet to the timber battens before fixing the plasterboard or, more simply, by using vapourcheck plasterboard which has a thin silver foil stuck on the back. Look right to the related projects section to see our project on the different types of plasterboard available.
If you are considering dry lining because your walls are damp please first check to see whether the water is getting in from outside. Our damp projects will help you identify the possible causes of damp in your building and the project on damp or mould will help you search for possible origins of water ingress.
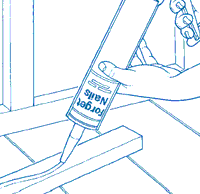
Forget Nails Adhesive
Take off skirting boards where possible. Keep them safe as they can be reused.
If there is any mould on the walls and you are sure you have dealt with any water ingress, treat the walls with a fungicide solution and follow the instructions carefully to kill all the mould.
Fix the timber battens at 400mm centres after fixing battens at ceiling and floor level. These will be required to fix the top and bottom of the board to. The joints of your boards must sit in the centre of the battens for solid joints so make sure you have enough.
Fix horizontal battens in any positions you think it may be helpful for fixing things like TV brackets or shelves later.
Make sure the surface of the battens are completely aligned by packing out behind them where necessary. The battens should be secured with plugs and screws or a strong adhesive.
Click through to our tool store for all products mentioned on this page and see our project on fixing to masonry for good methods of fixing.
Sockets and switches will need to be disconnected from the supply and moved forwards by battening behind the socket boxes or changing to plasterboard socket and switch patress boxes. Our project on plasterboard partitions shows you about these boxes.
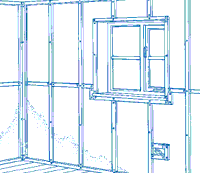
Battens need to be placed round these as shown in the diagram, left as the plasterboard needs to be fixed around the perimeter of all openings For window or alcove cut outs, see our project on cutting and fixing plasterboard.
Cut the polystyrene to fit very tightly in between each section. There should be no fixings required and a tight, friction fit is all that is required. There should be absolutely no gaps whatever.
Staple the polythene vapour barrier to the battens as seen in the diagram, and then nail or screw the plasterboard to the battens. If you have never done this before, go to the project on partition walls. Socket and light switch face plates can be put on and skirting etc replaced. Please remember this idea is a solution for walls affected by condensation only.
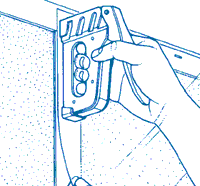
Staple Polythene Barrier
Door frames will need additional battening on the sides and timber cover strips can be bought from all DIY stores.