For most people, dealing with the external finish of their home only happens during repairs or maintenance. While understanding the finish is crucial for these tasks, we believe there’s more to external finishes.
Despite the work involved in altering the exterior of a house, modern options allow for dramatic changes without the hassle it once entailed.
However, it’s vital to check for any restrictions on listed properties or those in conservation areas. Councils can intervene if complaints are received, potentially revoking your right to alter your home’s exterior. See our section here for external finishes that may not be suitable for more information!
Factors to Consider When Choosing Exterior Home Finishes and Renders
Several factors influence your options for exterior finishes. Understanding these factors helps you make a suitable choice that aligns with your taste and complements your home’s setting. Key considerations include:
- Existing Substrate: This refers to the material beneath your chosen finish. It’s crucial, especially for renders, as they need to adhere to this surface and move with it.
- Age of the Property: This affects aesthetics, substrate, construction method, as well as the amount of preparation, repair, and ongoing maintenance required for your home’s exterior.
- Your Desired Colour and Finish: Unless you’re in a listed property, prioritise your preference here. Ensure your choice enhances your property’s appearance and blends well with its surroundings to maintain good relations with neighbours.
Renders are often applied when achieving an attractive and weatherproof finish with stone or brickwork isn’t feasible. They’re also used for damaged exterior walls as a cost-effective way to weatherproof them again. While it’s possible to restore and enhance brick and stone work authentically without the need to use renders, this is often far too expensive so render is a good compromise.
Generally, there are three main types of exterior finishes: painting, rendering, and cladding. Each offers multiple options, which we’ll explore further, with cladding discussed in a separate project.
Finishing a Home with Render
When it comes to finishing your home with render, you have two main options: Traditional Renders and Special or Modern Finishes. Traditional renders have stood the test of time, some being used for centuries with minimal changes, while modern options utilise new materials, techniques, and technologies.
The term Stucco is commonly used to refer to render, especially in North America. It encompasses various types of render, from lime renders to cement renders and more contemporary variants, all of which we’ll explore here.
Originating from Germany, Stucco gained popularity in Italy, where lime-based mortars and renders, reinforced with horsehair, were applied in multiple coats, laying the foundation for what we now know as Venetian plastering.
While the term Stucco has been used broadly to describe almost any form of render, its original meaning referred to lime-based pastes applied to provide an attractive finish on plain walls, either in a smooth or textured coat.
The main distinction between interior plaster and exterior render lies in weatherproofing. Exterior render must protect against the elements, particularly driving rain, and withstand temperature changes and moisture fluctuations, which interior plaster doesn’t need to endure.
Understanding the Ingredients of Renders
Renders consist of various components, and their proportions dictate the type of render and its characteristics. The name of the render typically reflects the ratios of these parts. Here are the main components of a render:
- Binding Agent: This compound acts as the adhesive, providing strength, moisture resistance, and permeability to the render. Common binding agents include cement, lime, clay, or gypsum.
- Structural Filler: This constitutes the bulk of the plaster. Sand is the primary filler, although other aggregates are also used.
- Water: Water is essential for working the render and activating the binding agent.
- Fibre: Fibres can be added to enhance strength, flexibility, and tensile reinforcement. Traditional options like horsehair, hemp, straw, and reed fibres have been used, but nowadays fibreglass, nylon mesh, and even steel fibres are common.
- Additives: These chemicals modify the properties of the render. Silicon, polymers, and acrylics are common additives, altering workability, elasticity, durability, and color.
The combination of these components determines the characteristics of the render. The components of render: The mixture of these components determines the properties of the render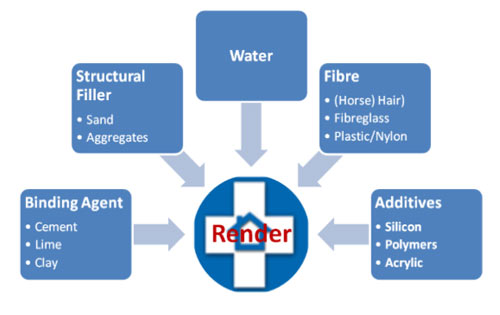
Types of Traditional Render Finishes
As traditional renders are the most common form of render found in the UK at present, we will start here first. The most common traditional render finishes include:
Lime Render
Lime render is a type of render made primarily from lime, offering significant advantages such as breathability and flexibility. These qualities make it ideal for buildings that undergo substantial movement, such as timber-framed and older, traditional structures. Traditional lime render applied to an exterior wall – Image courtesy of www.theheritagedirectory.co.uk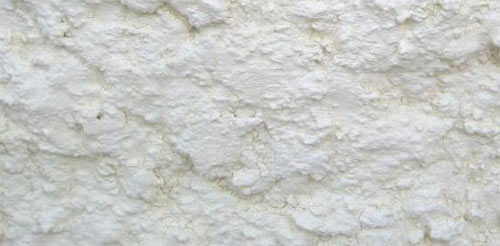
Lime render, also known as Traditional Natural Hydraulic Lime Render, has historically been used on walls constructed from low-quality stone, porous bricks, or those exposed to harsh weather conditions. Unlike cement render, lime render doesn’t create a moisture barrier; instead, it absorbs water like a sponge, preventing it from passing through the wall. The moisture is then released into the atmosphere when the weather improves.
Removing or replacing lime render in traditional buildings can sometimes lead to issues with penetrating damp, as the natural moisture regulation provided by lime render is disrupted.
To enhance its strength, traditional lime render often included chopped hair, while casein (extracted from cow’s milk) could be used as a plasticiser on challenging substrates. Lime render can also be tinted to various colours and shades. Moreover, it’s considered eco-friendly, as the curing process absorbs CO2 from the air, turning the render into a limestone state.
Application methods for lime render vary depending on the substrate and desired finish. In traditional buildings, a single coat may suffice, applied over a rough substrate. For a smoother finish, additional coats can be added and worked into an even surface.
Lime render is versatile, suitable for use on various substrates including earth, stone, brick, timber-framed buildings, rubble-filled walls, and straw bale walls. It’s equally applicable for new builds using different materials and can be used both externally and internally.
Pros and Cons of Lime Render
| Pros of Lime Render | Cons of Lime Render |
|
|
It’s important not to confuse lime render with hydrated lime products used as cement additives.
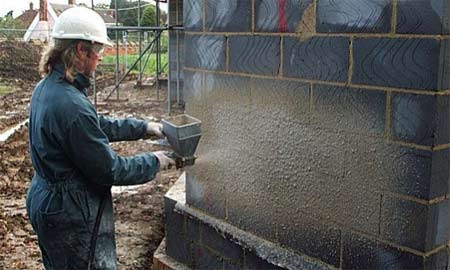
Sand and Cement Renders
Sand and cement renders are typically made using Portland Cement (OPC or Old Portland Cement), known for their strength and hardness compared to lime renders. These renders are often painted for added protection and decoration.
However, they aren’t ideal for older buildings due to their rigidity, which makes them prone to cracking in structures with more movement. While additives like hydrated lime can increase flexibility and durability, cracking remains a common issue.
Similarly to lime renders, cement renders aren’t waterproof, so they’re usually finished with a protective coat, typically paint, for both functional and aesthetic reasons. Traditionally, cement renders were mixed on-site, but pre-packaged options are increasingly available, offering added consistency, easier handling, and even machine application.
The significant advantages of sand and cement renders include their affordability, quick application, and popularity in new builds with firmer substrates and less movement.
However, they require more maintenance due to their susceptibility to cracking, especially if there’s movement in the substrate or moisture buildup, which can damage the finish.
Pros and Cons of Sand and Cement Render:
| Pros of Sand and Cement Render | Cons of Sand and Cement Render |
|
|
Clay Render
Clay render, one of the earliest materials used in renders and plasters, is experiencing a resurgence due to its environmental benefits. It’s easily produced and often locally sourced, making it an eco-friendly choice. Commercial clay renders ensure consistent quality, with minimal processing, further enhancing its environmental credentials. A rustic clay render – Image courtesy of bristolgreenhouse.co.uk
Unlike cement or lime-based renders, clay render doesn’t chemically cure; it can be reactivated by water, making it suitable for repairs but susceptible to erosion.
Clay render has a natural ability to attract and retain water, which is advantageous for use with wooden or straw substrates but can be a limitation with modern substrates.
Traditionally, binders like straw are added to clay to enhance durability and resistance to erosion. Linseed oil may also be added to improve water resistance, although excessive oil can reduce water absorbency and prevent breathability.
Pros and Cons of Clay Render
| Pros of Clay Render | Cons of Clay Render |
|
|
Pebble Dash
If you’ve heard about pebble dash, you might think it’s about the material, but it’s actually about the decorative finish. It involves coating wet mortar with pebbles, sometimes referred to as spar. However, spar isn’t just pebbles; it also includes chippings, shale, and gravel. The mortar underneath can vary, traditionally being lime-based, but nowadays, cement is more common. Polymer cements are also becoming popular. Each type of mortar has its own pros and cons.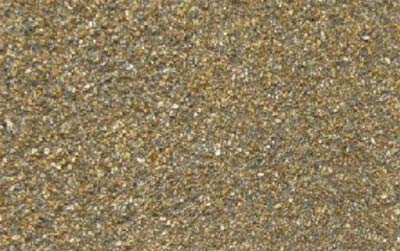
The choice of mortar depends on factors similar to those affecting the choice of render that won’t be coated. Lime renders are used in traditional buildings for their flexibility or to match existing render. Cement is suitable for substrates with limited budgets. Polymer mortars offer a wider color range for more options in pebbles.
There are different types of pebble dash, though the practice has become less common lately. Here are a few:
- Wet Dash (Roughcast): Pebbles are mixed into the final coat of mortar and cast or sprayed onto the wall. This is a traditional finish in the UK.
- Tyrolean Render: Applied with a Tyrolean Gun in layers, ideal for covering old or poor brickwork.
Using a Tyrolean gun to apply render – Image courtesy of neverpaintagain.co.uk 
The Faithfull Flicker Hand Wall Coating Sprayer - Harl or Harling: A traditional Scottish or Irish render applied by flicking lime render onto the wall and pressing pebbles into it while wet.
Technological advancements have introduced new compounds for renders, offering a wider range of finishes. New techniques have also emerged, altering available finishes.
Modern Polymer Render Finishes
Modern polymer render finishes are innovative cement-based products infused with specially developed polymers. These compounds enhance the cement’s performance and usability, making them ideal for various applications.
- Silicon: Incorporating silicon into the mix creates a water-repellent surface. This feature helps to deflect water away from the render while still allowing the wall to breathe, permitting moisture to pass through. Silicon water repellents are seamlessly blended into the cement or polymer render mix.
- Nylon or Glass Fibre: Nylon and glass fibre are utilised in reinforced base coats, providing a robust foundation before applying the final coat. A breathable mesh, often nylon-based, is embedded throughout the base coat, reinforcing the entire structure. In areas prone to stress and potential cracking, such as around windows and doors, this nylon base coat is especially beneficial. It’s quick to apply and offers the necessary strength.
Some polymer renders eliminate the need for a base coat and these are known as monocouche or one-coat renders. While these options speed up the rendering process, they have limitations regarding suitable substrates. Typically, they are best used on lightweight materials like breeze blocks.
Modern Acrylic Render Finishes
Modern acrylic render finishes are the final coat applied to surfaces to give them an appealing look. They’re versatile, as they can be applied directly to a prepared surface, a base coat render, or even an existing render if it’s properly prepped.
These finishes incorporate acrylic aggregates into the mix to achieve the desired colour and texture. They’re usually sprayed on and then smoothed out with a float. While they’re commonly used over base coats, they’re also suitable for enhancing the appearance of well-prepared brick and stonework.
Spraystone Render Finishes
Spraystone render finishes are versatile acrylic coatings suitable for various surfaces, including glass and plastic. They offer exceptional flexibility, allowing for unique applications such as blending pipe work seamlessly with the render.
Primarily used for exterior finishes, Spraystone renders are breathable, akin to porous paint, yet lightweight. They mimic the appearance of natural stone finishes, from marble to granite, providing a cost-effective alternative in situations where traditional stone finishes are impractical due to weight or cost constraints.
This innovative finish is relatively new, especially in the UK market. Here’s a brief overview of how it’s applied:
Step-by-Step Guide to Applying a Spraystone Finish
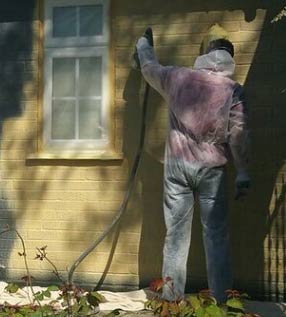
1. Before you begin, ensure that the surfaces you’ll be working on are properly prepared, and cover any windows and doors to protect them from overspray. Preparing to spray exterior walls with Spraystone acrylic paint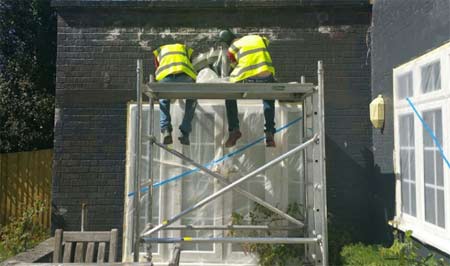
2. Apply a base coat primer to the prepared surface. This base coat not only primes the surface but also provides the initial colour for your finish.
Applying the base coat of Spraystone paint
2. Once the base coat is dry, apply the textured surface coat. This coat will give your finish its desired texture and appearance. There are various effects available, allowing you to mimic almost any stone finish, whether smooth or textured. Achieving sandstone and granite effect finishes with Spraystone acrylic paints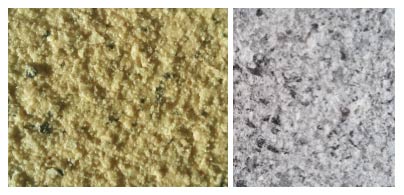
Advantages of Using a Spraystone Finish
Spraystone offers a plethora of benefits. It’s a highly flexible exterior finish that can be applied to almost any surface — yes, even an old umbrella can be transformed into a granite-like masterpiece! Plus, its porous and breathable nature ensures it doesn’t trap moisture, making it resistant to damp issues. Despite its incredibly realistic appearance, it’s much lighter than real stone, opening up a wide range of potential applications.
However, applying Spraystone isn’t quite a DIY walk in the park. Precision is key to achieving the desired effect. While spraying offers a speedy application, meticulous wall preparation and thorough masking of areas not to be sprayed are essential.
For additional insights into applying less specialised render to your home’s exterior, check out our guide on rendering exterior walls using more traditional methods.
External Wall Insulation: A Comprehensive Guide
As energy conservation gains traction, external wall insulation (EWI) emerges as a key player in discussions surrounding exterior rendering. By implementing EWI, it’s possible to significantly reduce heat loss during colder months and enhance heat retention in warmer weather.
Unlike internal wall insulation, which occupies interior space, EWI is favoured in scenarios where cavities are absent. It can also be employed on walls with cavities, especially when cavity insulation isn’t feasible.
Prior to rendering, an insulating layer — referred to as an ‘insulant’ — is affixed to the wall using either adhesive or fixings like dowels and screws. The choice of insulant depends on desired insulation levels, required thickness, and budget constraints.
In some instances, modifications to eaves and overhangs may be necessary to accommodate the additional wall thickness.
The insulant typically takes the form of boards or sheets, serving as a foundation for the subsequent rendering and finishing layers. It’s the render that not only offers weatherproofing but also serves as a decorative covering. Insulant added to the external walls along with render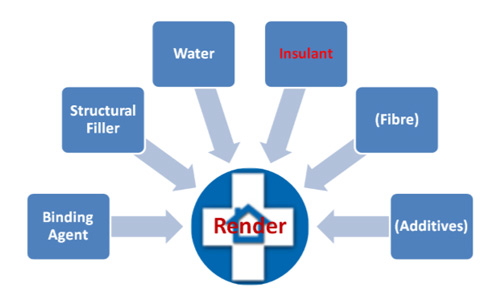
Painting Exterior Walls on Your Home
Transforming the appearance of your home by repainting the exterior walls or refreshing the render is a cost-effective way to enhance its aesthetic appeal. Whether you’re preparing to sell or simply looking to give your home a facelift, this DIY project is ideal.
Painting your house typically falls under permitted development, meaning there are usually no restrictions. However, exceptions may apply. For instance, listed buildings may have specific colour and style requirements, while properties in conservation areas or national parks might face restrictions. Additionally, flats may not fall under permitted development rules. If you’re unsure, it’s wise to check with the freeholder for any imposed restrictions.
Preparing Your Exterior Walls for Painting
Before you start painting, it’s crucial to prepare the surface properly to get the best finish possible. Here’s how to get your walls ready:
- Use a wire brush to scrub away any loose mortar, moss, or mould from the walls. Even if your walls are newly rendered, they’ll still need some prep work. Make sure to remove all surface dirt, loose material, or old paint.
- Fill in any cracks with an appropriate filler or render mix. For small cracks, a filling knife works well for smoothing the surface in one go. If cracks are deeper than around 10mm, build up the filler in layers, letting each layer dry before adding the next. Once the filler dries, sand it down to a smooth finish. If you notice large or structural cracks, notify your building insurer.
- Protect doors, windows, and pipes by masking them to prevent accidental paint coverage while you work on the walls.
- Apply a breathable primer to the walls. This step is essential, especially for porous or powdery surfaces, to create a suitable base for the paint. Using a breathable primer allows moisture trapped in the wall or render to escape, which is crucial, especially for solid walls lacking cavities.
Tips on Painting Your Exterior Walls
Prioritise safety when working at heights by using ladders correctly. If you need guidance, check out our project on ladder safety.
While you have freedom in choosing paint, opt for breathable options to prevent moisture from getting trapped beneath the surface, which can lead to issues with dampness. If your walls have been previously painted with impermeable paint and you’re facing damp problems, you’ll need to strip the old paint before applying a breathable one.
For smooth renders, textured paints work well, while smooth paints are easier to apply on rough surfaces like pebble-dash or Harling.
Steps for Painting Your Exterior Wall
- Check the weather forecast for clear, dry days, as painting requires favourable weather conditions. Ensure there’s enough forecasted time to complete the job in one go.
- Divide the wall into manageable sections that you can complete in one session. Use features like downpipes and windows as guides.
- Lay out ground sheets and use newspaper to mask pipe work before starting.
- Equip yourself with the following:
- Masonry Brush: For cutting in and painting areas the roller can’t reach.
- Masonry Roller: Ideal for covering large, flat areas efficiently.
- Extension Pole: Attach to the roller for reaching higher areas.
- Paint Kettle: Fill with paint for easier handling than large paint tins.
- Ladder or Platform: Ensure safe access to higher areas.
- Begin painting at the top of the wall and work downwards to avoid splattering newly painted areas.
- Apply paint with horizontal or vertical strokes. Start with a fully loaded brush on an unpainted section and work back to blend with the last painted part. Vary strokes to ensure thorough coverage, especially on rough surfaces.
- Stipple the brush on rough surfaces by holding it perpendicular to the wall and pushing the bristles into the texture to ensure paint penetration.
- Carefully paint around downpipes and vent pipes using a brush to ensure complete coverage.
Dispose of excess paint according to instructions. Visit your local council website for proper disposal guidelines.
Exterior Finishes to Avoid
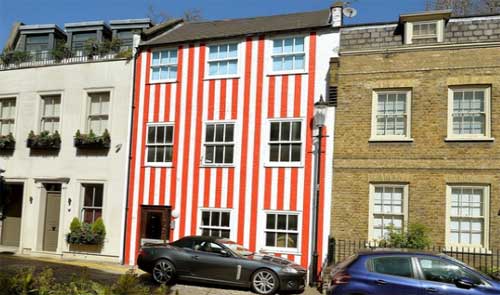
An exterior finish gone wrong – Candy stripes ordered to be repainted after complaints and media coverage – Image courtesy of the Guardian
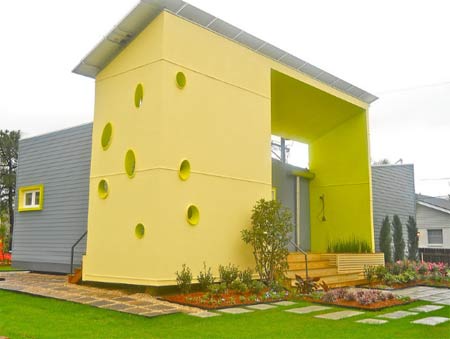
Examples of exterior finishes that aren’t well-received: Unusual exterior paint choices – Image courtesy of charlesandhudson.com Modern color scheme – Image courtesy of jetsongreen.com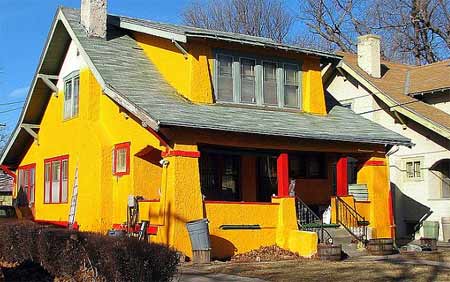
There are numerous options available to the homeowner to improve their home with render and paint. Modern products have made it all the easier to achieve a dramatic finish without having to spend a small fortune. Improving your home’s exterior is a challenging but a very worthwhile project.