If you don’t have a combi boiler in your home then you will most likely have a pump that pushes the water around your central heating system. Over time, these can wear out and break.
Replacing a central heating pump can sometimes be a little awkward because of its position, however it’s certainly something that you can do yourself, read on to find out how.
What is a Central Heating Pump?
A central heating pump is a form of pump that is used in a central heating system in order help with circulating hot water from a boiler around any and all radiators and then back to the boiler for re-heating.
Although a boiler will circulate the water itself it’s usually at a lower pressure and in turn a much slower speed and due to this, by the time it reaches the final radiator it can have cooled significantly, especially if it’s over a long distance.
The addition of a pump ensures that any hot water is distributed out to all radiators while it is still piping hot.
If, however, you have a combi boiler in your home that heats your hot water and central heating then you won’t have a separate pump as it’s built into the actual boiler itself.

Conventional heating system with pump
Why do Central Heating Pumps Fail?
On the whole, central heating pumps are very reliable and hardy objects and last for a good long while, around 15 years in most cases, however, like all things, nothing lasts forever and over time parts can wear and fail.
In most cases, if anything within a pump fails it’s most likely to be the impeller (the part that pushes the water) or the bearings that the drive shaft for the impeller runs in. They simply just wear and fail.
Another issue is that they can often get clogged up with the sludge that often builds up in a central heating system over time.
In terms of the tell-tale signs of pump failure, it will most likely be one or several of the following:
- The pump getting excessively hot
- Radiators taking longer to heat up
- The pump starts to get very noisy
- Possibly leaks around the pump
- No power due to electrical failure
Another good indicator that the central heating pump is playing up is if your radiators are hot at the top of the house, but cold downstairs. Also, see our project on Central Heating Problems for more on faults within the Central Heating System. If this is the case it can sometimes be overcome by turning the pressure up on the pump.
Can you Change a Central Heating Pump Yourself?
Yes you certainly can change a heating pump yourself as long as it is an existing installation and you are doing a like-for-like swap and changing an old pump for a new one of exactly the same type, you do not need a minor works certificate for such a task.
The only issues that arise when doing such a job is when it comes to the electrics, but as said if it’s an existing install and you’re just swapping out an old unit for a new one, this does not require any type of notification or certification supplied by a professional electrician.
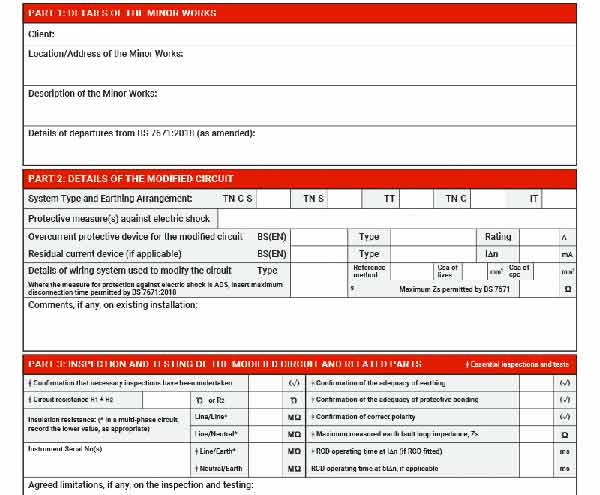
Example of a minor works certificate
Sourcing the Right Replacement Central Heating Pump
When replacing a central heating pump it is absolutely essential that you replace a failed pump like-for-like e.g. with a new pump of the same specifications.
Before you buy a new pump, look at all of the labels and writing on the old pump. Many of these will contain pump specifications (speed of pump, flow rate etc.) and will make it much easier for you to buy the correct replacement.
Also (having made sure the electricity is off) take off the electrical cover and take a photo on your phone of the connections inside.
If you cannot take a photo, make a diagram of the connections. This will help you put it all back together properly. It is much easier to have all of this information now than to struggle later.
Before you go ahead and purchase your new pump it’s also a good idea to think about what replacement pump you are going to buy. As mentioned above you will have to make sure that your new pump is up to the job of pumping water around your system and the existing pump should give you a good idea of the specs that you should go for.
Also it’s a good idea to go for a modern energy efficient pump that will not only stand you in good stead for the future but also go some way to saving you money on your heating bills.
In terms of manufacturer, many heating engineers and professionals regard Grundfos as about the best you can buy but if you are in any doubt pop down to your local plumbers merchant or contact a professional heating engineers for advice.
As with all DIY jobs, always go for the best quality pump you can for the budget you have available.
A modern replacement central heating pump indicating all major elements
Tools and Products Needed for Changing a Central Heating Pump
To successfully change a central heating pump, you will need the following tools and products.
As ever, always use the right tool for the job. If you don’t have what’s required you can always borrow or hire them.
- Selection of large spanners, adjustable spanners or Stilsons. More advice found in our spanners and wrenches project here
- Chosen replacement heating pump
- Selection of towels
- Flat blade screwdriver (for bleed screw)
- Philips screwdriver
- Radiator bleed key
- Electrical tester
- Pair of mole grips
- Paint roller tray or bowl
Adjustable spanner for removing and refitting central heating water pumps
A Stilson wrench is one of the best tools for removing and refitting central heating pumps
How to Change a Central Heating Pump
Now that you know exactly what a central heating pump is, what job it performs and why they can fail, it’s now time to take a look at exactly how to replace one when it fails.
Note: The heating pump is powered by electricity. Before any work is carried out at all, this must be turned off and disconnected from the pump before you can change it. You must also turn off the central heating!
Step 1 – Disconnect Electrical Wires
As suggested above, one of the first jobs to do is to isolate the electrical supply to the pump. This must be done by either turning off the MCB for the circuit supplying the pump in your consumer unit or pulling out the fuse if an old style fuse box.
Next, turn off the central heating itself so that it cannot come on while you are working on it.
Once this is done, remove the cover from the electrical connection box on the pump to expose the connections. Before you loosen anything, take a photo of all of the connections inside so you know what goes where for reassembly.
Next, release the wires from the live, neutral and earth positions. Unclamp the cable from the connection box and pull it clear of the pump.
Step 2 – Turn off Inlet and Outlet Valves
Once the electricity has been delt with the next job is to isolate the water supply to the pump. On each side there should be an isolation valve, as in the image below. Shut each of these off.
Each valve needs to be turned off using an adjustable spanner. These valves will turn off by turning them clockwise. If you have trouble with a valve that is stuck or jammed, view our project on this here.
Existing central heating pump in position with main features indicated
Step 3 – Lay Down Towels
It’s inevitable that some water will escape when doing this job so, to protect any objects or surfaces, lay down some old towels around and under the pump if possible.
Also, cover over any objects surrounding the pump so they don’t get wet or damaged.
Step 4 – Disconnect the Old Pump and Remove
Once everything is isolated and protected the next task is to now disconnect and remove the old pump.
Using Stilsons, spanners or adjustable spanners, undo the nuts connecting the pump to the pipework. Do not disturb the connection between the other side of the valves and the pipework as this could result in leaks.
To prevent this from happening, grip the body of the isolation valve if you can with a pair of mole grips, so that when you turn the nut the nut, only the nut moves and not the valve itself.
There will be some water in the pump so ensure your towels are underneath it. Also, try to slip your bowl or paint ray under the pump to catch any drips.
Once undone, slip the pump out and pop it in the bowl or tray. Ensure that you keep and washers that may be there.
Step 5 – Insert new Pump and Connect up
With the old pump gone, place the new pump in position. Make sure that you have replaced any washers, ideally with new ones and then finger tighten the nuts on to the new pump.
Make absolutely sure your new central heating pump make sure that you put it in the right way round! On the body of the pump there should be an arrow indicating the direction of water flow, this needs to be facing the correct way to match the flow of water. If not then nothing will work correctly!
It’s important to use new washers as when they have been compressed for a long period of time, indents can be created in its surface and it can also degrade over time, loosing some of its flexibility and in most cases creating very small fracture lines or cracks when bent, so it’s always better to replace any washers as you don’t want to put it all back together and find it leaks due to simply not replacing a few washers.
Position the pump so that it is sitting nicely and then finally tighten both nuts using a spanner or Stilsons.
Again, don’t over-tighten with the wrench as this may damage the threads and cause leaks.
Step 6 – Re-Connect the Electrical Connections
Once the pump is secured, remove the cover from the electrical connection box and reconnect the electrical supply.
Again, the correct connections should be stated in the manufacturers instructions, but of not then refer to the photo you took of the old connections before you disconnected it
Connect each wire to its correct terminal e.g. live to live, neutral to neutral and earth to earth. Make sure terminals are tighten correctly and wires are firmly held.
Finally, replace and cover over the electrical connections.
Step 7 – Test the New Pump
Once all connected up, turn the power back on, then open up both valves either side of the pump. Finally turn the heating back on.
To test the system with the new pump, turn up the room thermostat, to get the pump working as quickly as possible.
Depending on the type and nature of the pump you have used you should be able to hear it kick in when it starts to pump when the heating comes on.
If this is the case then all is well and the pump is working exactly as it should be.
Step 8 – Bleed any Air out of the System
There may be air in the system after changing the pump as you have created quite a bit of disturbance.
As you can see in the image above, each pump will feature a bleed screw that will allow you to get any air out of the pump and the system.
Open the screw very gently (normally by turning it anti-clockwise) until you hear a hissing. There is always the chance that a little water will escape at this point so it’s a good idea to put some rags or a shallow tray down to catch any spillage.
It may also be necessary to bleed the radiators at this point as air may have been pumped some way round the system. For help on doing this see our bleeding radiators project.
Once bled out, leave the heating on and allow all the radiators to warm up. You’re now done, good work!
How to Maintain a Central Heating Pump
With your new pump now in place it’s essential that you maintain your heating system to ensure the pump lasts as long as possible.
To do so, here are some tips and pointers:
- Bleed Radiators: Over time air can sometimes find its way into your heating system, to ensure this doesn’t prevent radiators from heating up correctly or restricting flow, periodically bleed them. For tips on doing this, see our bleeding radiators project here.
- Annual Service: Ensure that your heating system is serviced every year by a heating specialist to ensure it’s in peak operating efficiency
- Lag Pipes: Make sure that any and all pipes that run through colder areas of your home e.g. the loft are lagged. This not only prevents heat from escaping but also stops any pipes freezing and splitting
- System Flush: Over time, sludge can build up in your heating system and cause blockages and restricted flow. Flushing out your system can clear this sludge and ensure the system operates and peak efficiency. See our project here on power flushing for more information
- Use Inhibitor: Ensure that the correct amount of inhibitor is added to your system as this will prevent sludge build-up and other deposits from causing issues
Replacing a central heating pump is a fairly straight forward job if you have a basic understanding of DIY, however even if you don’t, as long as you work methodically and take your time, it’s certainly one that can be done by anyone.