The primary purpose of your home’s roof is to act as a shield for its interior against the elements, safeguarding it from the potential harm caused by water and moisture ingress. This protective barrier ensures the integrity of the structure beneath it and the comfort of its occupants.
Our guide focuses on the intricate construction of pitched roofs, shedding light on the crucial elements involved. We delve into the materials used, such as trusses, felt or rubber, tiles, and insulation, providing you with valuable insights into the components that make up a robust and resilient roofing system.
What Different Types of Roofs are There?
When it comes to roofs, they fall into two main categories: pitched or flat. In the realm of roofing, a pitched roof earns its name from the distinctive pitch shape it forms, converging at an apex where the two sides meet. The pitch of these roofs can vary significantly, influenced by factors such as property type, the choice of tiles, geographical location, and considerations like snow load possibilities.
When it comes to pitched roofs, the slope isn’t just an architectural feature but a carefully calculated element tailored to the unique characteristics of each property.
Exploring Pitched Roof Construction: Trussed and Traditional Approaches
When it comes to constructing a pitched roof, there are two primary methods used:
- Trussed Roof: Utilises pre-made sections known as trusses, strategically placed on top load-bearing walls or supports.
- Traditional Roof: Involves assembling sections of the chosen material, typically timber in domestic construction, either on-site or by combining elements of both methods. Essentially, it’s made from scratch on site.
The term “truss” implies being tied together, and roof trusses consist of sections, often timber, securely joined to create the angled structure essential to creating the roof pitch.
While many pitched roofs boast symmetrical pitches on both sides of the ridge, there are several various of single pitch:
- Mono-Pitch: Features a single sloping side descending from a wall.
- Inverted Pitch or Butterfly Roof: Features two sides sloping inward to form a valley at the pitch’s base.
- Asymmetrical Butterfly or Lean-to: Again, has a single side that runs from a wall or other structure down to wall plate or similar. A very popular feature on many homes and although not as complicated as a full-blown pitched roof, requires the same fundamental construction principles and attention to detail
Exploring Flat Roof Construction: Two Approaches for Different Needs
Flat roofs, as the name suggests, exhibit a mostly level surface, with a slight gradient incorporated to facilitate rain runoff.
When it comes to construction, they are typically created by laying beams across a roof span, covering them with sheet materials, and then applying waterproofing elements like felt, rubber, or even tiles.
Two distinct internal construction types define flat roofs: warm and cold. In warm flat roofs, insulation is tightly packed up to the underside of the sheet material, eliminating any air gap. Conversely, cold flat roofs feature an air gap, enabling air circulation around the roofing joists.
For an in-depth exploration of flat roofs and their construction, including insights into warm and cold variants, visit our comprehensive Flat Roof Construction guide here.
Essential Roof Design Principles
The primary purpose of any roof is to provide optimal protection against the elements for both the occupants and the interior of the property. Roof design is a complex subject and involves meticulous calculations concerning the strength of the materials used.
Roofs face the challenge of withstanding high wind speeds, snow loads, and other environmental factors. Each roof is uniquely designed to support the specific covering, such as tiles, chosen for it. For instance, a conservatory roof tailored for clear plastic (Polycarbonate) roofing sheets wouldn’t bear the load of concrete or clay roof tiles.
It’s crucial for DIY enthusiasts to understand that the construction of a roof serves multiple purposes, and altering its make up without consulting an architect can pose serious safety risks.
We’ve encountered numerous cases where individuals aimed to convert their loft or install a loft window without proper consultation. In many such instances, the removal of roofing timbers to create space seriously weakened the roof structure, leading to sagging.
Even seasoned roofing carpenters adhere to the principle that for every roof timber removed, at least two must be reinstated. The expertise lies in knowing precisely where to position them.
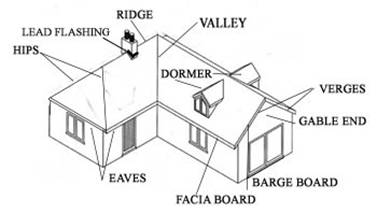
Fundamentals of Pitched Roof Construction in the UK
Exploring the components of a pitched roof, we’ll delve into each part in more detail in subsequent sections. In the UK, roofing typically involves the use of small sections like tiles and slates. This choice is practical, as these materials are easy to transport onto the roof, safe to handle during installation, and expand and contract very well with the country’s significant temperature fluctuations.
When laying tiles, a technique similar to bricklaying is employed, but the overlap serves a different purpose. Unlike bricks, the overlap isn’t for strength but to ensure that two joints do not align, preventing water penetration.
These tiles are affixed to battens, which are evenly spaced along the roof’s slope. Each batten is securely nailed to every rafter it crosses. Beneath the battens, a layer of roofing felt or, in modern applications, roofing membranes is installed. Various brands offer different materials, but their common function is to act as both a vapour and dust barrier. This prevents warm air from the roof space condensing on the cold underside of the tiles, a phenomenon that can lead to rot in roof timbers. Additionally, it serves as a barrier against dust, road fumes, and other external elements entering the roof space.
Cross-section illustrating the roof and tile arrangement
Insights on Roofing Felt: Separating Fact from Fiction
There exists a common misconception, perpetuated by some less scrupulous individuals, including certain untrustworthy builders (cowboys), that roofing felt serves as a secondary waterproof layer for the roof. However, this is far from the truth. In some roof constructions, ventilation holes are intentionally left in the felt, which immediately contradicts this.
Considering the placement of the felt beneath the tiles and the pitch of most roofs, determining the source of a leak can be a formidable challenge. A leaking roof might not manifest at the point of entry. Instead, water can infiltrate through a damaged tile or slate, travel down the felt, accumulate in a sagging portion, or seep through an unnoticed puncture in the membrane.
Identifying the source of a leak becomes a complex and potentially costly endeavour. For instance, water ingress due to a broken ridge tile might not become evident until it is observed streaming down a far wall in the bedroom. This often leads individuals to embark on the challenging task of locating the leak themselves.
Safety First: Navigating Rooftop Challenges
Embarking on roof-related work? Never venture onto a roof without the support of a secure scaffold. Even on seemingly dry days, tiles, constantly subjected to the elements, can be exceptionally slippery.
Having spent 35 years in the construction industry, we’ve unfortunately witnessed numerous falls from heights. It’s crucial to recognise that humans don’t possess a miraculous ability to bounce.
If a professional chooses to navigate your roof without such safety apparatus, provided they are insured against potential damage to your roof during their descent, that’s their prerogative. However, attempting it yourself is strongly discouraged.
For a more comprehensive guide on utilising scaffold and scaffold towers safely, check out our scaffold towers project here.
What are Roof Trusses and How are They Used?
Ever wondered about the backbone of most house roofs? Enter roof trusses, the unsung heroes of residential structures. Tailored to suit specific dwelling types, the most common of these, the Fink Truss reigns supreme, especially in houses of similar architectural styles.
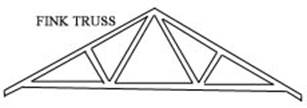
Fink Roof Truss
The Fink Truss, a double-pitch design, boasts two sloping sides converging at the centre. Positioned atop load-bearing external walls, these trusses are strategically spaced to accommodate the intended load. The spacing, typically 600mm in domestic setups, varies based on load considerations.
The key to their stability, roof trusses are interlinked by binding timbers affixed to the underside of each truss. To prevent a potential domino effect, the end truss (or trusses) are securely fixed to the interior of the gable end wall, as illustrated in the roof diagram above.
Beyond load-bearing considerations, it’s crucial to note that the bottom horizontal timber of a roof truss doubles as a ceiling joist. While adept at supporting the ceiling below, it’s not engineered for activities like walking, sleeping, or dancing.
Where water tanks are installed in the loft, it must be ensured they rest on reinforced platforms that distribute the weight across multiple trusses.
Roof Insulation: Keeping the Heat In!
Your roof space isn’t meant to be a heat haven, unless, of course, you’ve transformed it into a cozy retreat by means of a loft conversion. With recent updates to Part L of the Building Regulations (The conservation of fuel and power), it’s now expected that your existing loft insulation, considering condensation and boarding challenges, should be bolstered to a minimum of 270mm.
Position the insulation between and over the ceiling joists, ensuring comprehensive coverage. However, exercise caution not to cover cables and light fittings with insulation. Cables and lights generate heat, and improper dissipation can lead to overheating and potential fire hazards.
While conventional insulation prevents heat from escaping through the roof, it also means the loft space stays relatively cold. Consequently, insulating water tanks and pipes becomes crucial in this “cold roof” setup, where the loft temperature often mirrors the external environment. This precautionary measure is key to averting potential burst pipe situations, as outlined in our Repairing a Burst Pipe Project here.
The Importance of Ventilation
When your roof is crafted, especially in the common cold roof design, proper ventilation becomes a crucial consideration. In stagnant air, warmth tends to linger, collecting water vapour in the process. The warmer the roof space, the more humid the air becomes, laden with water vapour.
As this warm air encounters colder surfaces like the underside of tiles or even loft water tanks, condensation occurs. The vapour transforms into water, seeping into the roof timbers and potentially causing substantial damage.
In a cold roof setup, loft insulation should be intentionally halted before reaching the loft floor’s edge or eaves, as depicted in the diagram. This approach allows cold air to flow through the eaves into the loft.
To maintain a consistent loft temperature and avert condensation issues, air circulation is facilitated through soffit vents. These vents are strategically positioned in the soffit board between the facia board and the external wall of the house, ensuring a continuous flow of fresh air.
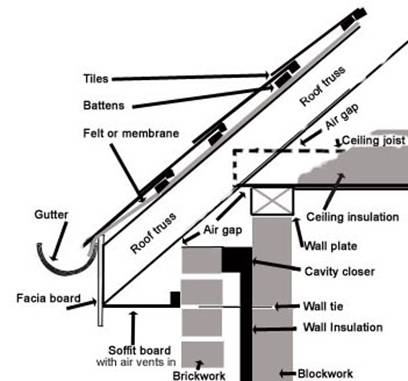
Cross Section of Roof Area
A Detailed Look at Roof Tiles
As already stated, pitched roofs are usually covered with tiles or slates which fix, or clip over battens. These battens sit on a roofing membrane and are fixed to the rafters below. The battens are fixed at regular intervals according to the gauge (distance between battens) specified by the tile manufacturer. This in turn will vary according to the angle, or pitch, of the roof.
The intricate laying of roof tiles unfolds with each tile overlapping its counterpart below. This fundamental practice to all tiled roofs, even on the smaller stage of a porch roof. The table below shows the accurate lap and spacing distances for a variety of commonly used tiles.
If you are embarking on some tiling work on your home and you are unsure of the particular type of tiles you have, take a snapshot of your tiles with a phone camera for identification at your local Builders Merchants.
Marley and Redland, long time players in the roof tile arena, each boast a lineage dating back to the early 20th century, bring a diverse array of tiles and slates to the stage. From smaller clay or concrete “Plain tiles” at 265 x 165mm to the grandeur of roofing slates at a much larger 600 x 300mm, the cast is as varied as the roofs they grace.
Understanding the terminology of the table is crucial. The “Tile Name” serves as their distinctive name. “Size” states the tile’s dimensions, always longer than wide. “Minimum Pitch” unveils the roof’s angle, measured from the horizontal, ensuring the tiles resist the advances of wind and rain even at steeper pitches.
The “Maximum Pitch” signifies the limit at which a tile should used, pitch-wise. The “Minimum Headlap” dictates the overlap, which in turn harmonises with the gauge for a final meet at the roof’s pinnacle, the Ridge.
Types of Redland Roof Tiles
Concrete Interlocking Tiles
| Tile Name | Size | Min. Pitch | Max. Pitch | Min. Headlap | Max. Gauge |
| Renown | 418 x 330 | 30° | 44° | 75 | 343 |
| Redland 50 | 418 x 330 | 30° | 44° | 75 | 343 |
| Regent | 418 x 332 | 17.5° | 44° | 75 headlap at + 22.5 pitch 100 headlap at – 22.5 pitch | At 22.5° pitch and over 343 at 22.5° pitch and under 318 |
| Grovesbury | 418 x 332 | 22.5° | 44° | 75 | 343 |
| Norfolk Pantile | 381 x 227 | 22.5° | 44° | 75 headlap at + 22.5 pitch 100 headlap at – 22.5 pitch | At 22.5° pitch and over 343 at 22.5° pitch and under 318 |
| Redland 49 | 381 x 227 | 22.5° | 44° | 75 headlap at + 22.5 pitch 100 headlap at – 22.5 pitch | At 22.5° pitch and over 343 at 22.5° pitch and under 318 |
| Delta | 430 x 380 | 17.5° | 44° | 75 | 355 |
| Relland Bridgewater Tile | 418 x 330 | 30° | 75 | 343 |
Interlocking Slate Tiles
| Tile Name | Size | Min. Pitch | Max. Pitch | Min. Headlap | Max. Gauge |
| Stonewold | 430 x 380 | 17.5° | 44° | 75 | 355 |
| Redland Richmond | 412 x 332 | 22.5° | 44° | Min.112 Max.159 | Min.253 Max.300 |
| Redland Cambrian | 300 x 336 | 25° | 69° | Min.50 Max.90 Min. at ridge 75 | Min.210 Max.250 |
| Caplestone | 365 x widths of 80 | 30° | 95 or 75 over sidelock | 270 |
Concrete Plain Tiles
| Tile Name | Size | Min. Pitch | Max. Pitch | Min. Headlap | Max. Gauge |
| Plain | 268 x 165 | 35° | Vertical | 65 | 100 |
| Ornamental | 268 x 165 | 70° | Vertical | 35 | 115 |
| Download | 268 x 165 | 35° | Vertical | 65 | 100 |
Clay Plain Tiles
| Tile Name | Size | Min. Pitch | Max. Pitch | Min. Headlap | Max. Gauge |
| Rosemary | 265 x 165 | 40° | Vertical | 65 | 100 |
| Cheslyn | 265 x 165 | 40° | Vertical | 65 | 100 |
Types of Sandtoft Roof Tiles
Concrete Tiles
| Tile Name | Size | Min. Pitch | Max. Pitch | Min. Headlap | Max. Gauge |
| Double Pantile | 420 x 334 | 22.5° | 75 | 345 | |
| Calderdale Slate | 420 x 334 | 22.5° | 75 | 345 | |
| Shire Pantile | 380 x 230 | 22.5° | 75 | 305 | |
| Double Roman | 420 x 334 | 22.5° | 75 | 345 | |
| Bold Roll | 420 x 334 | 22.5° | 75 | 345 | |
| Lindum | 420 x 334 | 22.5° | 75 | 3455 | |
| Standard Pattern | 380 x 230 | 17.5° | 75 | 305 | |
| Plain Tile | 265 x 165 | 35° | 65 | 100 |
Clay Tiles
| Tile Name | Size | Min. Pitch | Max. Pitch | Min. Headlap | Max. Gauge |
| County Panttile | 347 x 267 | 22.5 ° | 64 | 320 | |
| Neo Pantile | 284 x 250 | 22.5° | 75 | ||
| 20/20 Interlocking Plain Tile | 370 x 223 | 22.5 ° | 75 | 267 | |
| Villiage | 265 x 165 | 35° | 65 | ||
| Goxhill Plain Tile | 265 x 165 | 40 ° | 65 | 100 | |
| Arcadia Pantile | 342 x 252 | 30 ° | 72 | 270 | |
| Old English Pantile | 342 x 252 | 30 ° | 72 | 270 | |
| Greenwood Pantile | 342 x 253 | 30 ° | 75 | 267 | |
| Sandtoft Bridgewater | 420 x 340 | 30 ° | 75 | 345 | |
| Gaelic | 342 x 255 | 30 ° | 75 | 267 |
Slate Tiles
| Tile Name | Size | Min. Pitch | Max. Pitch | Min. Headlap | Max. Gauge |
| Balmoral | 370 x 226 | 22.5° | 75 | 267 | |
| Britlock | 360 x 340 | 17.5 °at 120 headlap | 75 @22.5° | 285 | |
| Britslate – duchess | 610 x 305 | 20 ° | 75 | 267 at 75 headlap | |
| Briteslate – Countess | 510 x 225 | 22.5 ° | 120 | 217 at 75 headlap | |
| Pennine – Standard | 480 x 429 | 22.5 ° at 90 headlap | 120 | 202 at 75 headlap | |
| Rivius | 400 x 320 | 22.5 | 75 |
Types of Marley Roof Tiles
Plain Tiles
| Tile Name | Size | Min. Pitch | Max. Pitch | Min. Headlap | Max. Gauge |
| Plain Tiles | 267 x 187 | 35 ° | Vertical | Roof 65 Vertical 37.5 | Roof 100 Vertical 115 |
| Heritage Plain Tile | 267 x 187 | 35 ° | Vertical | Roof 65 Vertical 37.5 | Roof 100 Vertical 115 |
| Thaxden Plain Tile | 270 x 168 | 35 ° | Vertical | Roof 70 Vertical 40 | Roof 100 Vertical 115 |
| Marlden Plain Tile | 267 x 168 | 35 ° | Vertical | Roof 65 Vertical 27.5 | Roof 100 Vertical 115 |
| Ashmore Double Tile | 333 x 267 | 22.5 ° | Vertical | 77 | 190 |
Interlocking Slate Tiles
| Tile Name | Size | Min. Pitch | Max. Pitch | Min. Headlap | Max. Gauge |
| Duo Edgemere | 420 x 330 | 22.5 at 75 headlap 17.5 at 100 headlap | Vertical | 75 headlap at 22.5 pitch 100 headlap at 17.5 pitch | 345 |
| Edgemere | 420 x 330 | 22.5 at 75 headlap 17.5 at 100 headlap | Vertical | 75 headlap at 22.5 pitch 100 headlap at 17.5 pitch | 345 |
| Marquess | 325 x 330 | 22.5 ° | Vertical | 75 | 250 |
| Melbourn | 327 x 300 | 15 ° | Vertical | 50 headlap at +20 pitch 65 headlap at -20 pitch | 250 max at 50 headlap 235 max at 65 headlap |
| Monarch | 325 x 330 | 22.5 ° | Vertical | 75 | 250 |
| Duo Marques | 325 x 330 | 22.5 ° | Vertical | 75 | 250 |
| Dalestone | 325 x 330 | 22.5 ° | Vertical | 75 | 50 |
Interlocking Tiles
| Tile Name | Size | Min. Pitch | Max. Pitch | Min. Headlap | Max. Gauge |
| Ashmore Double Plain | 333 x 267 | 22.5 ° | Vertical | 77 | 190 |
| Anglia Plus Tile | 387 X 229 | 30 ° at 75 Headlap 22 ° Smooth at 100 headlap | Vertical | 75 | 312 |
| Bold Roll Tile | 420 X 330 | 17.5 ° | Vertical | 75 | 345 |
| Ludlow Plus Tile | 387 x 229 | 22 ° Smooth at 75 headlap 30 granular / 22.5 ° smooth at 100 Headlap | Vertical | 75 | 312 |
| Double Roman | 420 X 330 | 25 ° Smooth / 30 granular at 75 Headlap | Vertical | 75 | 345 |
| Ludlow Major | 420 X 330 | 30 ° at 75 Headlap | Vertical | 75 | 345 |
| Malvern | 420 X 330 | 17.5 ° at 75 Headlap 15 ° at 100 headlap | Vertical | ||
| Mendip | 420 X 330 | 22.5 ° Smooth / 30 granular at 75 headlap 25 granular at 100 Headlap | Vertical | 75 | 345 |
| Duo Modern | 420 X 330 | 22.5 ° Smooth at 75 Headlap 17.5 ° smooth at 100 headlap | Vertical | 75 | 345 |
| Modern | 420 X 330 | 22.5 ° Smooth / 30 granular at 75 headlap | Vertical | 75 | 345 |
| Wessex | 420 X 330 | 15 | Vertical | 75 | 345 |
Types of Forticrete (Anchor) Tiles
| Tile Name | Size | Min. Pitch | Max. Pitch | Min. Headlap | Max. Gauge |
| Centurion | 230 x 385 | 10 ° – 12.5 ° | 44 o | 100 | 285 |
| Clay Plain | 265 x 165 | 35 ° | 90 ° | 65 | 100 |
| Gemini | 270 x 337 | 22.5 ° – 30 ° | 29 ° – 70 ° | 80 – 95, 75 – 95 | 175 – 190, 175 – 195 |
| Minislate | 270 x 337 | 22.5 ° – 30 ° | 29 ° – 70 ° | 80 – 95, 75 – 95 | 175 – 190, 175 – 195 |
| Rivenslate | 270 x 330 | 22.5 ° | 70 ° | 80 – 95 | 175 – 190 |