What is a Soakaway?
A soakaway is simply a hole dug into the ground, filled with rubble and coarse stone which allows surface water to percolate back into the earth close to where it falls. As part of a full drainage system it is an efficient and low environmental-impact way of dealing with surface water (also called runoff, rain water or storm water). There will be a pipe leading into the soakaway, from the area where there is excess water, like a gutter from a roof, a driveway drain or a French drain.
Soakaway construction is a low environmental impact solution to drainage because it is uses few materials. As this drainage system deals with the surface water in the area where it is occurring, you are avoiding the need for processing or adding to the overburdened council drainage and sewerage systems. It also avoids the need for chemical treatments before being returned into the eco system. The surface water is less likely to become polluted before it returns to the ground.
Planning Soakaway Construction
As part of your soakaway design stage you need to consider the make up of the ground. The soil around where the soakaway is planned must be granular, with good drainage properties. It is pointless sinking a soakaway in clay, because what you will actually be building is a pond!
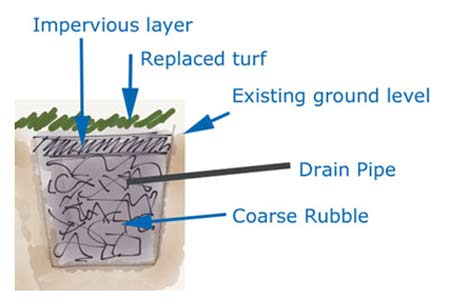
Detail of a Soakaway Pit
Why Build a Soakaway?
If you have areas of your drive or garden that are waterlogged, or you have standing water building up against walls you will need to think about installing drainage to remove surface water, preventing water damage and damp to your buildings.
If you are using hard landscaping in your garden, including building a driveway you must make provision to ensure that surface water is dealt with as part of the building project, rather than being directed into the existing sewers and onto the effluent treatment systems.
A soakaway provides a Sustainable Urban Drainage System (SUDS) which complies with this regulation. See more in Building regulations below.
When you have drained the water from the ground you will need to direct it somewhere. It should be directed into the rainwater or storm drain system of the mains drains or into a soakaway, but never into a foul water system. You should not direct rain water into a cess pit or septic tank either (see our project on Foul and Surface Water Drainage Systems for more information).
One of the simplest water drainage systems to install is a French Drain leading to a Soakaway. To find out more about French drains and where you would install a French Drain rather than other drainage systems go to the project French Drains – How they work. If you want to find out how to make a French drain then go to our Step–by–Step Guide to how to Build a French Drain.
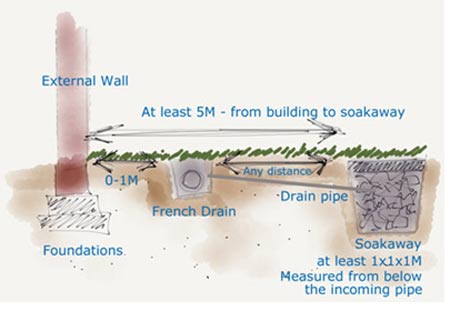
Cross section of a Drainage System Including a French Drain and Soakaway
How to Build a Soakaway
Plan Before You Dig Your Soakaway
Some simple planning can make the job much easier and make sure you don’t make a mistake that could be back breaking and time consuming.
Building Regulations
You need to check the requirements of Local Building Regulations before you start work on any drainage system including French Drains and Soakaways.
If you are planning hard landscaping and need to provide SUDS (Sustainable Drainage System) to deal with requires surface water (also called storm-water, rainwater, or runoff), you should take note of the Planning Policy Statement 25 which deals with flood risks through developments. It requires surface water to be collected and treated where it falls (and even reused where feasible).
In light of this Part H3 of the Building Regulations, which deals with surface water and foul water drainage, has been updated to deal with surface water at source rather than directing it into existing sewer systems. Download the H3 PDF, courtesy of the Government’s Planning Portal Website.
A soakaway often complies with this requirement for a low environmental–impact solution to this problem.
Where Should I Dig My Soakaway?
Most Local Authority Regulations will stipulate that Soakaways must be at least 5 metres from any habitable building.
It is best to locate it on the lowest part of your garden, or land, as this will mean that you have less digging down to do. Having said that you do not want a run of pipe that is longer than you need, or that has a change of direction in it, unless you have to. Both of these situations will make the pipe more susceptible to getting blocked.
You also need to bear in mind where the water table lies. You should dig an exploratory pit to check that the water table is below your intended site for your soakaway – otherwise the water you direct there will not have anywhere to drain out to.
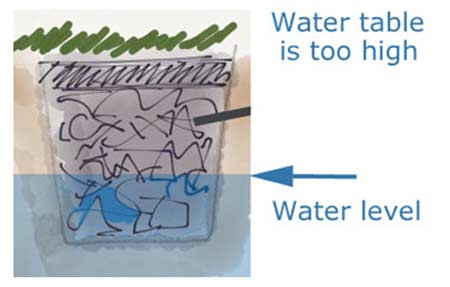
Here the Water Table is Too High – Your Soakaway Should be Constructed in Well–Drained Ground and Above the Water Table
Land Drainage Pipe
The pipe flowing into soakaways should be at least 75mm diameter, which is the minimum pipe size for any surface water drainage. However 100mm is the recommended size, therefore while you are laying pipework you might as well make it 100mm to be as effective as possible.
Digging The Trench
Your soakaway pipe should be laid to a fall of 1 in 40. So for every 4 meters of pipework the trench should slope down by 100mm.
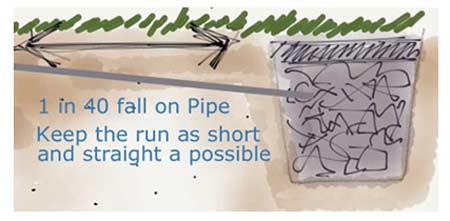
The Soakaway Pipe Should Fall at a Rate of 1:40
You can dig the soakaway pit and drainage trench by hand, using a shovel, or you can hire a mini digger to do the work for you. We recommend the second option, but it is up to you!
How Big Should The Soakaway Be?
The size of the soakaway should be a minimum of 1m x 1m x 1m below the bottom of the incoming pipe. Other than that it depends on how much water the soakaway will be processing and the perculation rate of the surrounding soil – i.e. how quickly the water will soak into the soil around the soakaway.

A Soakaway Should be a Minimum Size of 1m x 1m x 1m below the incoming pipe
How Much Hardcore Do I Need?
The hardcore (stone infill) should completely surround the pipe, and finish approximately 100mm above it.
An impervious layer should then be placed on top of the stone, such as thick polythene, tarpaulin, or even a bed of concrete (A1 below). Topsoil can then be placed on top of this layer to restore the garden level (A below).

Detail of a soakaway showing the construction of the soakaway pit in cross–section with rubble infill, impervious top layer and topsoil covering
Soakaway Crates
What Is A Soakaway Crate?
Due to the popularity of drainage systems such as the soakaway and French drain, there are now quite a few products available on the market that have taken the principals of construction of the affore mentioned drainage types and refined them. One such product is known as the Soakaway Crate (or sometimes known as Aquablocks, water blocks or soakaway drainage crates).
These are very handy products in that they effectively take the place of the rubble infill in the soakaway pit. They look very similar to large milk crates but with a bit more constructive stability and are purchased in a flat pack form that you then simply clip together to form a box shape.
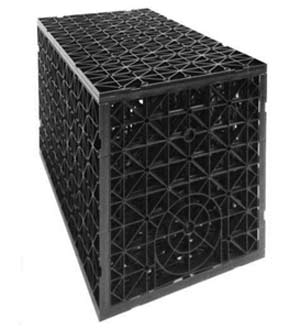
Soakaway crate
The two different colours of green and blue that they come in, in most cases signify where they can be used (can vary so check manufacturers usage instructions) and also in two different types – green and blue. The green soakaway crate can be used in non traffic areas (as they are not built to take the weight of a vehicle) and the blue ones can be used in traffic areas such as under driveways etc…. as they can take the weight of a vehicle.
They can save you a fair amount of time and effort as you won’t then have to transport the rubble from source to your soakaway pit but they can be quite expensive compared to the cost of using traditional methods, especially if you already have the required materials available (left over from building work etc….).
How To Use A Soakaway Crate
Once you have dug your 1m x 1m x 1m hole and clipped your crate together you will then have to line your hole with a very tough but porous membrane such as a geotextile membrane (make sure you use plenty as you will need to wrap your soakaway block in this membrane). This will allow water to pass into the void of the crate but keep any soil and sediment out as this will eventually fill your crate and prevent it from draining correctly.
With your hole now lined you can now place your soakaway crate in, but just before you do you will notice that on one end of the crate there is a circular inlet area. You will need to knock out the inside of this circular area to allow your drainage pipe to slide into the inside of the crate.
With the hole lined and drainage pipe inlet exposed, slide the drainage pipe into the crate and then insert the crate into the hole and wrap it in the membrane so that the entire surface of the crate is covered. Keep and eye on the incoming drainage pipe and make sure that this is also covered and will not allow any soil into the inside of the crate.
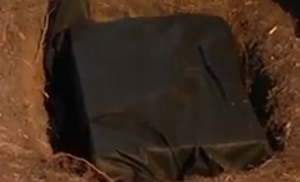
Soakaway crate wrapped in geotextile fabric in soakaway pit
The final job now is to in–fill around the outside of the crate using either soil or gravel and then over the top with either soil or more substantial material if being used in a traffic area.