Fitting and fixing socket boxes into plasterboard or dry lining as it’s known is a really simple operation. Proprietary plasterboard, or dry wall, socket boxes are available which simply clip into place when the hole is cut for them, nice and easy.
In this DIY guide we look at how to install plasterboard back boxes into plasterboard surfaces.
Rules and Regulations for Electrical Work
Due to the dangers that working on and around electricity poses there are extremely strict rules set by the BS 7671 Wiring Regulations and also the UK building Regulations as to who can actually do certain jobs.
On a DIY level, works that can be done are mainly restricted to changing switch and socket faceplates and adding a spur socket and a few more jobs. Any electrical work other than this should only be done by a qualified Part P registered electrician with the necessary skill to do the work to code, test it once it’s done and then issue a minor works certificate.
If it’s not done this way and in the event that any issues occur and you cannot provide a valid certificate of works, then this will most probably invalidate your home insurance!
For more details on how to stay safe when working on or around electricity, checkout our electrical safety project here.
What are Dry Wall or Plasterboard Socket Boxes?
Whether you’re fitting sockets into solid brick or block walls or plasterboard stud walls they need what’s know as a socket box, pattress box or back box for the socket faceplate to screw into that in turn is fixed to the wall or in a chased out recess that then hold everything in place.
As the gap behind a plasterboard wall is generally hollow you don’t have anything to fix a socket box into as you would when installing into a solid brick or block wall and due to this the plasterboard socket box was born.
Dry wall socket boxes are a joy to work with and are very simple to use. Simply mark the size of the box on the plasterboard surface where it needs to be placed, cut the hole out using a plasterboard saw or multi-tool, slot the socket box in the hole and flip out the wings to hold everything in place.
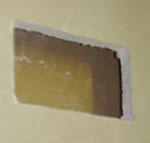
Hole cut in plasterboard wall ready for socket box
Once the faceplate is wired up and in place and the wings pushed out, as you tighten the face plate onto the back box, the wings grip the plasterboard tight holding everything firmly in place.
The same method is used for switch boxes as socket boxes.
Generally, when the back boxes are in place, the supply cables are pulled through ready for connecting up, this is known as first fix, but before the faceplates are actually fixed (second fix), the plastering needs to be done.
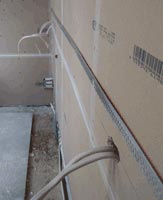
Electrical wires in plasterboard wall
The reason it’s done this way is so that the plasterers can simply lay the plaster on and don’t have to worry about laying plaster on around fiddly socket faceplates, they can just get on with it.
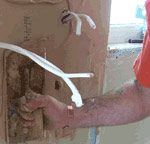
Laying plaster onto a dry-lined wall
Tools and Products for Installing Plasterboard Backboxes
To successfully install a plasterboard back box you will need the following tools and products:
- Plasterboard socket box
- Pen/pencil
- Multi-tool or plasterboard saw
- Spirit level
How to Install a Socket Back Box in Dry Lining
Despite the fact that you aren’t allowed to actually wire up new sockets yourself, to save a little time and money, some electricians are ok with you installing all the socket or back boxes yourself and also running all the cabling, but this will depend though.
If you are installing some sockets into a plasterboard stud wall and your electrician is ok with this, follow the below steps to learn how to install plasterboard socket boxes.
- Step 1 – Mark Around Box: Hold the socket box in the exact installation position and ensure it’s level using a spirit level and mark around it with a pencil
- Step 2 – Cut out Hole: Using a pad saw or even easier a multi-tool if you have one, gently cut out the hole. Be aware or any cables behind the wall as you don’t want to cut them, push these out of the way if there are any
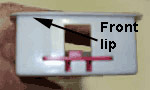
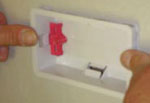
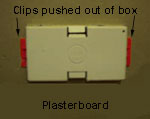
- Step 3 – Push in Wings: In the top image below it shows a plasterboard socket box with its wings extended. These red clips either side are what holds the box to the plasterboard as they grip it from the rear. In the centre image the wings have simply been pushed into the box so that you can slide it into the hole. The bottom image below shows the pattress box from the side with the wings pushed in
- Step 4 – Insert Box: With the clips pushed into the box it is then pushed into the hole in the plasterboard. The lip at the front of the box sits flush up against the plasterboard surface, preventing it from slipping into the hole. Once in place, the clips are pushed out and sit behind the plasterboard as can be seen in the bottom image below. This is a view you will never see yourself!
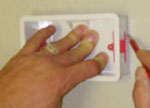
- Step 5 – Fit Faceplate: When the face plate is wired up by your electrician and the screws are put through the holes in the face plate they screw into the holes in the clips of the pattress box. As they are tightened they pull the clips up tight to the back of the plasterboard, firmly holding everything in place
Drawing around socket box on dry-lined wall
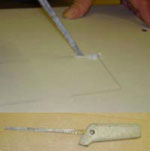
Cutting hole in plasterboard for socket box to fit into

Socket or pattress box with clips out

Socket or pattress box with clips in
Socket or pattress box with clips in side view
Push socket box into hole in plasterboard
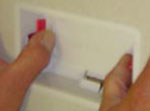
Push clips open to grip plasterboard and hold in place
Rear view of socket box with clips pushed into place to hold it
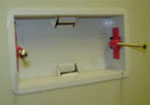
Patress box fixed and secured into plasterboard wall
Fitting sockets into plasterboard first requires you to install a plasterboard socket box which is in itself, quite an easy and straight forward job, which if your electrician allows you to do, can in some cases save you a fair bit of money, but you will need to first discuss this with your electrician.