Wiring a light switch or ceiling rose is a simple task for a qualified electrician, but it requires knowing exactly which wires connect where for the light to work safely and correctly.
If you are replacing a switch or ceiling rose, it’s easy to lose track of the wiring. This guide explains how to correctly wire both one-way and two-way light switches and ceiling roses so everything functions as it should.
By law, most home electrical work in the UK must be tested by a certified electrician. You must receive a Minor Works Certificate, as failing to do so could invalidate your home insurance and cause problems when selling your property.
Warning: All electrical work must meet current Electrical Regulations. Click here for more information.
Types of Light Switch
There are several common types of light switch used in UK homes and the one you need depends on how many lights you want to control, from how many locations and today, also by what device, a standard switch or a smart phone.
- 1-way switches (single or 1 gang)
- 2-way switches (single or 1 gang)
- Intermediate (3-way or crossover) switches (single or 1 gang)
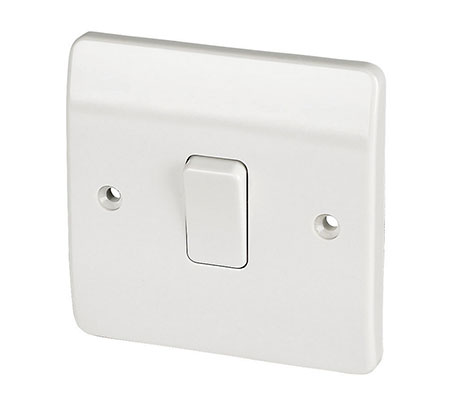
Single gang 1 way light switch
A 1-way switch is the simplest type and controls a single light from one location, such as in a bedroom or bathroom.
A 2-way switch lets you control the same light from two different places. A typical example is a stair light that can be switched on or off at both the top and bottom of the stairs.
An intermediate switch is used with two 2-way switches to control one light from three or more locations, making it ideal for long hallways or large homes.
Other popular options include dimmer switches, which allow you to adjust brightness and smart switches, which can be controlled using apps or voice assistants for added convenience and energy efficiency.
You can usually identify your switch type by checking the terminals on the back. A 1-way switch has COM and L1. A 2-way switch has COM, L1 and L2. An intermediate switch has two L1 and two L2 terminals. A 2-way switch can also be used as a 1-way if needed.
The term “gang” refers to how many switches are on the face plate: 1 gang = one switch, 2 gang = two switches, 3 gang = three switches and so on.
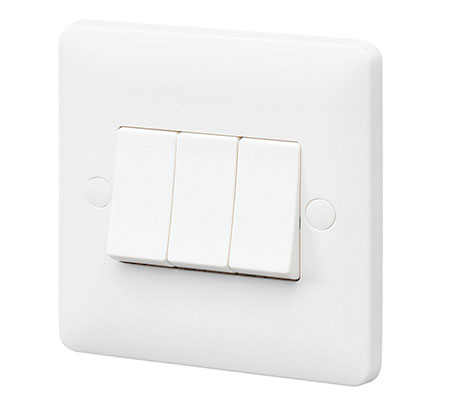
3 gang 1 way light switches
We have a full and detailed project that covers different types of switches here if you’d like more in-depth guidance.
DIY Electrics, Building Regulations, and the Law
Working with electricity in your home is both practical and potentially dangerous, so it’s vital to understand the rules before starting any DIY electrical work. In the UK, all domestic electrical installations must comply with the Building Regulations Part P, which ensures safety for you and your home.
Part P covers most electrical work in dwellings, including installing new circuits, lighting or socket outlets. If your project falls under these rules, you must either hire a qualified Part P registered electrician or notify your local authority so the work can be inspected and certified.
Even minor electrical tasks, like replacing a light switch or ceiling rose, require attention to detail. Incorrect wiring can cause fires, damage appliances or invalidate your home insurance. Always plan your work carefully, turn off the power at the consumer unit and double-check connections before restoring power.
After completing any notifiable work, you must obtain a Minor Works Certificate or equivalent certification from a qualified electrician. This ensures your installation is legally compliant and keeps your property safe for occupancy or resale.
Remember, following the law isn’t just about avoiding fines, mainly about safety. Always consult the latest electrical safety guidance to ensure your DIY electrics meet UK legal standards.
What Does L1 and L2 Mean on a Light Switch?
L1 is the terminal that carries the live wire to the light. In simple terms, when the switch is turned on, electricity flows from the live supply through L1 to power the light. This is common for both 1-way and 2-way switches.
L2 is used in 2-way switching setups. It allows you to control the same light from two different switches, such as a staircase light that can be operated from both the top and bottom of the stairs. L2 works in conjunction with L1 and the common (COM) terminal to complete the circuit depending on the switch’s position.
For intermediate or crossover switches, the principle is similar, but additional terminals are used to allow three or more switches to control a single light. Correctly identifying L1, L2 and COM ensures your lighting works safely and efficiently.
Always remember to turn off the mains supply before handling wires, and if in doubt, consult a qualified electrician. For more detailed guidance on wiring switches, check out our DIY light switch project guide.
What Happens if You Wire a Light Switch Wrong?
Wiring a light switch incorrectly can cause a range of problems, from a simple malfunction to serious safety hazards. The most common issue is that the light simply won’t work at all or operates unpredictably, such as flickering or switching on and off unexpectedly.
In more serious cases, incorrect wiring can create a live circuit where parts of the switch or fixture become live even when the switch is off. This increases the risk of electric shocks and can also cause short circuits, potentially damaging your wiring or the light fitting itself.
Another risk is tripping the circuit breaker or blowing a fuse. This is your home’s way of preventing overheating and fire, but repeated incidents could indicate ongoing wiring problems that need a professional assessment.
For multi-way switches, such as 2-way or intermediate setups, wiring mistakes can result in one switch not controlling the light correctly or the light only working from one location.
Even experienced DIYers can get confused with L1, L2 and COM terminals, so careful labelling and following instructions is essential.
Always turn off the mains supply before attempting any electrical work! If you are unsure about any aspects of wiring, it’s vital to consult a fully qualified electrician.
What Size Cable and Fuse Used for Wiring Light Switches?
In most UK homes, standard lighting circuits use 1.0mm² or 1.5mm² twin and earth cable. This size is sufficient for the low current drawn by typical light fittings, including LED and compact fluorescent bulbs.
For simple single-gang or multi-way lighting circuits, 1.0mm² cable is usually enough, but many electricians prefer 1.5mm² for added safety and future-proofing.
The twin and earth cable includes a live (brown), neutral (blue) and an earth (green/yellow) wire, which is required for all metal switch plates and fittings.
It’s important to avoid using cables that are too thin, as this can lead to overheating and potential fire hazards such as fire. Conversely, using cables that are too thick isn’t so much a safety issue but can make installation harder and more costly as electrical cable, due to the copper, is expensive.
As we have stated previously, if you are in any doubt about any aspects of your electrics then you should always consult a professional Part P registered electrician!
In the UK, a standard lighting circuit should be protected by a 6 amp MCB in the consumer unit. If your home still has a traditional fuse board, the correct protection is to use a 5 amp fuse wire.
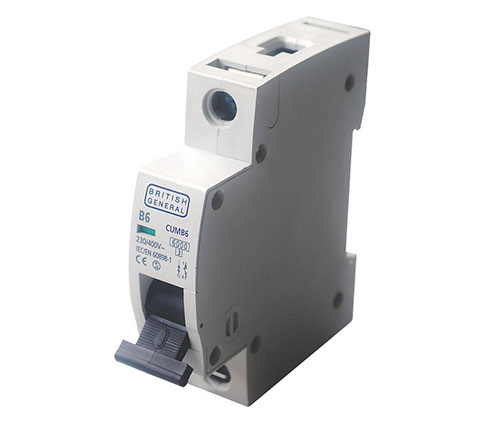
6amp MCB suitable for lighting circuits
It is a worthy point to note that in the UK, wiring colours were updated to match European standards. Older systems used red, black and green/yellow, while modern cables use brown, blue and green/yellow. See our guide to old and new wire colours here for full details.
Different Types of Lighting Circuit Wiring
In the UK, there are two main types of lighting circuit wiring: the traditional junction box system and the modern loop-in system.
Both systems work in a similar way to a radial circuit, where a single cable runs from the consumer unit to each light in sequence, ending at the final fitting.
The key difference is how the light and switch are connected.
With a junction box system, the main cable runs to a junction box. From there, separate cables go to the light fitting and the switch, before continuing on to the next junction box.
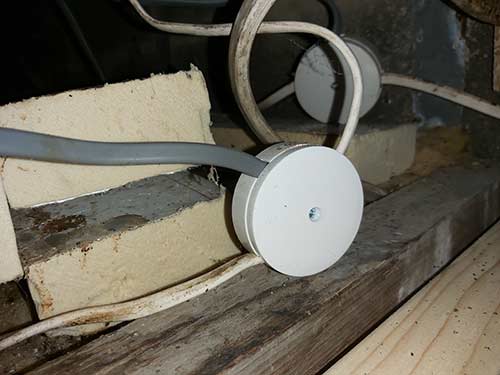
Junction box used in lighting circuit
In a loop-in system, the ceiling rose acts as the junction box. The supply cables loop through the light fitting, and a single cable runs down to the switch.
This setup is far more practical, as it avoids hidden junction boxes under floors or ceilings, making fault-finding and adding new lights much easier.
In some installations, the switch itself may act as the junction point instead of the ceiling rose.

Loop-in lighting circuit using old colour wires
Older homes often have a mix of both systems, but most modern UK properties now use the loop-in method due to its simplicity, accessibility and ease of maintenance.
How to Wire a Light Switch – Wiring a 1-Way Switch
Most people need to wire a light switch or ceiling rose after removing one to replace it with new or decorate and then forgetting which wire goes back where.
This is very common and easy to fix once you understand how the circuit works.
A frequent mistake is matching colours like-for-like, for example blue to blue or brown to brown. In a lighting circuit this is not always correct, as the cable between the switch and the light contains two live wires. The blue (or black in older systems) is often used as a switched live and should be marked with brown or red sleeving or tape to indicate this.
Before disconnecting any wires, always take a photo or make a note of the original connections. If you are adding a new light, this is done by running a new cable from an existing ceiling rose and connecting live, neutral and earth into the new fitting.
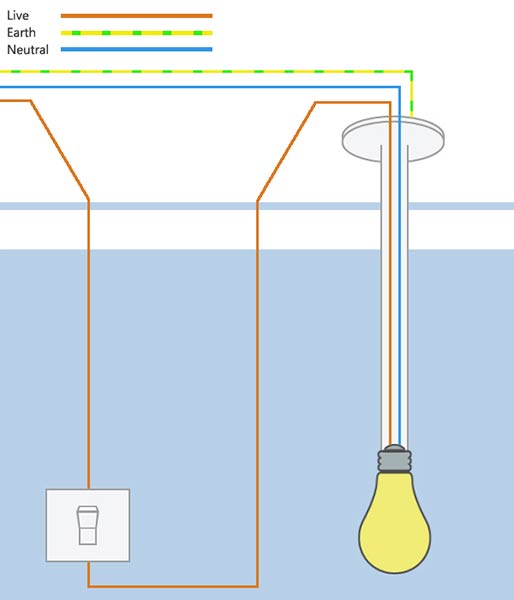
How a switch is wired in a one-way lighting circuit
In a one-way lighting circuit, the switch simply breaks the live connection, allowing the light to turn on and off.
To wire a one-way light switch and ceiling rose, follow these steps:
- Important: Turn off the power at the consumer unit. Switch off the correct MCB or remove the fuse. Always double-check the circuit is dead.
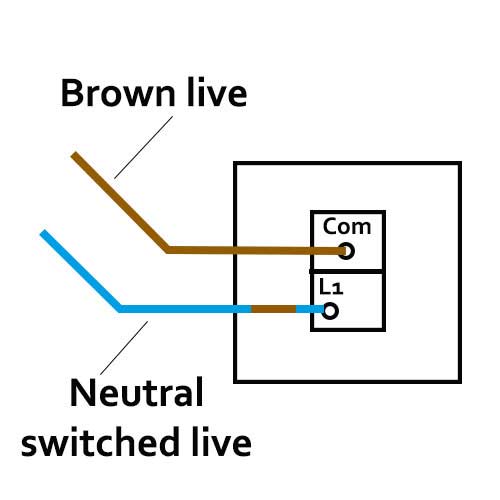
- At the switch, connect the live supply to the COM terminal.
- Use the blue (or black) wire as the switched live and connect it to L1. Mark it with brown tape to show it is live.
- At the ceiling rose, connect the live feed from the consumer unit and the live to the next light into the live loop terminal.
- Connect the switched live from the switch into the terminal feeding the light fitting.
- Join all earth wires into the earth terminal.
- Join all neutral wires into the neutral terminal with the neutral for the lamp holder.
- If the switch has no earth terminal, insulate the earth wire and leave it safely in the back box. Do not cut it off.
- Refit the fittings, restore power and test the light.
Wiring a one way switch in a lighting circuit

Ceiling rose wiring for a one way light switch
Once you understand which wire is live, neutral and switched live, wiring a one-way light switch is a simple and logical DIY electrical task.
How to Wire a Light Switch – Wiring a 2-Way Switch
A 1-way light switch is simple, but a 2-way switch is slightly more complex because it allows one light to be controlled from two different switches, most commonly at the top and bottom of the stairs.
The wiring layout can vary depending on how the circuit was originally installed. In most modern setups, 3 core and earth cable is used between the two switches, as this provides the extra live connections needed.
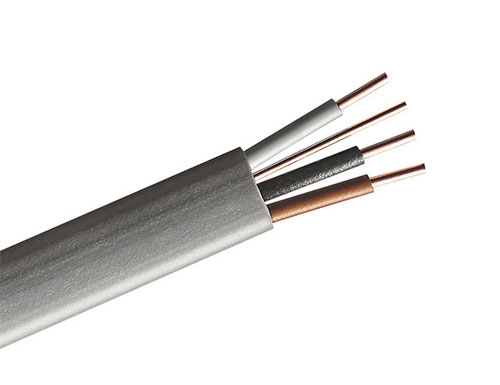
3 core and earth cable
There are several correct ways to wire a 2-way switch. Below is one of the most common and easiest methods used in UK homes:
- Important: Isolate the circuit at the consumer unit or fuse box before starting any work.
- Run a supply cable from the ceiling rose and connect the brown live to L1 on the first switch.
- Connect the blue wire to L2 and mark it with brown tape, as it is now acting as a live.
- Run a length of 3 core and earth cable between the two switches.
- At the first switch, connect brown to L1, grey to L2, and black to COM.
- At the second switch, connect brown to L1, grey to L2, and black to COM again.
- At the ceiling rose, wire it the same way as a 1-way circuit, ensuring the blue wire used as switched live is marked with brown tape.
- Join the earth wires together using a connector block. Leave any unused earth insulated and tucked safely into the back box.
- Refit the switch plates and ceiling rose, restore power and test that both switches control the light correctly.
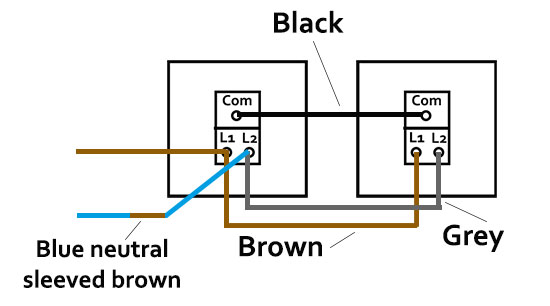
Common wiring for a 2 way light switch

Common wiring for a 2 way switch lighting circuit ceiling rose
If your property uses older wire colours (red, yellow and blue), the same method applies. Simply match the wires at each switch like-for-like and ensure any switched lives are clearly marked.
Wiring a 1-way or 2-way light switch with a ceiling rose may seem intimidating at first. However, once you know which wire connects to each terminal, the process becomes simple and much easier to follow.