Modern kitchens often lack enough sockets for all appliances, and this is often coupled with the fact that space can be limited.
If this is an issue that you are facing, consider installing pop-up sockets in your worktop. These can be raised and lowered as needed. Read on to learn more.
Rules and Regulations for Pop-Up Worktop Sockets
Installing pop-up worktop sockets depends on the type you choose as there are two different types:
- Sockets with a plug that you can plug into a standard socket, acting as an extension.
- Sockets that require hard wiring into an existing socket circuit.
The first type can be installed by anyone since it just plugs into an existing socket. The second type requires installation by a Part P registered electrician. This is because it involves splicing into an existing circuit, testing, and issuing a minor works certificate.
When installing in a kitchen, keep the socket away from water sources. If unsure about placement, consult a professional electrician.
For safety tips when working with electrics, visit our electrical safety project.
What is a Pull-Up or Pop-Up Worktop Socket?
Struggling with not enough sockets in your kitchen or avoiding wall sockets in your new kitchen design? Concealed worktop sockets are your solution.
These sockets install easily into your worktop, offering access to three sockets for any portable appliance. When not in use, simply push them down to hide them away neatly down under the worktop.
Originally used on computer desks, these sockets are now a great addition to any kitchen, especially where space is tight.
No need for removing tiles, running cables, or hiring electricians. Just drill a hole in your worktop, insert the pop-up socket unit, and plug it into an existing socket. You’re all set!
The only challenge is having an accessible socket to plug the unit into. If none is available, you may need an electrician to install one.
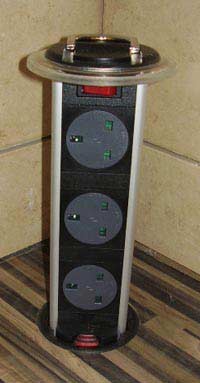
Pull up or pop up socket installed into a worktop
Tools Needed for Installing Your Worktop Socket
Installing a worktop socket is a straightforward DIY job. The key is precise measuring and positioning of the hole. Here are the tools and materials you’ll need:
- Pop-up socket unit
- Drill or cordless drill/driver
- Holesaw set (size specified by the socket manufacturer)
- Tape measure
- Pencil
- Existing accessible socket
How to Install a Pop-up Worktop Socket
Follow the below steps to install a pop-up worktop socket in your kitchen and solve your power supply woes:
Step 1 – Considerations Before Installing
A pop-up worktop socket comes with an integral seal to prevent liquids from spilling into the socket when it’s closed. Fold-down handles allow easy access, and most models sit flat, minimising any raised areas that can cause issues.
Choose the location for your socket carefully. It should be accessible but not in the way, and away from water sources. Remember, drilling a hole is permanent, so be sure of your placement.
Ensure the socket is near an existing outlet for plugging in, typically found under the worktop near appliances like a washing machine, dishwasher, or fridge.
Step 2 – Determine Hole Location
As we have said, the hole’s position is crucial, so ensure it’s placed correctly.
First, check beneath the worktop for any obstructions like drawers or dividers. Make sure there’s enough depth for the socket to fully retract when closed. Measure the distance inside the kitchen unit to confirm this.
It’s also important to mention that there is often a space at the back of most units to allow for pipes and the likes, this is often an ideal location.
Next, determine the hole’s exact position relative to nearby walls or corners. Typically, units sit 60-70mm from the wall to allow for pipes, cables, and hoses.
For an 80mm hole saw, calculate the centre of the hole: 60mm for the false back, 15mm for the unit back, 10mm for tolerance, and 40mm for the hole saw’s radius. This totals 125mm. Measure 125mm from both walls if placing the hole in a corner.
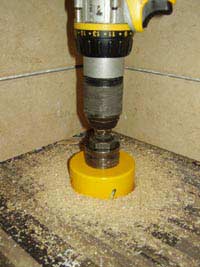
Drilling 80mm hole in top of worktop for pull up socket
Step 3 – Drill the Pilot Hole
The hole saw drill bit has a pilot drill in the arbor. If you’re new to using a hole saw, how to use a holes project.
Position the pilot bit on your mark depicting teh centre of the hole and start drilling slowly. Apply firm, even pressure until the pilot bit penetrates the underside of the worktop.
Once the hole saw engages the surface, drill steadily but stop before going all the way through to prevent the saw from damaging the underside.
Step 4 – Drill Up from Underneath the Worktop
To prevent blowout and damage to the hole edges, stop drilling and place the drill under the worktop, aligning the pilot bit with the hole you just made.
Drill upwards about 10mm, then return to the top of the worktop and finish drilling down through the worktop.
This method prevents the worktop from blowing out and splitting when the hole saw breaks through.
Step 5 – Install the Pop-Up Socket
With the hole drilled, it’s time to install the pop-up socket.
Disassemble the socket unit according to the manufacturer’s instructions. Feed the lead and socket section down through the hole.
Screw the underside washer up to the main body of the unit. Ensure the sockets are facing the right direction, then tighten it fully.
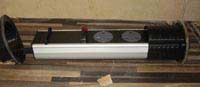
Pop up socket unit dismantled and ready for installation
Step 6 – Test the Socket
Once the socket is secured, test its movement by pulling it up and down a few times. Plug the power cord into an existing socket and switch it on.
Pull up your new socket, plug in an appliance, and check that it works correctly.
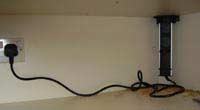
Pop-up socket unit installed and fixed into the worktop, viewed from underneath.
Clean up any sawdust from the worktop and underneath. And that’s it, your installation is complete!

Pop up socket fully installed and closed down into worktop
Adding a plug in pop-up socket to your kitchen worktop provides extra, often much needed electrical outlets without the need for an electrician or the hassle of installing new wiring.