Most of the time repairing a fence post is a hugely awkward, difficult and time consuming job to do and generally one that gets left to the very last minute before it absolutley has to be done.
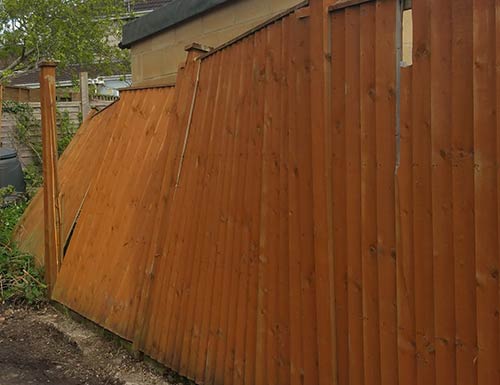
Nevertheless, if one of your posts have failed and your fence is currently laying on the ground or you have 2 panels flapping in the wind while they’re supported by the posts either side then it’s time to get it repaired before anyother posts break and you have twice the work to do!
Why do Fence Posts Fail?
The main reason for their failure is due to the moisture content of the soil that surrounds them. Over time water and moisture will penetrate the timber causing it to decay to the point that it eventually breaks.
This happens more often than not when a fence post has been embedded directly in soil as opposed to encased in concrete. When concreted in moisture can and will still penetrate down but generally this will take much longer than when it’s touching the soil.
As stated this can also happen when the post is concreted in place. Normally the post rots at ground level because it has been concreted in by someone who did not take 5 minutes to trowel the top of the concrete to a slight dome allowing the rainwater to run off. Instead of that, the water sits on the concrete, at the base of the post, slowly rotting and weakening the post until, again, the wind blows the fence panels and the post breaks.
Another cause of fence post failure is from insect attack e.g. wood boring insects that are attracted to damp and moist conditions. If any damp is present in the timber, insects such as these can get into and rapidly speed up the process.
Aside from concreting your post in place and minimising any damp conditions as much as you can there are several other techniques you can use to help prolong its life:
- Use treated timber posts – These are fence posts that have been pressure treated with a preservative that helps combat rot and insect attack
- Treat the ends of the posts – Although you may be using treated timber, additional treatment will further help. Before sinking posts into the ground, coat the section that will sit in the ground with a few coats of bitumen paint
- Use concrete fence posts – Unlike timber posts, concrete fence posts will never rot and will last forever
An important point to note is that although you may use treated timber this is by no means fully resistant to the damage that moisture can inflict and in most cases over time will eventually succumb to moisture in the same way as an untreated post, it’ll just last a lot longer.
Broken fence post that has snapped off at ground level
Problems With Replacing a Broken Fence Post
Despite the actual repair job there are generally several other problems that you will encounter.
Problem number 1 is the fact that the broken post has to be removed from between the two panels it is fixed. This can be a tricky job and ultimately it’s best to remove both the panels and clear some space for you to work.
Problem number 2 is the fact that the bottom third of the post (See our project on concreting fence posts) is fixed firmly in a whole wheelbarrow load of concrete and to create the space necessary for a new post or even a concrete spur that concrete has got to go.
As we have just mentioned, one of the methods of repairing a fence post is to dig the old post out or insert a concrete spur
One small problem with either of these is that, once you have finally excavated all of the post and concrete, you have loosened all of the soil and have a gaping hole looking a little like a bomb crater!
As the hole is a lot bigger than it should be, seemingly the only choices you have are to try and reform the hole or use 10 times more concrete than you need.
However, this is easily rectified with some old timber or even better a couple of spare paving slabs which can be put inside the hole and used as "formwork" to form a box inside the hole and to hold the new concrete in place. The rest can then be backfilled with soil.
The image below shows an old hole with bits and pieces of timber pushed in to form new sides around the post in the centre. Some earth is pushed in behind these pieces of timber so when the concrete is tipped in the earth will stop the new sides (Also known as shuttering or formwork) from pushing out.
As long as you have 6 inches of concrete either side of the post it will be strong. Refer to our concreting posts project to see how to keep the water from the top of the concrete.

New concrete into an old hole
Methods to Repair a Broken Fence Post
As we have briefly touched on 2 different techniques above there is a selection of other methods for repairing a fence post also so at this stage it’s a good idea to take a look at all options available in a bit more detail.
Replace the Broken Fence Post
The best solution and belt and braces approach is to ultimately replace the broken fence post with a brand new one.
The method will give you the most sturdy fix and ensure that the fence lasts for many, many years to come.
However it is arguably the trickiest and most time consuming fix and will involve you in removing the fence panels either side of the broken post or posts, digging the remaining post end or ends out of the ground which can also involve breaking up concrete, shoring up the existing holes that are left, resetting new fence posts and then fixing the panels back in place.
As you can see, this is quite a lot of work but in the whole scheme of things it will yield the best and most long lasting results, especially if you use concrete fence posts that will last a life time!
Replacing old broken fence posts with new posts
Fix a Concrete Spur in Place
The next best solution is to keep the existing broken fence post in place but insert a concrete spur into the ground and then fix the broken post to that. As the damaged part of the post has broken off the remaining post should be solid and by fixing to the solid spur in the ground you will end up with a solid post that should last a good amount of time.
Fixing a concrete spur post involves digging down alongside the old post and concreting in the new spur. It is always advisable to have, at the very least, 450mm of spur under the ground but 99% of the time the existing fence post concrete stops this happening.
If you do not fix a spur solidly it actually helps the fence to wobble about even more!
One answer is to break out the concrete or pull out the whole lump. The concrete can be broken fairly easily with the right tools and these can be seen in our breaking concrete project.
Once the concrete, or some of it, is broken out a spur can be fitted properly but by the time you have got to this point you might be feeling its worth carrying on to remove all of the concrete and the old post, and start again with a new post and new concert. We would agree with you!
The one drawback of this method, apart from the fact you may as well just put in a new fence post is that the spurs are a little unsightly.
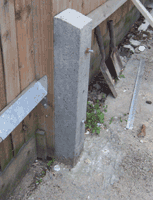
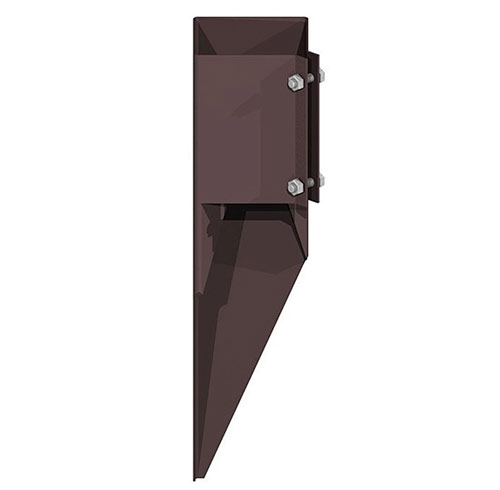
Concrete spur to a fence post
Use a Post Buddy or Similar Product
In recent years a selection of products have come on to the market that work in a similar way to a concrete sour but are much quicker and easier to fix in place.
The Post Buddy (many other variations are available and all pretty much work in the same way) is a long length of flat steel with a number of holes in the top end.
Using a lump hammer or sledge hammer, you hammer the product down the side of the broken post down into the snapped end of the post and the remaining concrete until you reach the stop line. Three more are then hammered into place around the post
Once here the remaining end of the post is then leveled up and the Post Buddy is then screwed up to it.
Products such as these do give you a fairly solid fixing and if done correctly can last a while, but in reality they don’t give as solid and lasting a solution as doing the job properly and putting in a new post.
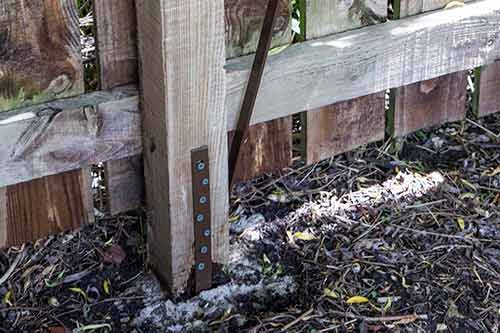
Post Buddy used to repair broken fence post
Use a Drive-in Post Spike ro Fence Spur
The Drive-in Spike or Fence Spur is a similar product to the Post Buddy above, only this time it’s hammered down between the broken post end and the concrete in one of the corners.
Once driven down until it’s flat on top of the concrete a new post can then be inserted on top and then clamped up giving you a solid fixing.
Like the product above the fence spur will provide a fairly solid mounting for a new post in ideal conditions but will never be as good as a new post fixed in the ground correctly.
Drive-in Post Spike or Fence Spur
Insert new Posts and cut Down Panels
The final way of effecting a proper repair to a fence is to ignore the broken post hole completely. This is more of a major job but there are situations where it is far more practical than other methods.
It also involves cutting a fence panel down which is a really handy thing to know how to do anyway. See our project on cutting down fence panels for more information.

Inserting half panels into fence
The image above shows the broken post (A). This post is removed and cut off at the very top of the concrete so it finishes below ground level. This leaves the two fence panels flapping in the breeze so they need to be taken off too.
Presuming the fence panels are 6 foot panels, dig two new fence post holes in positions D and E and using our project on concreting fence posts, put 2 new posts in.
New paneled fence
One of the panels you have removed is now fitted between posts D and E and the other panel is cut in half and the two halves are fitted between C and D and E and B.
Yes, it is noticeable but if the next door neighbours has a patio which comes right up to the fence….How many choices have you got ?!
How to Repair a Broken Fence Post
For the purposes of this guide we are going to go with the concrete spur method of repair as this project is geared around how to repair a fence post. As we have mentioned, the proper fix would be to insert a new fence post but there are some situations where you have to go with the spur method.
There is absolutely nothing wrong with the other repair methods mentioned above (although some are better than others), the main reason for this is that the concrete spur represents the best job for both time and money spent.
Step 1. Clear Some Space and Support Panels
The first job to do is to clear some space to work in so that you can work comfortably and easily. Remove any vegetation, excess weed growth and earth so that you can easily see the end of the broken post and the concrete.
Next remove any fence panels that are flapping in the wind and put them safely to one side. If it’s loose, remove the top half of the broken fence post also
Step 2. Dig Around Concrete and Break up
With any panels and foliage out of the way you should now be able to see the snapped end of the post and the top of the concrete in the ground. This is where the hard work starts!
Using a decent shovel, dig around the front side or side of the concrete that you are going to place your concrete spur against the broken post.
Once you have found the edge of the concrete dig down at least 450mm, preferably 600mm. The deeper you can go the better.
Once you have exposed the concrete it’s now time to break it away so that you can access the broken piece of post. To do this you can either use a bolster and lump hammer or a concrete breaker (see how to use a breaker or Kango hammer in our project).
Step 3. Prepare Existing Fence Post
Once you have broken all of the concrete away and fully exposed the face of the remaining section of fence post check its condition. It should be fairly solid but if not and it’s also rotted through then you may have no choice now but to remove and replace with a new post.
For our example we are going to assume that it’s in good condition so now use a good quality wood preservative or even a Bitumen paint and fully coat the exposed face and any other exposed timber and allow it to fully dry out.
Finally if there is any timber protruding out of the top of the concrete then use a saw and cut it off, ensuring it’s flush with the top of the concrete.
Step 4. Insert Concrete Spur
With the post prepared it’s now time to get the spur set in place next to the broken post. Place the spur in the hole you have dug and push it up flush with the post and ensure it’s sat nicely in the hole.
Pay close attention to where the spur and the concrete and post end currently is and make sure it hasn’t moved. You are going to need to make sure that your new post is in exactly the same place as the old post to ensure the fence panels will fit back in place once more.
Using a spirit level or post level, level the spur up. Once fully leveled, hold the spur in place using timber braces and also some soil and rocks placed loosely in the base of the hole if needed. Make sure it can’t move.
Step 5. Fix Spur to new Post
With the spur in place and help firmly, place your new fence post against the spur and again level it up fully. A second pair of hands at this stage would be beneficial to hold the post steady while you mark the fixing holes.
With the post in place mark through the fixing holes on the concrete spur on to the fence post and then remove the post and drill out the fixing holes.
Once drilled, put the fence post back in place and then use suitable length stainless steel coach bolts to bolt the spur to the post. Use a spanner or socket to fully tighten them up.
Check everything is level again, both the post and the spur and re-level if not, and then use timber braces to hold the post firming in place.
Step 6. Concrete Spur in Place
With everything held solid by the bracing on the post remove any bracing in the hole and then mix up a general purpose concrete mix, see our mixing concrete project here for more help.
If you don’t have the means to mix concrete using the tips in the project above then you can also use Postcrete. See our project on using Postcrete for more information.
Before anything cures check one final time that your post is nice and level and in the correct position for the panels to fit back correctly. Make any last minute adjustments if needed.
Step 7. Replace Panels
Once you concrete or Postcrete has fully dried out and cured and your spur is now holding your fence post firmly in place you can now finally refit the 2 fence panels. Use either galvanised nails or decking screws as they won’t rust.
Once the panels are fixed over the 2 gaps you have now finished, top job!
Fence panels fixed in place after repairing fence post