What are Strip Foundations?
There are many types of foundation. Differing ground conditions, proximity of trees, backfilled land, soil types, proximity of drains, wind speeds, all dictate the form our foundation work will take. This project will deal only with the strip foundation, the most common and widely used. Indication will be given here where strip foundations may not be suitable. A strip foundation is quite simply a strip of concrete placed in a trench. The absolute minimum thickness of this strip is 150mm.
Please note that all of the loading figures given here may not apply to your project and should be checked by an architect on site. Soil samples and tests may be necessary.
When can I use a Strip Foundation?
The building regulations for foundations give a clear list of rules under which strip foundations are suitable. This is conditional upon the walls the foundations support which are placed centrally on their respective strip of concrete:
- a) There is no "made" ground (imported soil etc) or wide soil strength variation in the loaded area ( floor area of the construction or "load") or weak soil patches likely to cause foundation failure
- b) The width of the foundation strip is in accordance with Table 12 of approved document A1/2 in section E1 of the building regulations. (This table can be found below)
- c), d) and e) deal with the chemicals in the soil and the British Standards that the concrete should meet to be approved in these conditions. We will deal with this later
- f) The concrete strip thickness is equal to or greater than the projection from the wall face, and never less than 150mm
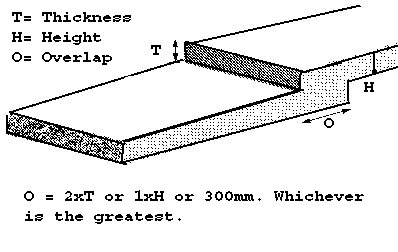
- g) The upper level of a stepped foundation overlaps the lower level by twice the height of the step, by the thickness of the foundation or by 300mm. Whichever is the greater
- h) The height of the step is not greater than the thickness of the foundation
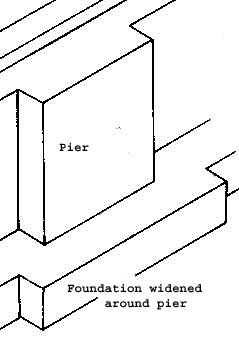
- I) The foundation strip projects beyond the faces of any pier, buttress or chimney forming part of a wall by at least as much as it projects beyond the face of the wall proper
Step Foundations
Foundation Strip
If you can meet all the requirements of the above then, with the Building Inspectors approval you should be able to use strip foundations.
Things to Consider When Using Strip Foundations
Trees
Existing trees draw a considerable amount of moisture from the ground, this is especially important in clay soils. The ground will actually rise and fall (even without trees) in differing conditions and in a dry summer the trees will continue to draw water from the ground, shrinking the clay further. The ground can rise and/or fall up to 40mm around a tree between Winter and Summer.
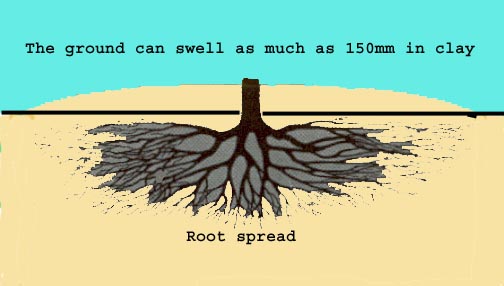
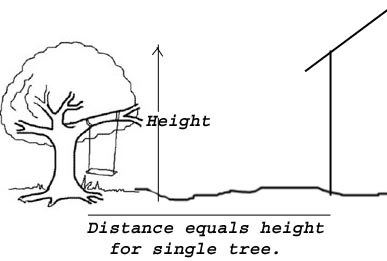
Where a tree has been chopped down, in clay conditions, the ground can swell up to 150mm as the roots are no longer drawing water from the ground. This can of course affect the foundations and any drains within the root zone of the tree. It is an accepted rule of thumb that, wherever possible, and using strip foundations, that the structure is kept away from the tree/s by at least as much as the height of the tree itself. British Standard 5837 suggests that special precautions are taken (unless investigation shows them to be unnecessary) with foundations that are to be constructed within an area equal to the expected height of a tree at maturity. Where trees are in rows, this may be increased to 1.5 times the height of the tree. These precautions may include piling the foundations, or other measures deemed necessary by the building inspector. It must also be remembered that dead trees will eventually rot underground and this can lead to depressions forming and weakened bearing.
Tree Root Cross Section
Distance between tree and building
Mining
If there has ever been mining in the area, a special check will need to be made with local authorities as to the extent of the works.
Foundation sizes are determined by the load placed on them. This load is spread throughout the property and comes to bear on the walls which are actually sitting on the foundation…For example, the weight of the roof, a particularly heavy part of the structure, is spread, via roof trusses to the walls of the structure. This is the same with the suspended floors contained within the property. This "loading" is calculated for the property and the foundations are designed to suit. However, the nature of the ground will have a great deal to do with this design criteria. To this end a table is produced within the building regulations for foundations, which dictates the size of the foundation for a certain loading in certain ground conditions. This table is called Table 12 Minimum width of strip footings and is reproduced below.
Calculating the Load When Designing Strip Foundations
The load is measured in Newton’s, units of force, which are calculated by taking the weight of the structure in kilograms, and multiplying it by 9.81, a figure which, in effect, is the maximum pressure gravity will place on that structure.
To design the foundations, it is therefore necessary to know the load of the building and this is measured in 3 ways:
- Dead Load: This is the force attributed to the total structural mass of the building as mentioned above, roof etc. This will be the weight of all the materials multiplied by 9.81 to give Newton’s.
- Imposed Load: This is the force that will be imposed on the property in the way of people, furniture and fittings. The loading of snow (snow load) will come into this category and an allowance for this in all foundation design will be included in the calculations. Generally, for the design purpose of domestic properties, 1.5 kN/square metre is allowable and a snow loading of the same amount is applied to flat roofed buildings, while on roofs pitched over 30 degrees an allowance of 0.75kN/square metre is normally made.
- Wind Load: There are so many variables here it would take forever to explain the calculations. If you are dedicated enough to want to know, the "dynamic force" calculations can be found in BS CP3, Chapter 5 Part 2 (1972). For our purposes, and assuming the build to be of relatively low rise, in a normal, reasonably sheltered environment, a figure of 1 kN/ square metre is acceptable.
Using these figures it is reasonably safe to assume (and given the ground conditions outlined in Table 12) that the total force from a traditional two storey dwelling to the ground will not exceed 50kN/ meter, with a bungalow of the same construction, not exceeding 30kN/m.
Table 12 – Minimum width of Strip Foundations
NOTE: For minimum width column, width is in mm for total load in kN/m offload bearing wall of not more than: 20kN/m, 30kN/m, 40kN/m, 50kN/m, 60kN/m, 70kN/m
| Type of Subsoil | Condition of Subsoil | Field Test Applicable | Minimum Width in mm |
| Rock | Not inferior to sandstone, limestone or firm chalk | Requires at least a pneumatic or other mechanically operated pick for excavation | In each *case – equal to width of wall |
| Gravel or sand | Compact Compact | Requires pick for excavation. Wooden peg, 50mm square hard to drive in beyond 150mm | *250 – *300 – *400 – *500 – *600 – *650 |
| Clay or Sandy clay | Stiff | Cannot be moulded with fingers, requires pick/pneumatic/mechanical spade for removal | *250 – *300 – *400 – *500 – *600 – *650 |
| Clay or Sandy clay | Firm | Can be moulded by substantial pressure with the fingers and hand dug with graft or spade | *300 – *350 – *450 – *450 – *600 – *750 – *850 |
| Sand / Silt sand / Clay sand | Loose | Can be excavated with a spade. Wooden peg 50mm square can be easily driven | *400 – *600 – From here on must be specified by design/architect/engineer |
| Silt / Clay /Sandy clay / Silty clay | Soft | Fairly easily moulded in the fingers and readily excavated | *450 – *650 – From here on must be specified by design/architect/engineer |
| Silt / Clay /Sandy clay / Silty clay | Very soft | Natural sample, in winter conditions, exudes between fingers when squeezed in fist | *600 – *850 – From here on must be specified by design/architect/engineer |
The depth at which your foundations will start must be determined by the local authority, who will make the decision based on ground conditions.
Once the ground conditions have been ascertained, loadings are calculated and foundation widths are decided, the depth oif concrete must be worked out.
This is an incredibly complex procedure for normal mortals involving punching shear (the tendency of the weight to want to punch a hole through the concrete base) and tension (tendency of the base to bend under the weight) calculations, crushing strength of aggregates and all sorts of mathematical procedures.
The crushing strength of concrete in most domestic foundations is measured at 15-20 Newton’s per square mm. The nominal mix for house foundations is called a C15P mix (P = Portland cement) and is comprised of 1 cement, 2 sand and 6 coarse gravel. See our mixing concrete project for more information and calculation tables.
In All Cases the Final Decisions of Width and Depth of Strip Foundations Rest with the Local Authority
It is a general rule that the depth of the foundation will be equal to, or greater than, the distance from the front face of the wall to the edge of the foundation.
This is indicated in the diagram below but the concrete depth will never be less that 150mm. In some cases, reinforcing steel may be introduced into the strip foundation to allow a lesser depth of concrete. This will be a design situation.
It must also be remembered that, if building the foundations in block work and/or brickwork, space must be found in the trench to stand and build.
It is considered normal practice, in ground of the required bearing strength or better, to introduce concrete strip foundations of 600mm wide and 250mm deep.
This will cover almost all eventualities in a domestic build and should only a single story be planned, the opportunity to extend vertically is not removed.
The setting out of a building is made a great deal easier if the foundations are wider rather than narrower and allows for a margin of error in excavation. It is also worth noting that 600mm is a standard size for a digger bucket!
The choice of filling the foundation trench with concrete is now given in most cases. And in most cases it is much cheaper to do so. The cost of the labour involved in laying bricks and blocks to ground level, together with the materials involved, is usually greater than the cost of pouring the concrete to the required height which, in most cases, is to within two brick courses of finished ground level.
The diagram below shows the basic construction of a strip footing. The walls constructed below the ground are subject to pressure from the earth in both directions and are treated as retaining walls.
It is therefore indicated in most domestic builds of this type, that any cavity be filled with a weak concrete mix (to be specified, normally 8 ballast = 1 cement) up to finished ground level and in all cases 150mm below the level of the damp proof course.
Pipes passing through the concrete must pass through a duct, purpose made and giving the amount of room, indicated by the local authority, to remove the possibility of pressure from any other surface coming to bear on the pipe work.
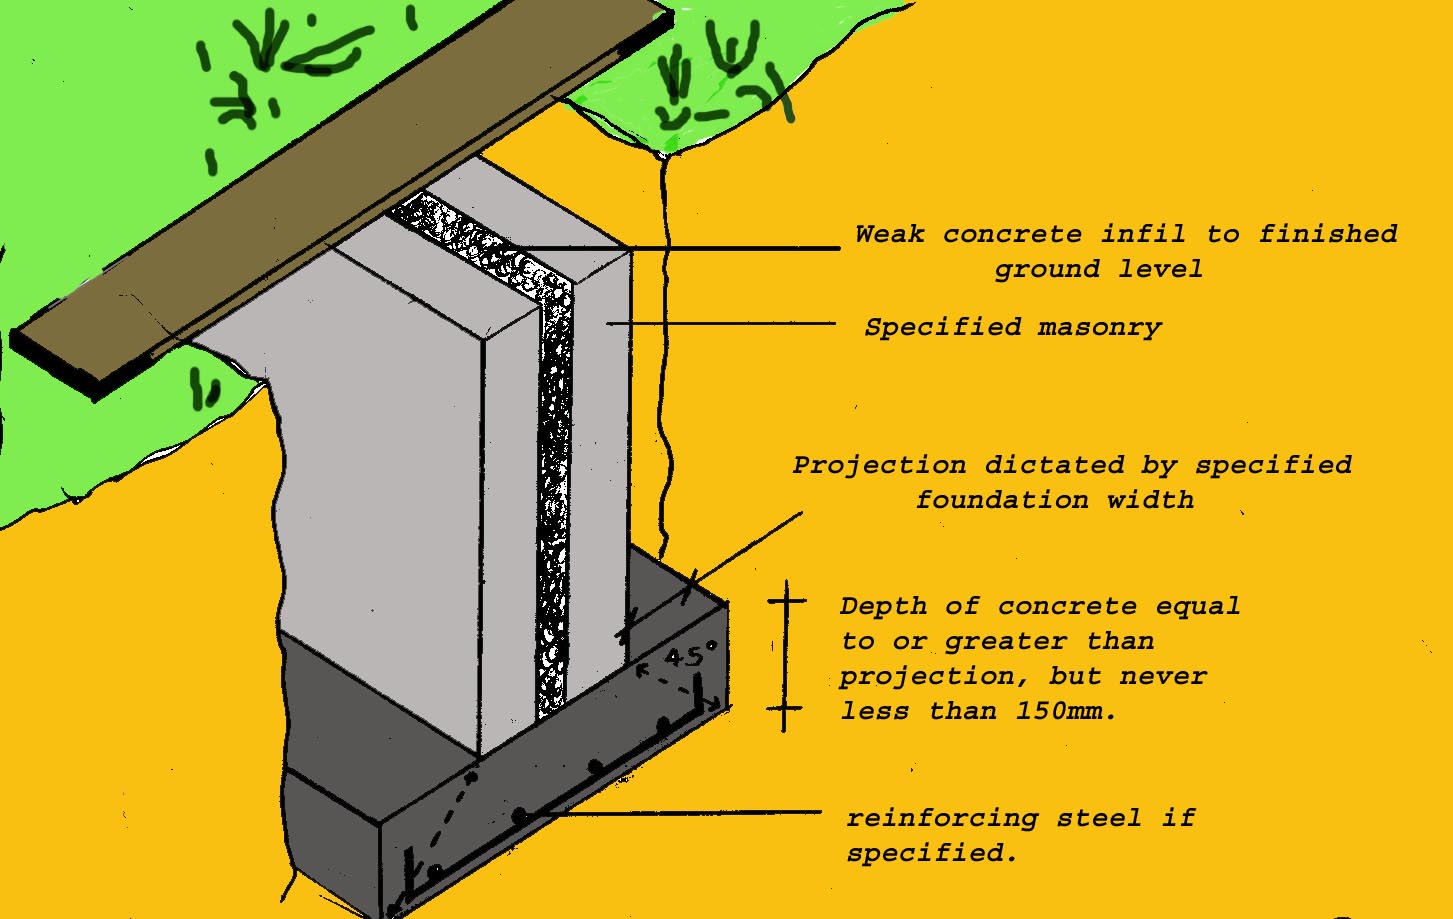
Concrete infill cross section of strip foundations
In terms of how a strip foundations is then built upon and including the concrete slab, insulation DPC and inner and outer walls, here follows a diagram of how this should be formed once the strip foundations has been laid.
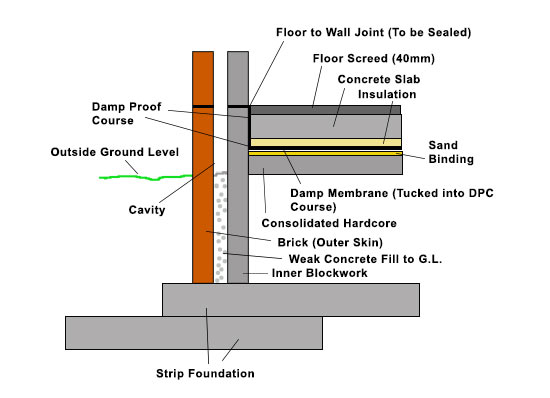
Cross section of a wall, concrete slab, insulation etc. built on top of a strip foundation