During many DIY and construction jobs, it may be essential to “prop objects up” to prevent them colapsing while you work in and around them and to do this safely and securly the only real item to use is an acrow prop (or acro prop, jack post, screw prop or shoring post as they also known), so in this project we are going to explain how to use an Acrow prop and timber needles or Strongboy brackets to support a load bearing wall.
Even if you have never used one before it is likely that you have come across one. In appearance, they look like a piece of scaffold tubing with a flat plate on either end and will feature a threaded collar with a handle attached some where around the middle area.
If you have always wondered what these mysterious items were, now you know!
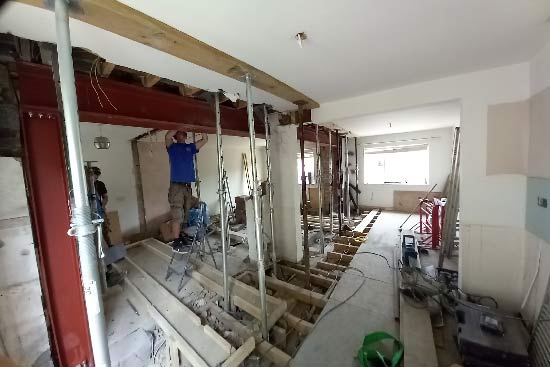
Acrow props being used to support ceiling
What is an Acrow Prop, how are They Used and how did They Come About?
Put simply, an acrow prop is a temporary vertical support used in the construction industry to hold up load bearing objects, preventing them from colapsing while building or repair work is carried out below.
For example, it you wanted to cut a new doorway into a load bearing solid brick or block wall (a knock through), then simply cutting out the hole may cause the structure above to drop or worst case, collapse.
To prevent this from happening, you would chop out the mortar from the brick/block course above your new door opening and insert an acrow prop with a load bearing member such as a strongboy, timber bearer or timber needle attachment (more on these below) to take the weight of the wall and roof above while you insert a lintel or RSJ above the opening to act as your new support.
Aside form the support of walls, roofs and formwork for the creation of doorways, windows, archways and any other sort of hole or opening you would wish to make in a wall, the acrow can also be used to support steels and RSJ’s, lintels etc…. while they are positioned in place and “made good”.
As the original design was only meant for supporting vertical loads, the Acorw’s simplicity and ease of use has spawned several variations aimed at horizontal support.
Push and Pull Shoring props feature an adjustable base-plate set an an angle to provide horizontal support for things such as concrete formwork.
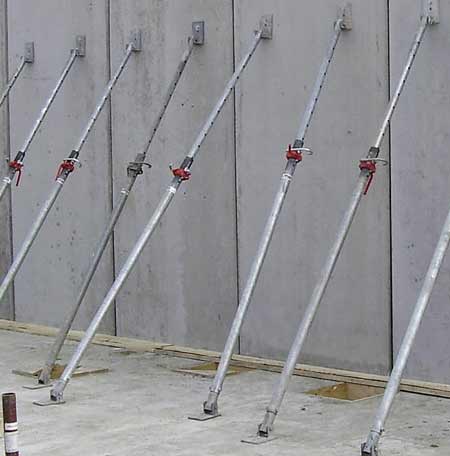
Push and Pull Shoring props used to support concrete formwork – Image courtesy of mevaformwork.com
Another variation is the horizontal strutting prop. Again, their main purpose is horizontal support so they are mostly used for shoring up and supporting trenchwork and groundwork.
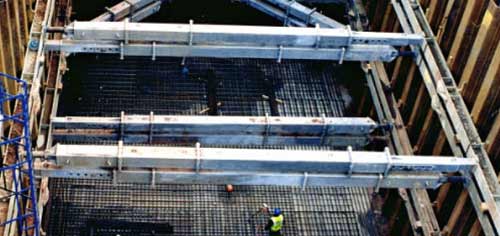
Horizontal strutting props installed in a large industrial trench operation – Image courtesy of Mabey
Before the Acrow prop was invented around 1935 by Swiss-born William de Vigier, timber beams were traditionally used, with each beam having to be cut to the correct supporting height for each job.
As you can imagine, this lead to a huge amount of waste and cost, not to mention safety issues as timber by its very nature is particularly susceptible to both fire and damp.
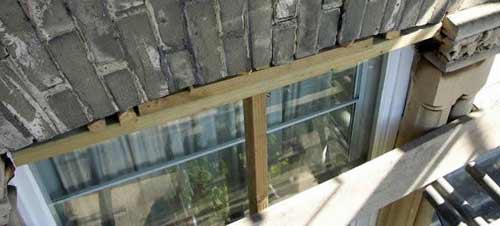
Traditional style timber supports – Image courtesy of actionwallties.co.uk
De Vigier quickly identified these problems and set about inventing a new propping system that was made of steel and could be height-adjusted, meaning that it was much safer and longer lasting and could be used over and over again in a variety of different situations.
Although de Vigier’s props were vastly superior to their timber counterparts, uptake was slow until the then head of McAlpine & Sons construction Sir Robert McAlpine realised their efficiency, cost saving and safety benefits and started to use them.
After this, sales and uptake soon rocketed until they established themselves as the go-to solution for any form of propping or support in the building trade.
Even today, the acrow prop is still the quickest and most efficient, cost effective and safe solution when it comes to the support of heavy or load bearing objects.
The Different Parts of an Acrow Prop
When it comes to the individual parts of an acrow prop, its real beauty lies in its simplicity. When de Vigier set about designing his solution, some of his key considerations were reliability and cost efficiency – essentially, this meant “keeping it simple”.
A design featuring numerous moving parts or complicated internals would almost certainly spell unreliability, especially when subjected to the rigours of a building site.
Although de Vigier’s original design has been refined over the years, it’s core principals are still the same and feature:
- Steel outer tube with solid base (solid steel plate welded to bottom)
- Steel inner tube with solid top plate (solid steel plate welded to top)
- Large nut/threaded collar and winding handle(s)
- Prop pin – These can be a pin attached to a chain, fixed to the prop to prevent loss or a clip-type
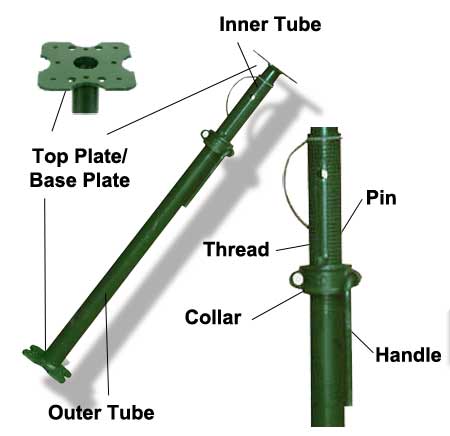
The different parts of an Acrow prop
Originally, the props were constructed of pure steel and, although they far outlasted any traditional timber prop, they were still subject to rusting over time, especially if they were left exposed to the elements.
Today, nearly all Acrow props are galvanised (coated with a protective layer of Zinc) to prevent rusting and, due to this, ensure many years of active service.
One other point to note is how the thread for the fine adjustment collar/nut is formed. In some variations, this is physically cut in to the outer tube, but this weakens the tube as its thickness is decreased.
In almost all cases today, the thread is friction welded to the outside of the tube overcomiing this issue.
Tip: If you are looking to purchase a prop, always look for those that have been manufactured using a single-piece outer tube and not a two-piece welded outer tube. The single-piece outer tubes are much sturdier than their welded counterparts. Also ensure they are manufactured to BS4074 standards.
Due to the range of different situations that an Acrow prop can be used in, they are available in 5 different BS (British Standard) sizes:
- Size 0: 1.1m up to 1.8m
- Size 1: 1.75m up to 3.12m
- Size 2: 2m up to 3.4m
- Size 3: 2.4m up to 4m
- Size 4: 3.2m up to 4.9m
Another benefit of their popularity is that any spare parts or accessories are cheap and readily available. In the unfortunate event that a prop does become damaged you can simply replace the damaged section without the need to replace the entire prop.
Additional Propping and Supporting Attachments
As the Acrow prop does such a great job when it comes to the supporting of vertical loads, numerous attachments have been developed and can easily be added to provide additional supporting. Some of the most common are as follows:
Timber Needles
Although timber needles aren’t an attachment in the traditional sense, they are in a way an addition to the prop itself so we though it necessary to mention them here (more info also below).
In the scenario that you need to support upper courses of brickwork while you work below you can either use Stongboys (see below) or needles.
Essentially a “needle” is inserted through both the outer and inner skins of bricks or blocks either side of the area that needs supporting and an Acro is placed under each end of the needle.
This then provides support to the upper courses of bricks/blocks allowing work to be carried out safely below.
Today, of course, the needles don’t necessarily have to be timber, they can also be steel RSJ’s
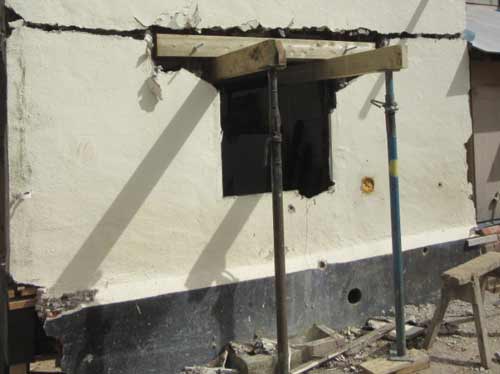
Timber needles supported by Acrow props holding up the side of a house while a lintel is inserted – Image courtesy of thewoodhaven2.co.uk
Strongboy Brackets
These are really just an evolution of the timber needles above.
Where the Strongboy differs is that instead of having to run them through both wall skins, mortar can be removed from between brick courses and the front edge of the blade of the Strongboy can be pushed through the gap to provide teh vertical support.
Once inserted, the screw collar of the prop is tightened until both the prop and Strongboy are taking weight.
It is also important to note that you should never over tighten the collar as this can cause damage to the Strongboy itself, the prop and even the brickwork it supposed to be supporting.
When used correctly, the Strongboy will provide more than enough support to allow you to work safely and ensure there is no danger of collapse. Despite this, there are some pointers you should beaware of:
- Always ensure your Strongboy is installed correctly on the top of your prop. If you pull down on the front of the blade, there should be no movement
- For maximum support, always ensure it’s inserted so that the web bracket or handle area sits against the face of the wall you are supporting
- For a standard cavity wall, the measurement from the centre line of your prop to the centre of the cavity wall should not be more than 215mm and for single skin walls the distance from the prop centre to the wall centre should not exceed 305mm
- Any working heights should not be greater than 3m from floor level
- The maximum load applied on to a single Strongboy should not be greater than 340kg
- Any walls being supported should also be braced for lateral forces. With this in mind, the Strongboy should not be any more than 500mm from a floor
- When using several Acrow props and Strongboy attachments together, they should not be any more than 900mm apart. N/B for the correct amount of support, any distances should be calculated from the point of view of the weight or load they will be carrying
- When creating openings in load bearing structures that are up to and over 4m in width, all props should be diagonally and horizontally braced together
- During any works you should regularly check any props and Strongboys in use are not loose!
- Strongboys can be used on both single and double skin walls, but you should only work on one skin at a time
- The brick skin or leaf you are working on should be no thicker than 112mm
- When working on a double skin wall with a cavity, the cavity itself should be no wider than 50mm
If you would like any more information on Strongboys and how to use them, checkout the Strongboy website here and also check out the information available in the propping guide on the Brick Brace website here.
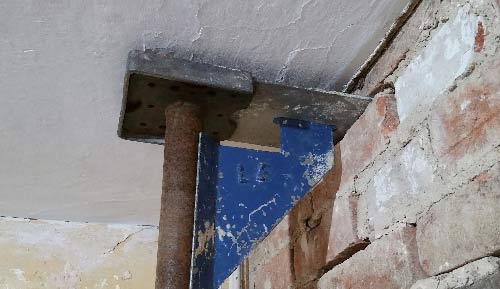
A Strongboy supporting the upper floor while the wall is worked on
U-Head or Forkhead Attachments
These attachments are primarily used for supporting an object once it’s in place on top of an Acrow prop.
As you may have guessed form the name, these items are a “U” or “Fork” shape and they are designed to hold an object on top of one or several props and stop it from slipping off.
Their main use is for holding timber beams of steel RSJ’s while they are inserted and fixed in place. The “U” or “Fork” stops the beam or steel from slipping off of the inbuilt small top plate of the prop.
There are several different types, some designed to fix over the top plate, some designed to fix over the inner tube and some that are inserted down in to the inner tube through the hole in the top.
These latter designs can also be threaded and have a collar that allows them to be screwed up or down for further adjustment and ease.
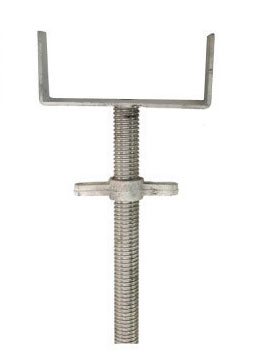
Adjustable U-head attachment for an Acrow prop
Safety and What to Know Before Using an Acrow Prop
Before any propping or removal or any load bearing item begins you need to know:
- Exactly how much vertical load weight you will need to support
- Exactly how you need to support it e.g. Strongboys or needles
- Exactly how many props, strongboys or needles you will need to use to safely support the load
In order to know the above, you will need to have a sound understanding of loads and forces and how they are imposed on a given area and also what different types of load or force there are e.g. horizontal and vertical loads, lateral force etc….
Each of the above types have to be calculated so that you know precisely what you need.
If these calculations are not carried out correctly and you end up using the wrong type of prop and/or attachment or not enough supports then serious structural damage can occur and, worse case, even collapse!
When it comes to loads and forces, it’s not just about the obvious ones. For example, if you were cutting in a new window in to a solid wall, before installing a lintel or steel to support the new opening, the above brick or block work will need supporting, this, we know.
But it isn’t just the bricks and blocks above that excert vertical load and force, it’s also the first floor (if there is one), it’s also the roof, it’s also any furniture on the first floor, it’s also any footfall or workmen using heavy tools and also any heavy items that may be installed during the work. Many of these are not immediately obvious.
One other aspect to consider is the base that you will be propping off of. A solid concrete base should be more than adequate (worth getting it checked though) but if you are propping off of a timber floor and joists, these will need to be checked to ensure that they can take the weight.
With the above in mind, we would always recommend a qualified structural engineer or architect carry out these calculations for you so that you know they are absolutley correct.
Do your own calculations if you know how by all means, but always get them checked by a professional just to be sure.
Some other safety aspects to think of when using Acrow props are:
- As we have mentioned, but will mention again as this is vital; ensure you are working with the correct load calculations!
- Ensure any vertical load is fully supported before you start making any openings or removing load bearing objects
- Always use the correct length prop for the job
- Ensure that any props that are used are installed absolutely vertical and upright. Any lean, even very slight could cause the prop to strike out. At the very most any vertical offset should not exceed 1.5°
- Ensure the base that your prop will be sitting on is strong enough to take the weight. A solid concrete base is best. If you are working off of a timber floor it will need to be checked and calculations carried out
- Make sure all existing walls, roofs, masonry and any timbers are in good condition, straight and level
- Use steel or hardwood sole plates under the base of your prop to help spread any load evenly (recommended sizes are 450mm x 225mm x 36mm)
- If propping across an extended gap and/or using multiple props you should brace them all together using scaffold poles and couplers or specialist braces to form a solid structure and reduce any lateral movement
- Never use an Acrow prop to “jack up” a load
- Regularly check all installed props to ensure they are upright and not loose, ideally at the beginning and end of each day and several times during
- If cutting an opening into a wall with a cavity (inner and outer skin), you should only prop and work on one skin at a time and ensure any new lintels/supprts, mortar etc…. have set before moving on to the second skin
As we have stated several times, if you are in any doubt about whether your supporting methods will be suitable, get them checked by a professional structural engineer or architect before starting!
How to use Acrow Props With Stongboy Attachments or Needles
If you have read through all of the above information you should now have a pretty good idea of whats involved and how you should correctly use an Acrow prop.
You should also have a set of calculations produced (by a professional or by yourself and professionally checked) and know exactly what vertical, horizontal and lateral loads and forces are being implied on the area you are wanting to work on.
For the purposes of this project we are going to assume that a structural engineer has carried out your calculations and told you exactly how many props you need, how they should be spaced and also confirmed that the surface you’re propping off of can take the load.
Note: If your propping surface is not suitable, the engineer or architect should be able to tell you how it can be reinnforced or improved so that it is.
We are also going to assume that you are cutting a new doorway opening in to a cavity wall, where bricks or blocks are no more than 112mm thick and the cavity is 50mm in width and that you are inserting a reinforced concrete lintel for your new support.
Mark out the Area to be Removed
The first task before positioning your props and any structural supports is to mark out the exact area that you will be removing for your new opening. This is so that you know exactly where your props are going to be positioned and at what height.
Using a suitable marker pen or chalk and a tape measure, measure the width of the opening and it’s height and draw the outline on the face of the bricks or blocks.
To give yourself a bit of space to work and allow for any additional depth on the lintel, mark the mortar line two courses of bricks up or one course if your working with blocks. This is where your Strongboys or needles are going to be inserted.
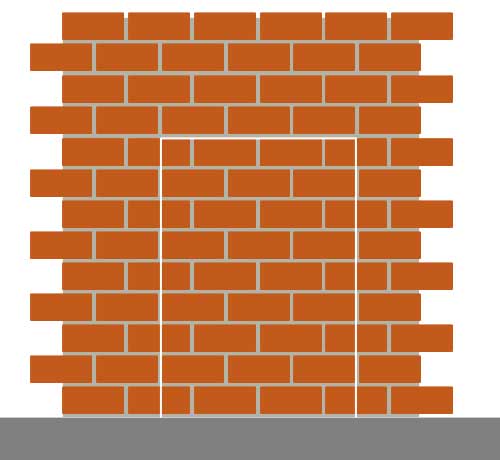
Mark out the area of the wall that will be removed
Remove Mortar or Bricks for Strongboys or Needles
Depending on what support method your using e.g. Strongboys or needles will now dictate the holes you need make:
Stongboys
With your mortar line identified, measure and mark the points that each Strongboy is going to inserted at, taking note of the spacing that you previously calculated or were provided by your engineer/architect. Mark each of these points along your mortar line.
measure the width of the Strongboy blade and then halve it. Now measure and mark this measurement either side of each mark on your mortar joint so that you have a line the total width of your blade with the propping point dead in the centre.
Using a masonry drill bit and drill or an angle grinder with diamond tipped blade, drill or cut out the mortar from the joint, making sure you remove all of it.
If any is left, especially on the underside of the bricks or blocks that the Strongboy will be taking the weight on, then this could compromise its ability to hold weight correctly and cause it to fail.
In most cases, the depth of the mortar line will be thick enough to get the blade in, but if not then you will need to remove the brick above.
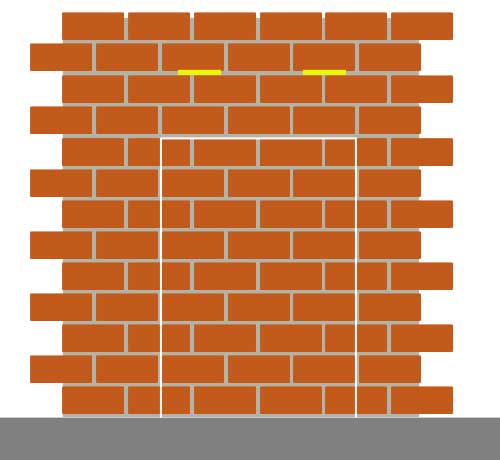
Mortar to be removed so that Strongboy blades can be inserted
Needles
When it comes to needles, this is a similar process, but instead of removing just the mortar, we will be removing the entire brick or block or even several, to provide enough space to insert the needle.
In terms of the size of needle to use, again, the engineer or architect should specify this but as a very general rule, for small domestic work, 4 x 4″, 6 x 2″ or 6 x 4″ timbers should suffice.
As above, measure and mark the exact positions where each of your needles need to go, in line with the spacing calculations you or your engineer arrived at.
To remove the bricks, use an angle grinder and diamond disc or masonry drill bit and drill.
Drill or cut away all of the mortar around each brick, one at a time and use a club hammer and bolster to knock the brick out. Do this carefully as you don’t want to dmaage it.
Again, remove all of the mortar from each face of the remaining bricks.
Unlike the Strongboy method above, we are now going to have to repeat the above steps on the inner skin so that we can pass the needle through the wall.
Once you have made your holes and can easily pass the needle through, work through the below steps to get this area supported before you move on and create any futher holes.
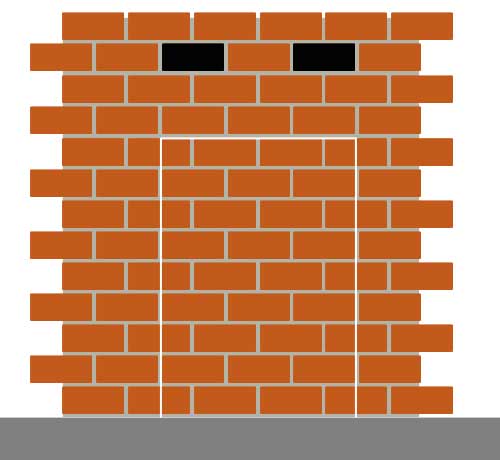
Bricks removed from wall so that timber needles can be inserted
Adjust Acrow Props for the Correct Height
As mentioned above, as you know a rough measurement on the position you need to prop, make sure you select the correct size Acrow using the size chart above.
It’s now time to prep your Acrow props so they can be positioned.
Move your prop so that it is next to the area to be supported so that you can judge how far to pull up the inner tube and where you need to insert the pin.
With the prop placed, pull the inner tube up until it is the rough height needed and push the pin all the way through so that it comes out the other side.
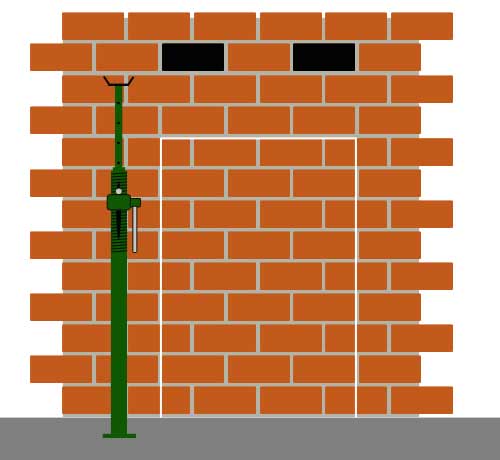
Acrow prop positioned and inner tube extended to the rough correct height
Position Acrow Props and Needles or Strongboys
If you’re using Strongboys it’s now time to fix it to the top of your prop.
Take your Strongboy and position it over the plate on top of the prop, lowering the blades leading edge until the web bracket is touching the inner tube of the prop.
To check that it is in place correctly, pull down on the end of the blade, there should be no movement at all. If there is take it off and start again, it needs to be absolutely solid!
Now, move the prop in to place, pushing the blade into the mortar slot you created, right up until the handle body is touching the face of the wall. This will provide the maximum vertical support.
Also, make sure that the prop is absolutely vertical. Use a spirit level to check this.
If using needles, push the needle through the wall, ensuring that an equal amount of timber is on either side of each wall skin.
At this point, you may need a second pair of hands. Set the rough height of each prop and move each into position just in from each end of the timber.
Wind up the screw collar of each prop to raise the inner tube up to the point that it is just holding the needle in place.
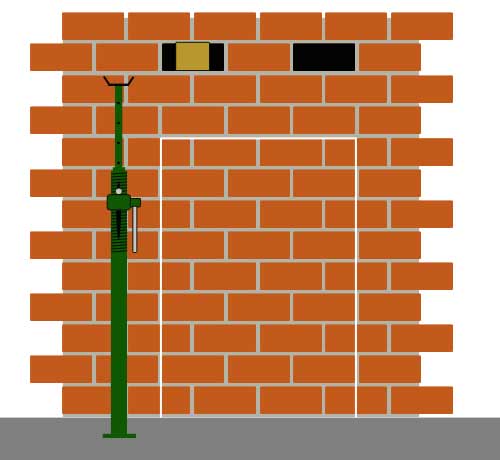
Timber needle positioned and pushed through wall
Adjust Acrow Props to Take the Weight
With your Acrow or Acrows in place, tighten the screw collar(s) to the point that they are hand tight.
If using Strongboys, check that the blade is tight and fully engaged with the underside of the brick/blockwork it’s supporting and again, that the prop is in a dead vertical position.
If using needles, before you fully tighten each collar, again, make sure each prop is totally vertical and that the needle itself is flat and level.
Once both are, tighten the collar to a decent hand tightness and then check that the needle itself is fully engaged with the underside of any brick or block faces.
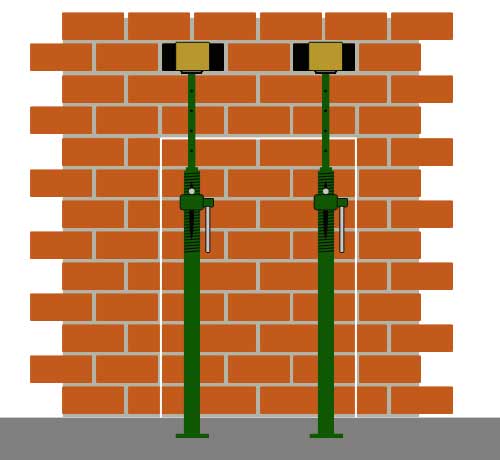
Acrow props in place under timber needles and adjusted to support load
Brace if Needed
As we have stated above, if you are using a series of props then to ensure they are not subjected to any unnecessary lateral force, brace them together.
You can use specialist bracing produced specifically for this job or you can use scaffold poles and collars.
With your Acrow props in place and your wall now fully supported you can now safely go ahead and remove any bricks and blocks to form your opening.
Please also remember to wear any appropriate safety gear; old clothing, steel toecap/safety boots or shoes, gloves, protective eye-wear, ear defenders etc….

