Fixing plasterboard or drywall as it’s also known is a tricky job at the best of times, even for 2 people let alone if you are trying to do it on your own as full sized boards are heavy and awkward.
To aid with this certain tools have been developed over the years, including one of the most useful, the plasterboard lifter. In this guide we take a look at the plasterboard lifter and how it’s used.
What is a Plasterboard Lifter?
A plasterboard lifter is a specialised tool designed to assist in the safe and efficient installation of plasterboard, also known as drywall.
This device allows a single person to lift and position heavy sheets of plasterboard onto walls or ceilings without the need for extra hands.
It’s an essential tool for professional builders, DIY enthusiasts, and anyone involved in construction or renovation projects where plasterboard needs to be installed, especially overhead or in hard-to-reach areas.
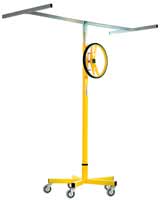
Plasterboard lifter
Traditionally when fixing plasterboard, at least 2 people were needed. Firstly you would both lift and position the board into position and then one would either install a prop (deadman) or hold it in place while there other screws it in place.
This can be very tricky to do, especially when working overhead. Trying to hold a board without it moving is not an easy task and in most cases it would move about requiring it to be repositioned, which is very annoying.
The plasterboard lifter does away with all these issues, firmly holding the board in place and preventing any movement where it can be easily fixed and all done by only one person!
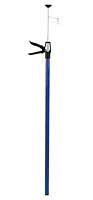
Hand operated plasterboard lifter
Devices with multiple moving parts such as these require regular maintenance, as outlined in the user manual, to ensure proper function.
Plasterboard lifters are typically made from lightweight materials and can be easily dismantled for convenient storage in a workshop or vehicle.
If purchasing a lifter isn’t necessary, they are available for hire from most tool rental shops.
Before lifting plasterboard, always check for hidden cables or pipes behind the installation area.
If it has them, ensure the lifter’s stabilisers are properly positioned and locked before you begin lifting.
How Does a Plasterboard Lifter Work?
The plasterboard lifter works by securely holding the plasterboard in place while raising it to the desired height using a crank, lever or hydraulic system.
The device typically features a sturdy frame with adjustable arms that grip the plasterboard, preventing it from slipping during installation.
Once the board is positioned, it can be easily secured to the wall or ceiling with screws or nails, without the user having to physically support its weight.
Most plasterboard lifters are equipped with wheels or casters, allowing the user to move and position the board with ease.
They are also adjustable to accommodate various sheet sizes and installation heights, making them versatile for different tasks.
How Much Weight can a Plasterboard Lifter Lift?
This is an important question and in brief, any plasterboard lifter should be capable of lifting at least the weight of a full sized 8×4 foot piece of plasterboard, so around the 25kg mark.
That being said, it really does depend on the quality of the lifter in question. If it is constructed of good quality materials such as metal then it should be able to lift a little more than this. Some good quality items can lift an 8×4 sheet of 15mm plyboard which can equate to over 30KG.
How to use a Plasterboard Lifter
Whether you’re a professional or tackling a DIY project, using a plasterboard lifter can make the job easier and faster. Here’s a step-by-step guide on how to use a plasterboard lifter.
Step 1 – Set Up the Lifter
If you haven’t as yet, the first task is to assemble your plasterboard lifter as it will be delivered flat pack.
Assemble the lifter in accordance to the manufacturers instructions.
Once all in one piece, ensure that the stabilising legs or wheels are locked in place to keep the lifter secure.
Position the lifter in the area where you will be working, ensuring there’s enough space to manoeuvre the plasterboard sheet.
Step 2 – Load the Plasterboard
Once the lifter is correctly set up and positioned in place, carefully load the plasterboard onto the lifter’s support arms. The board should rest evenly on the arms, with the surface you plan to attach facing outward. This is normally the grey face.
Ensure the plasterboard is well balanced and is evenly placed on both support arms, to avoid slipping during the lift.
Step 3 – Raise the Plasterboard
Once all in position and ready, it can the raised into place. Use the lifter’s manual crank, wheel, mechanical lever or what ever mechanism it features to slowly raise the plasterboard to the desired height.
For ceiling installations, make sure the board is lifted high enough to be flush with the ceiling surface.
If you’re installing on walls, raise it to the correct vertical position.
Most plasterboard lifters allow for easy adjustments, so you can fine-tune the height as needed.
Step 4 – Position and Secure the Board
Once the plasterboard is lifted into place, check that it is properly aligned with the area you are working on. Adjust the position if necessary by gently moving the lifter.
Once the board is perfectly positioned, you can start securing it to the wall or ceiling using screws (preferably) or nails.
The plasterboard lifter will hold the sheet steady, allowing you to fix it in place without needing an extra set of hands.
Step 5 – Lower and Repeat
After securing the plasterboard, lower the lifter and repeat the process for the next sheet.
For larger projects or ceiling installations, using a plasterboard lifter is definitely th way to go significantly reduces physical strain and speeds up the overall installation process