If you ever do any carpentry you will know that getting straight, clean and accurate cuts is essential for the success of any job and using teh right tools to do so is teh first step.
One of the most important tools in any carpenters arsenal is the table saw, allowing you to make perfect straight cuts in most types of timber, regardless of size. In this guide we take a look at this great piece of kit and how it’s used.
Parts of a Table Saw
Here’s a labeled image detailing the key parts and features of a table saw. While there may be slight variations by model and manufacturer, most table saws include these essential components.
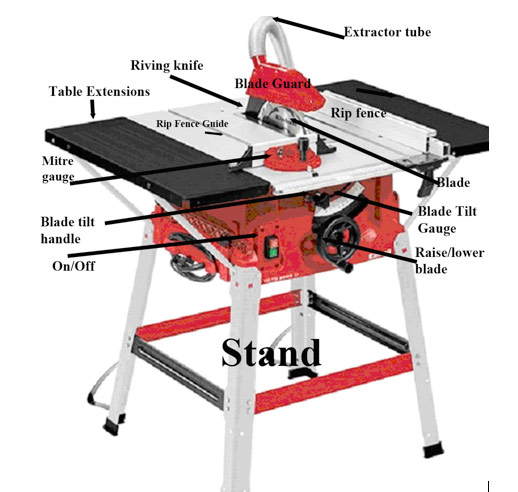
How the parts of a table saw work together
Why Buy a Table Saw?
Here are some compelling reasons why you should invest in a table saw and how this fantastic tool can really make a difference to your woodworking projects, especially for jobs using large pieces of timber:
- A 6-inch (150mm) x 1-inch (25mm) timber board is cheaper than two 3-inch x 1-inch boards.
- An 8ft x 4ft sheet of plywood is more cost-effective than smaller pre-cut sections.
- Making multiple identical cuts by hand can be tedious and inaccurate.
- Ripping wood with a hand saw is labour-intensive and hard to keep straight.
- Table saws provide stability when cutting larger pieces.
- The stationary blade ensures more precise cuts.
- Table saw blades are easily adjustable for various depths and angles, allowing for notching, rebates, and chamfers.
- Using dust extractors or vacuum hoses keeps your workspace cleaner.
What to Look for When Buying a Table Saw
Selecting the right table saw for your needs and budget is crucial for achieving your woodworking goals. Here are the main types of table saws and their intended uses:
The Cabinet Saw
Table saws come in three main types, and the cabinet saw is the most robust option. These heavy-duty saws are designed for workshop use and are not meant to be moved. Serious woodworkers prefer cabinet saws because they provide exceptional accuracy when set up correctly.
Cabinet saws feature a large table, allowing for stable positioning of larger workpieces. As a fixed apparatus, they often include advanced safety features that portable saws may lack. For example, the wider blade guard accommodates a more efficient dust extraction system.
Additionally, larger stop and power buttons enable easy operation with a knee, and some models incorporate a blade brake for cutting wet timber.
With a sturdy cast iron table, cabinet saws are ideal for dedicated woodworkers with enough space for permanent installation.
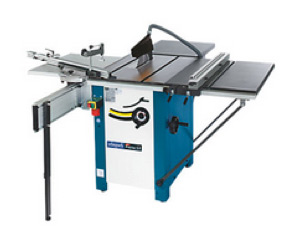
Cabinet table saw with cast iron table
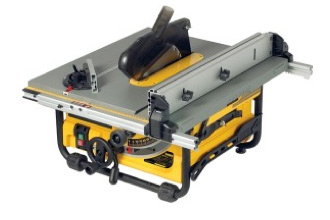
The Contractor’s Saw
The Contractor’s saw is a portable alternative to the cabinet saw, featuring adjustable legs that can be levelled on-site for a stable and safe working surface.
Designed for outdoor use, contractor table saws maintain essential safety features, such as dust extraction tubes, ensuring safe operation in any environment.
Additionally, the stand can be removed, allowing the contractor’s saw to function as a bench-top saw for added versatility.

Contractors table saws are portable with stands or legs
The Benchtop Saw
The benchtop saw is the smallest of the three options, but it’s not always the least expensive. These versatile saws can also function as site saws.
They deliver significant power, typically ranging from 600W to 2000W, enabling quick and deep cuts. However, caution is essential, as they can be just as dangerous as larger saws. Always ensure your saw is securely positioned before use.
When selecting a benchtop saw, aim for the best quality you can afford, keeping in mind how frequently you plan to use it. More powerful saws may cut faster but can also increase the risk of kickback.
Using a bench top table saw
What to Check Before Using a Table Saw
To ensure that your cuts are accurate and you are totally safe when making them, there are some important safety checks that you must make to your saw before starting, here are the most important.
Checking for Sideways Movement in Table Saw Blades
To ensure your table saw blade is secure, first turn off the power. Hold the blade at the top and gently move it side to side. There should be no noticeable sideways movement apart from the blade’s natural flex. If you detect movement, inspect the retaining nut or clamp that secures the blade to the motor and tighten it as needed.
Table Saw Rip Fence
Ensure the rip fence and mitre guide are securely locked in place to guarantee straight cuts. The rip fence must always stay parallel to the blade. When adjusting the rip fence or mitre block for different cuts, they should slide smoothly in their guide slots and lock firmly into position.
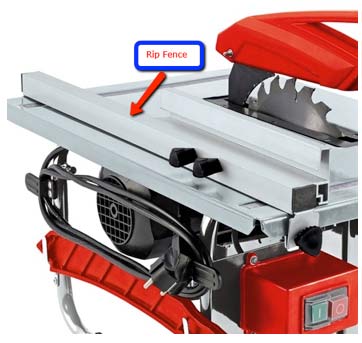
Rip fences on tables saws should remain parallel to the blade
Table Saw Mitre Gauge
The mitre gauge should allow for smooth angle adjustments without sticking. Once the desired angle is set, it should lock securely in place.
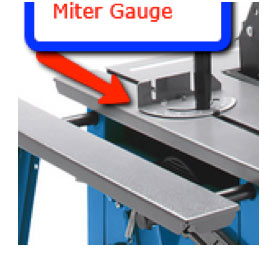
Table saw mitre gauge should lock easily into position
Table Saw Dust Extractor Pipes
The dust extractor pipe should be positioned close to the blade and centered in the blade guard. Ideally, it connects to an extractor fan that directs sawdust outside the workshop or into a large storage bag.
In many cases, the pipe will attach to a vacuum or have a rubble bag secured at its end.
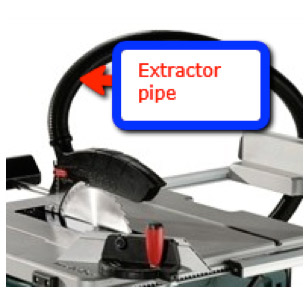
Keep extractor pipe connected to dispose of sawdust
Choosing the Right Blade for Your Table Saw
Selecting the right blade for your table saw is crucial. Using the wrong blade can lead to uneven joints and rough edges that require extra sanding.
In general, blades with more teeth provide smoother cuts. Fewer teeth can cause “ tear out”, especially during cross cuts, where the wood is torn rather than cut.
The best option for beginners is a combination blade, typically featuring 40 to 50 teeth and an alternate top bevel. This blade is versatile for both ripping and cross-cutting timber.
While it won’t produce “finished” cuts, which may require sanding, you can alternatively switch between an 80-tooth cross-cut blade and a 30-tooth ripping blade for different tasks.

For an all round blade use a 40 – 50 tooth combination blade with alternate bevels to the teeth
Types of Teeth for Table Saw or Power Saw Blades
Table saw blades feature various tooth types, each producing a unique cut. For a deeper understanding of power saw blades, check out our informative webinar here.
The image below illustrates the most common types of power saw blade teeth along with their abbreviations. Ensure your blade is perfectly flat to prevent kick-back, which is discussed further below.
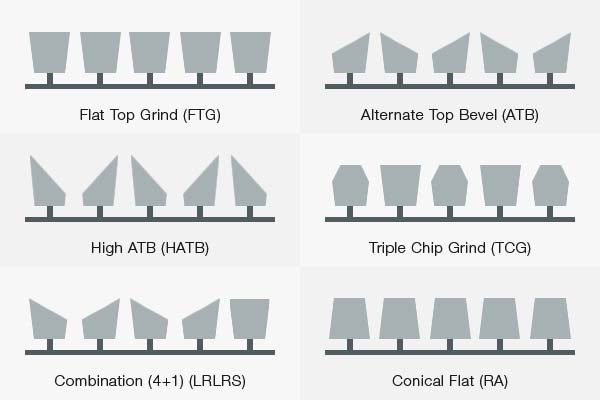
The various teeth used on circular saw and table saw blades
What is Kickback in a Power Saw or Table Saw?
Kickback occurs when the material being cut binds to the blade, which is spinning at speeds over 140 mph. This creates a dangerous situation, as the blade essentially acts as a catapult, launching the material back toward you or across the workshop.
A solid piece of wood flying through the air can cause serious injury to you or damage to nearby objects.
Most saw blades are designed to prevent kickback. The teeth of the blade are wider than the blade plate, which ensures that as you cut, the kerf (the width of the cut) does not bind on the material. If the teeth were the same width as the blade plate, they would inevitably get stuck deeper in the cut.
Binding can also happen due to various factors, such as:
- Wet wood closing around the blade as it cuts
- Sappy timber binding to the blade
- Improper alignment with the rip fence
- Warped or tight-grain wood
- Misalignment of the riving knife, causing the wood to close on the blade
Additionally, kickback can occur if the cutting guide or fence is not parallel to the blade. If the fence is angled toward the blade, it can push the material into the side of the blade, creating binding and friction that can damage the material.
While most saws and blades are marketed as correctly set up to prevent kickback, this is often not the case. Always ensure your saw is properly set up before use to minimise the risk of kickback.
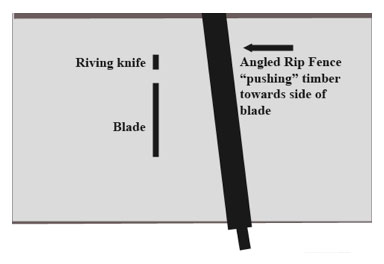
Table saw kick back caused by angled rip fence
The Riving Knife
A riving knife is a crucial safety feature on your table saw, positioned just behind the blade and moving up and down with it as you adjust the cut depth.
Its main function is to prevent the two halves of the wood from closing together during the cut, which reduces the risk of kickback and makes cutting easier. This helps you achieve a cleaner cut with less resistance.
Most reputable saw manufacturers include a riving knife with their products, but some budget brands may not. If your saw doesn’t come with one, you can often purchase a universal riving knife. Just ensure it fits properly and doesn’t interfere with the saw’s operation.
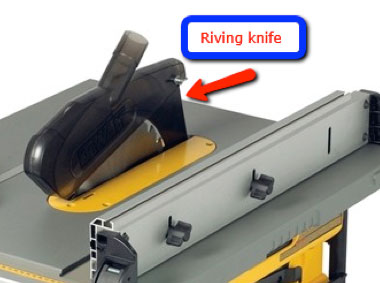
Riving knife situated behind blade of table saw
Extensions for Table Saw Platform or Work Table
Extension tables greatly enhance your table saw’s functionality, allowing you to cut larger pieces of material with ease.
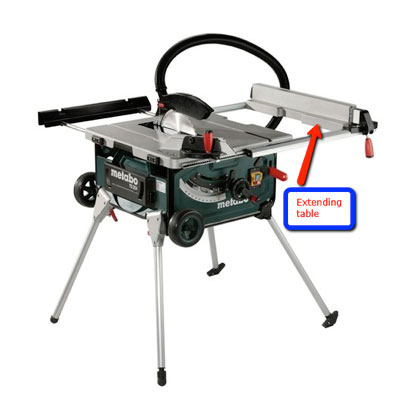
Cutting larger timbers with table saw extension tables
Without proper support when cutting large sheets, like plywood, the material can twist or bow, increasing the risk of kickback and potentially causing splits in thinner materials.
If your table isn’t large enough for the workpiece, consider building a support platform next to the saw.
Roller support stands can also be aligned with your table saw to help stabilise workpieces as they pass through. These stands are portable, making them easy to position as needed.
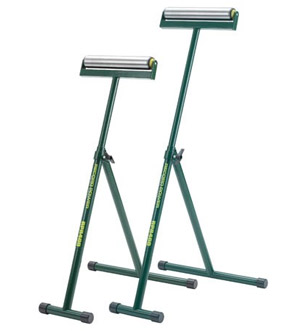
Support work pieces on a table saw with roller support stands
How to Use a Table Saw
As useful as they are, table saws are also very dangerous and should always be treated with the respect that they deserve.
Before starting it is always a good idea to have a practice run of your cut and make sure that any supports are in the correct place and that the edge you are working from e.g. the edge that will be running against the face of the fence guide is square, if not then you may be opening yourself up to kickback or the cut you are actually making may not end up square.
Additionally, don’t be fooled in to thinking that any factory cut edges are square, in most cases, they probably won’t be so don’t use them as the basis for making your final cuts.
Step 1 – Prepare Work Space and Setup Saw
The first job to do is prepare your work area. Ensure that it is clean and clear of any unnecessary objects that may hinder your work or create a dangerous working environment.
Ensure that your saw is on a flat, solid and stable surface and that it does not move or wobble in any way.
Check the condition of teh saw blade and ensure that it’s free from damage and that it is sharp and correctly aligned with teh cutting fence and also make sure teh riving knife is properly positioned to prevent any binding of teh blade.
Step 2 – Set Blade Height
Next, if your machine features a blade height adjustment, set it to the correct height by measuring the thickness of the item you’re cutting and then turning teh wheel to raise the blade so that it is a few millimeters higher than this measurement above the cutting table.
If you are making a mitre cut, now set teh blade to teh correct angle by loosening teh lock and tilting the blade until it reaches the desired angle and then lock it off.
Step 3 – Set Fence Position
After setting the blade correctly, next set the fence to the correct distance from the blade.
After measuring and marking your cut on the material, move the fence so that it is the same measurement from the cut side of the cutting blade and then lock it off and then measure each side to make sure that it is totally parallel to the blade.
If you’re making cross cuts, adjust the mitre gauge to the desired angle. Ensure it slides smoothly in its slot and locks firmly.
Step 4 – Have a Practice
As we have suggested above, before making your actual cut, have a practice with an old, scrap piece of timber so that you know the feel of the saw and timber as it cuts and also that everything is positioned in the right place.
Step 5 – Make the Cut
Once everything is set up, start the saw and gently push your material through the blade. Take your time and whatever you do, do not force it, as this can damage the material and strain the saw’s motor.
Keep an eye on your cut line and ensure the timber is flush against the fence guide.
Always keep your fingers away from the blade! For small pieces or cuts near the blade, use a push shoe or push stick to guide the material safely. This will help you avoid any contact with the blade.
A table saw push stick or push shoe used to guide the cutting material through the final stages of the cut – Image courtesy of familyhandyman.com
Step 6 – Finish up and Clean up
When you’re finished, turn off the saw immediately and wait for the blade to stop completely before removing any cut pieces. Nudging small timber against the blade can cause it to catch and fly through the air!
Finally, clean up any sawdust and other debris from the work area and then pack away any tools
Using a table saw is a great way to cut timber of all different sizes and get a clean and accurate cut, however they are dangerous pieces of kit and should hever be taken for granted, so ensure that you know how to use such a implement safely and correctly before doing so.