If you’ve got some wood to chop, but your chainsaw hasn’t been used in a while and needs a new chain, it’s important to find the right chain size and specifications, but it can be a hassle if you’re not sure what you’re looking for.
This guide will walk you through everything you need to know about replacing a chainsaw chain, from measuring to determining the gauge and pitch required for your new chain.
If you’re unsure about using a chainsaw safely, check out our guide on how to handle a chainsaw safely.
When to Replace Your Chainsaw Chain
Knowing when to replace your chainsaw chain is essential for safe and effective cutting. A smoothly running chain ensures efficient performance and reduces the risk of accidents. Here are the signs that it’s time to consider a replacement:
- Broken Cutting Teeth: If your chain encounters hard objects like rocks and loses cutting teeth, it won’t be able to cut effectively. Multiple missing teeth indicate the need for a new chain to maintain performance.
- Filed Down or Reduced Teeth: As you sharpen the cutting teeth over time, they naturally become smaller. However, when they become too small, they’re more susceptible to damage and may break during use. If sharpening becomes difficult due to tiny teeth, it’s time for a new chain.
- Decreased Cutter Size: The cutters on the chain should wear down evenly with the cutting teeth. If you notice uneven wear or faster deterioration, it’s a sign that the chain needs replacement. Uneven wear can affect the chain’s pulling force and compromise cutting performance.
- Sagging or Loose Chain: While it’s normal to adjust the chain’s tension, there comes a point where further tightening isn’t possible. If your chain remains loose and doesn’t stay taut against the bar, it poses a safety hazard and should be replaced promptly to prevent accidents.
Now that you recognise the signs indicating a chain replacement is necessary, let’s explore how to go about it.
Important Safety Measures for Handling Chainsaw Chains
Even if you’ve never handled a chainsaw before, you likely understand that they can be extremely dangerous tools. Mishandling them can lead to serious injuries or worse.
To ensure your safety while measuring, removing, or replacing a chainsaw chain, follow these important guidelines:
- Wear sturdy gloves made of materials like leather to protect your hands from any sharp edges, even on relatively dull chains.
- Always engage the chain brake, regardless of the type of saw you’re working on.
- For cordless saws, remove the battery to prevent accidental activation.
- For corded saws, unplug them from the power source to eliminate the risk of electric shock or the saw starting.
- For petrol-powered saws, ensure the engine is turned off and the power switch or combi lever is set to 0 or off.
- Work on a stable, well-lit surface to prevent accidents.
By adhering to these safety measures, you can significantly reduce the risk of accidents or injuries when handling chainsaw chains.
Removing the Chain From Your Chainsaw: A Step-by-Step Guide
If you’re new to using a chainsaw, taking off the chain might seem daunting. But fear not! These straightforward instructions will walk you through the process safely and efficiently.
Let’s get started:
- Pull Back the Chain Brake: Start by pulling the chain brake back towards you. This step is crucial for safety and ensures smooth disassembly. Forgetting this step can make reassembly challenging. Pulling back the chain brake also releases the chain.
- Undo the Bolts: Use a suitable tool to undo the two bolts securing the side casing, also known as the clutch cover. Carefully remove the bolts and set them aside in a safe place to avoid misplacement. Wiggle the casing if necessary to detach it completely, revealing the bar and chain.
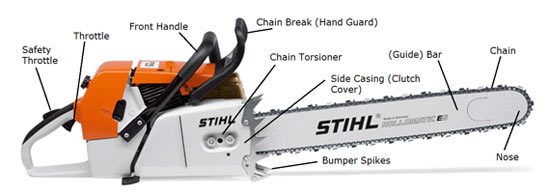
The Parts of a Chainsaw – Particularly when Removing the Chain
- Detach the Chain: Gently pull the bar away from the chain tensioner, then lift the chain off. Be cautious as even a dull chain may have sharp edges that can cause injury. Consider wearing gloves for added protection.
- Remove From the Nose: Start by removing the chain from the nose of the chainsaw. Leave the clutch sprocket in place and proceed to take off the bar.
Following these steps ensures a safe and hassle-free removal of the chain from your chainsaw.
Step-by-Step Guide: How to Remove a Chainsaw Chain
- Pull Back the Chain Brake: Start by pulling the chain brake back, which releases the chain.
- Undo Bolts and Remove Side Casing: Use a tool to undo the bolts, then carefully remove them along with the side casing.
- Pull the Bar Away: Gently pull the bar away from the chain tensioner.
- Lift Off the Chain: Lift the chain off, ensuring it’s clear of the nose of the chainsaw bar.
- Remove the Clutch Sprocket: Take off the clutch sprocket, then flip the bar over and reattach it.
Pro Tip: Chainsaw bars wear on the side of contact and are symmetrical. When replacing the chain, flipping the bar over helps even out the wear, prolonging its lifespan.
Now that you’ve removed the chain, it’s time to determine its size and specifications for replacement.
Understanding Chainsaw Chain Specifications: Why They Matter
When it comes to chainsaw chains, understanding their specifications is crucial. These specifications are typically provided in three numbers:
- The Pitch: This refers to the distance between three consecutive rivets divided by two. It’s a key factor in determining how tightly the chain fits around the guide bar.
- The Gauge: This indicates the thickness of the drive link portion of the chain, which corresponds to the width of the groove in the guide bar. It’s essential for proper chain fit and performance.
- The Number of Drive Links: This denotes the total number of drive links in the chain, which must match the specifications of your chainsaw bar length for proper operation.
These three numbers are crucial when purchasing a new chainsaw chain. While additional information like chain length may be provided, focusing on these three specifications is essential.
Choosing the wrong pitch or gauge can result in a chain that doesn’t fit your chainsaw properly. These specifications are unique to your chainsaw model. Additionally, ensuring the correct number of drive links is crucial for compatibility with your chainsaw’s bar length.
Simply extract these measurements from the chain you’ve removed, and purchase a replacement with the same specifications. However, this process may pose challenges, so attention to detail is key. Section of chainsaw chain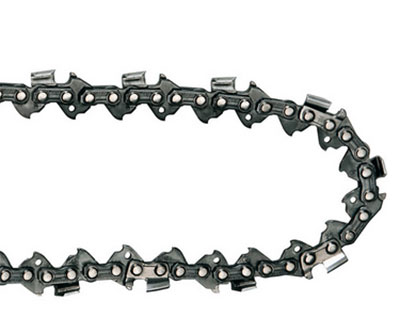
How to Determine Your Chainsaw Chain Specifications: Pitch, Gauge, and Number of Drive Links
If you’ve lost the original packaging or manufacturer’s information for your chainsaw chain, you may be uncertain about its size. It’s crucial to know the chain specifications to ensure you purchase the correct replacement.
Here are three methods to determine the specifications of your chain:
- Original Documentation: If you still have the original specifications that came with the chain, you’re in luck. However, these are often misplaced or lost over time.
- Manual Measurement: You can manually measure the chain to determine its specifications. This involves measuring the pitch, gauge, and number of drive links accurately.
- Utilising a Chainsaw Adviser: Alternatively, you can use a tool known as a “chainsaw advisor”. This handy tool will help you calculate all of your required measurements to a high degree of accuracy.
Locate Specs on Chain or Packaging
Before delving into the process of measuring your chain, it’s wise to check for existing specifications. Look on your chainsaw bar or locate the packaging from your previous chain purchase. Additionally, consult the chainsaw manual for relevant information.
If these avenues don’t yield results, try searching online for your chainsaw model. Should you still struggle to find the correct specifications, don’t fret—this article is here to assist you.
Remember, taking note of the specifications when you acquire a new chainsaw or chain can save you time and effort in the future.
Manual Method for Measuring Chain Specifications
If you’re unable to locate or retrieve the correct specifications for your chainsaw chain, measuring becomes essential. You’ll need to obtain three crucial numbers: the pitch, gauge, and number of drive links.
Drive Links
To determine the number of drive links, count the teeth (inside hooks) on the chain. Lay the chain out flat, aligning the loops facing each other to facilitate counting in pairs. Refer to the diagram below for the shape of the drive links. Drive links on a chainsaw chain
Pitch
Measuring the pitch is the trickiest of the 3 measurements. It involves determining the distance between three rivets on the chain and dividing it by 2. Using callipers instead of a ruler may make this process easier. Refer to the diagram below for locating the rivets and the table for converting the distance into pitch. How to measure the chainsaw chain pitch: the distance between 3 rivets on a chainsaw chain to count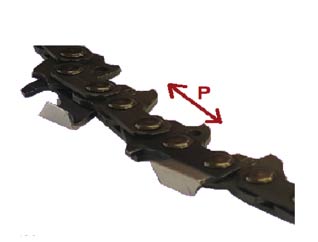
Chain Pitch Conversion Table – Distance between 3 Rivets to Chainsaw Chain Pitch:
| Distance between 3 Rivets | Pitch |
| 0.375” | 1/4” |
| 0.1875” | 3/8” |
| 0.1625” | .325” |
| 0.202” | .404” |
Gauge
To measure the gauge, use callipers to determine the thickness of the drive links, which are the teeth on the inside of the chainsaw chain loop. Place the callipers around the tooth and measure its thickness, which can be in either millimetres or inches. Most chain sellers provide measurements in both units. Refer to the conversion table below for standard chain gauge measurements.
Standard Chain Gauge Measurements Conversion Table:
| Metric | Imperial |
| 1.1 mm | 0.43” |
| 1.3 mm | 0.50” |
| 1.5 mm | 0.58” |
| 1.6 mm | 0.63” |
Using a Chainsaw Adviser
Measuring and finding the specifications of your chainsaw chain can sometimes be a challenge. Fortunately, there’s a nifty tool called the Chainsaw Advisor to assist you.
Rotatech, a UK manufacturer of chainsaw chains, has developed this tool to simplify the chain measuring process. It’s not only more affordable than buying a calliper but also easier to use.
The tool, known as the Chainsaw Adviser, does all the calculations for you. Priced at just £2.99 (Excluding VAT) from Northern Arb Supplies, it’s a worthwhile investment. Plus, you’ll receive a voucher to save £3 on your next chain order, making it essentially free.
Here’s how to use the Chainsaw Adviser to measure your chain:
Counting Drive Links
To determine the number of Drive Links, simply count them as before. Drive Links are the same hooked links you assessed for thickness when measuring the gauge. You can streamline the process by arranging the chain so that the teeth are facing each other, allowing you to count them in pairs. Count the drive links of the chainsaw chain using the normal method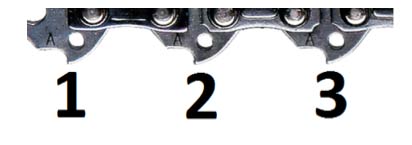
Measuring the Pitch
To determine the chain pitch, align the edge of the Chainsaw Adviser with the Drive Links of the chain, where the teeth point inward toward the chain loop. The distance between each link represents the Pitch.
Align the front edge of the Adviser with the first tooth (as shown in the image below), and then note the measurement where the second tooth aligns. This measurement indicates your pitch. The Adviser typically features four measurements. You may need to refer to either the top or bottom scale of the Adviser, depending on which is closest to your measurement.
The imperial measurement system is commonly used with the Chainsaw Adviser. For metric measurements, refer to the conversion table provided earlier for assistance. How to measure the Chainsaw Chain Pitch using the Adviser – Align it with the drive links to measure the Pitch from the scale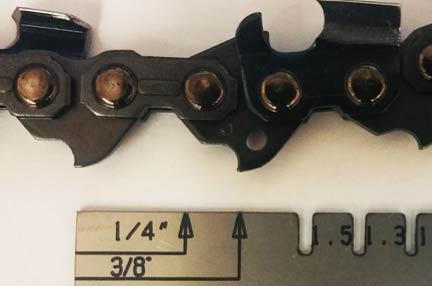
Measuring the Gauge
To determine the gauge, insert a Drive Link of the chain (teeth pointing inward toward the chain loop) into the slots on the Chainsaw Adviser. Test each of the five slots on the adviser until you find one that fits snugly. This slot corresponds to your gauge. The image below illustrates the use of the chainsaw adviser to measure the gauge. How to utilize the Chainsaw Chain Adviser to measure the gauge of a chainsaw chain. Refer to the video at the end of this page for a demonstration of how to use the adviser.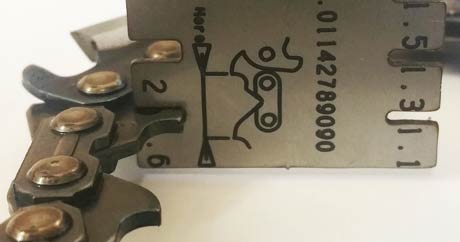
When it’s time to change or replace the chain on your chainsaw, one of the trickiest tasks is figuring out the specifications and measurements for the new blade. It’s a good idea to keep these details safe once you know them, but they can easily get lost. That’s where the Chainsaw Adviser comes in handy, offering quick and accurate assistance in finding the right replacement chain.
With the convenient Chainsaw Advisor tool, you can confidently remove and replace your chainsaw chain, ensuring a smooth and safe process with the correct new chain in hand.
Choosing the Right Chainsaw Chain for Your Task
Deciding on the appropriate chainsaw chain depends on the job at hand. For most DIY or occasional tasks, a standard chain, also known as a full house saw chain, suffices. It delivers smooth cuts and is compatible with bars up to approximately 24 inches long. Moreover, it’s readily available and cost-effective compared to more specialised options.
Below are several types of chainsaw chains you might consider:
- Ripping Chains: These chains are ideal for making planks, featuring cutters angled at about 10 degrees to ensure smooth plank cuts.
- Low Profile Cutters: Equipped with a round edge and grind profile, these chains are popular and often come standard with chainsaws. They are the easiest to sharpen.
- Semi Chisel Cutters: Similar to low profile cutters, these chains boast a round radius edge and tend to retain sharpness longer than other types.
- Full Chisel Cutters: Designed for hardwood trees, these chains cut swiftly but require more frequent sharpening. While they’re not too difficult to file, proper technique is crucial.
- Full Skip Saw Chain: Known for its efficiency, this chain type has fewer teeth and is best suited for bars 24 inches or larger. It excels at cutting tinder, albeit resulting in somewhat rough cuts.
- Square Round Saw Chain: These chains deliver rapid cutting performance. They belong to the full chisel chain category, requiring a special fat-headed file and posing challenges in terms of sharpening.
Identifying a High-Quality Chainsaw Chain
When it comes to selecting a quality chainsaw chain, a few key indicators can help you make the right choice.
Blued Steel Cutters
Quality chains often feature blued steel cutters, which contribute to their durability and longevity. These cutters are recognisable by the blue tint on the metal they’re made from. A Standard Chainsaw Chain with Chrome Plated Cutters from Rotatch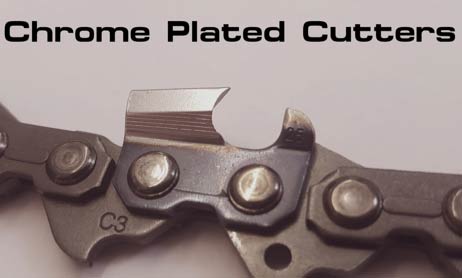
Check for Oil Holes
Oil holes are crucial for chain lubrication and preventing overheating. Opt for chains with large, clearly visible oil holes, ensuring efficient lubrication during operation. Large Oil Carry Holes in a Chainsaw Chain
Oil Reservoir
Look for a bump on the connective links, indicating an oil reservoir. Chains equipped with oil reservoirs hold extra oil, extending lubrication intervals and enhancing chain performance. Chainsaw Chain Oil Reservoir Links
Select a Reputable Brand
When in doubt, opt for chainsaw chains from reputable, well-established brands. Some of the top respected brands in the industry include Rotatech, Stihl, Oregon, and Husqvarna.
Once you’ve acquired your new chain, the next step is to fit it in place onto your chainsaw.
Tools and Products Needed for Replacing a Chainsaw Chain
In order to remove and refit a new chainsaw chain you will need the following tools and products:
- Tape measure
- Chosen chainsaw chain (correct size/type for your chainsaw and work being undertaken)
- Chainsaw Advisor (if using this measuring method)
- Callipers (if using this measuring method)
- Chainsaw user manual (if you still have it)
- Chainsaw chain packaging (original packaging with chain details, if you still have it)
- Sturdy gloves
- Stable/solid work surface
- Socket set
- Flat blade screwdriver
- Philips screwdriver
- Chainsaw safety clothing – Boots, chaps etc.
- Chainsaw chain oil
Installing a New Chain on Your Chainsaw
Now that you have your new chain, it’s crucial to fit it properly. The key step is to adjust the tensioner before placing the chain. Begin by screwing it in and then threading the drive links (the hooked teeth) of the chain onto the saw’s bar.
Start from the back sprocket, move over the top to the front nose of the bar, and then around. Afterward, apply tension to the chain and reattach the side cover, securing the bolts by hand.
Once the chain is correctly tensioned, you should be able to pull it slightly away from the bar, but not enough to remove it. Once satisfied with the tension, securely tighten the bolts using the appropriate tool.
Simple Steps to Install a Chainsaw Chain
- Adjust the tensioning screw by screwing it in slightly. This allows you to adjust the tension as needed if the chain stretches over time.
- Guide the chain around the back of the sprocket.
- Thread the drive links into the bar, starting from the top back of the bar, moving around to the nose of the bar, and then underneath.
- Apply tension to the chain by gently pulling on the bar nose to ensure it fits correctly at the adjusting pin.
- Replace the side cover.
- Using your fingers, tighten the nuts until they are firm, but not overly tight.
- Adjust the chain tension using the saw’s adjusting screw.
- Test the tension by attempting to pull the chainsaw chain slightly away from the bar. It should have some give but should not be removable.
Note: If the chain appears to be hanging from the saw, it needs to be tightened before use!
Understanding Chain Tensioners and How to Adjust Them
The chain tensioner in a chainsaw is crucial because it maintains the right level of tension on the chain. This ensures proper cutting performance and reduces the risk of the chain slipping off the drive gears during operation, which could be lethal!
There are typically two types of chain tensioners:
- Side-mount tensioner
- Front chain tensioner
The method for adjusting the tensioner depends on which type your chainsaw has:
Adjusting a Side Chain Tensioner:
- Remove the sprocket cover on the side of the saw.
- Release the chain brake by pulling it back until you hear a click.
- Turn the tensioner anti-clockwise until it moves fully to the left, located between the studs holding the chain bar.
- Reattach the chain bar and chain, ensuring correct positioning.
- Replace the side cover over the bar and hand-tighten the nuts.
- Tension the chain by lifting the saw slightly to allow chain sag, then turn the tensioner clockwise until there’s a 1-2mm gap between the chain and bar.
- Finally, fully tighten the bar and side cover nuts using a socket.
Adjusting a Front Chain Tensioner:
- Remove the sprocket cover on the saw body if it’s not already removed.
- Disengage the chain brake by pulling it back until it clicks.
- Turn the tensioning screw all the way in.
- Install the new chain correctly and ensure proper alignment.
- Reinstall the chainsaw bar, ensuring the chain sits correctly over the sprocket.
- Replace the cover and hand-tighten the nuts.
- Tension the chain by lifting the saw to allow for sag, then adjust the tensioning screw until the chain is pulled about 1-2mm away from the bar.
- Finally, fully tighten both cover bolts to secure the bar in place.
Essential Chainsaw Maintenance for Optimal Performance
After successfully replacing and tensioning your chainsaw chain, it’s crucial to ensure proper maintenance for both the saw and the chain to prolong their lifespan and ensure safe operation.
Here’s a checklist of essential maintenance tasks to follow every time you use or work on your chainsaw:
- Check and refill the chain oil reservoir after chain replacement or each time you refuel.
- Wipe up any oil spills as soon as they occur.
- Use the correct fuel mixture specified by the manufacturer; a 2-stroke fuel mixing bottle with marked fill levels simplifies this task.
- Wipe away any fuel spillages during refuelling.
- Always wear appropriate safety gear, including gloves, eye/face protection, safety boots, and trousers.
- Regularly check and tighten any bolts or screws.
- Periodically check and adjust the chain tension if necessary.
- Thoroughly clean your saw after each use to remove debris and prevent buildup.
- Store the chainsaw on a flat, even, and sturdy surface to prevent damage.
Following these maintenance steps will ensure your chainsaw operates safely and efficiently throughout its lifespan.
To ensure that your chainsaw operates correctly and safely, it’s absolutely essential to ensure the chain is both sharp and suitable for your specific saw. Refer to our guide above to make sure this is the case before you start cutting anything!