Drilling or cutting neat large diameter holes in timber, masonry, metal or plastic materials can be a tricky job. To complete this task properly a correct sized hole saw should be used.
In tis DIY guide we take a look at how to use a hole saw for a range of different jobs.
What is a Hole Saw ?
A hole saw is the name given to a large diameter, hollow drill bit and as the name implies, they are for drilling holes! Hole saws come in as many varieties as normal drill bits and, using the different types, can drill through everything from a bath or basin to insert new taps, to an external wall to insert a six inch soil and vent pipe.
Why use a Hole Saw when I Could use a Normal Drill Bit?
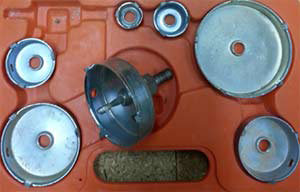
Hole saws, as you can see from the images on this page, are hollow. The circular bit has teeth much like a saw and the walls of the hole saw are relatively thin compared to the diameter of the drill bit. This allows the hole saw to cut much larger holes, with considerably less friction, than a solid drill bit. In turn this means the drill you are using needs a great deal less power to push through a greater surface area and puts a lot less strain on the motor.
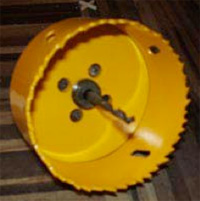
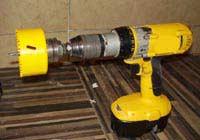
A hole saw assembled with arbour and centre guide pilot drill
As you can see from the image above, the pilot drill extends beyond the face of the hole saw by about 20mm to guide the holes saw into the correct position. You can see from the images below how a hole saw can be used for wood and masonry.
Are there any disadvantages on using a hole saw?
A hole saw placed on a surface would simply slide all over the place, wrecking the surface, if it was not directed exactly by a pilot bit in the centre of the hole saw. The "pilot bit" is a separate unit which fits into a threaded holder (called an arbour) which in turn fits into the hole saw by screwing the threaded end of the arbour into the threaded hole of the hole saw.
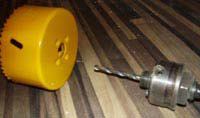
A pilot drill and arbour to fit an 80mm hole saw
The image above shows an 80mm holes saw, the arbour and the pilot bit. Without the arbour and pilot bit, as mentioned the hole saw would just skid across the surface. The pilot bit keeps the hole saw central and allows a neat cut to be made in exactly the right place.
One other handy tool to mention at this point is the countersink drill bit. This handy little device is used for creating an indent in a surface so that when a screw is inserted and screwed down, the head of the screw sinks below the surface that it has been screwed into so that it won’t catch any items on teh surface. You can find out more about countersink drill bits in our project here.
Moving back to the subject of hole saws, while the advantages of using a pilot hole and arbour are obvious, the disadvantage is that as well as storing the hole saw itself, you have to store the pilot bit and arbour also. Without a hole saw kit, where everything is packed away as one, this can mean "mislaying" the arbour and associated bit in your toolbag or elsewhere in the garage or workshop.
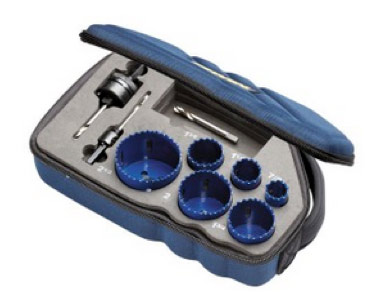
Metal, plastic and timber can be drilled with the Irwin hole saw kit
Another disadvantage of using a hole saw is that while the hollow nature of the hole saw makes drilling a large hole a great deal easier, the contents of the hole fill up the centre or core of the hole saw. This means the maximum depth of hole that can be cut, without “emptying” the hole saw, is the depth of the actual hole saw itself.
This is easily overcome however by just inserting a lever of some kind (usually a screwdriver!) into the slots on the side of the hole saw to push out the core or waste.
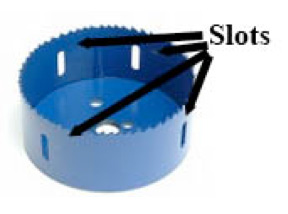
The slots in the side of the hole saw can be used to lever out waste from the hole you have just cut using a screwdriver
Are There Different Types of Hole Saw?
As with normal drill bits, they can come in a variety of different flavours for many different applications (e.g. different bits for drilling metal and wood), and this is no different for hole saws and these come in two main varieties:
- High speed for metal, wood and plastic (as seen in the images above)
- larger toothed (either tungsten or diamond tipped) for masonry and concrete
The masonry hole saw or core drills as they are also known can be bought with diamond tipped cutting edges which makes the job of cutting large holes in masonry or concrete very easy. The only draw back is that diamond tipped hole saws are very expensive to buy, but they can also be hired from local tool hire shop to save on the expense of buying one.
The teeth on a masonry hole saw are set wider apart than with hole saws for metal, wood and plastic. This stops the teeth getting clogged with masonry dust and binding in the cut. If this happend it would soon burn out the motor on the drill.
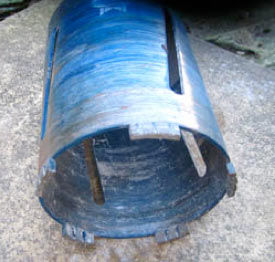
A masonry hole saw or core drill with diamond tipped teeth
The image below shows a masonry hole saw cutting through an internal wall. You can see how the waste core from the hole is sticking out of the front of the hole saw. This will be removed as explained above.
This particular masory hole saw is 200mm long which allows for a far deeper hole than the normal length hole saws. This makes it ideal for cutting holes through walls for waste pipes from 32mm diameter right up to 152mm diameter.
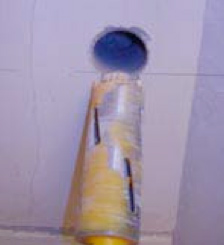
Cutting holes for a waste pipe through an internal masonry wall
It is also a good point to mention ceramic and tile hole saws. These differ slightly from the high speed metal and timber hole cutters and also the masonry hole cutters.
Traditionally, this type of holecutter looked similar to the masonry core bits, with protruding cutting teeth spaced out around the main body of the cutter. These would certainly do the job but getting a clean cut would sometimes take a bit of practice.
Traditional ceramic and porcelain hole saw
In recent years, the above type have been replaced with diamond tipped hole saws. This particular type are mainly geared towards cutting holes in porcelain tiles due to how hard these tiles are, but they can also be used on ceramic tiles. With the addition of the diamond coating, these hole saws make a nice clean cut through pretty much all tiles.
Again, they can take some practice to use as they do not feature the traditional pilot drill in the centre that helps to guide the hole saw to cut in the correct place.
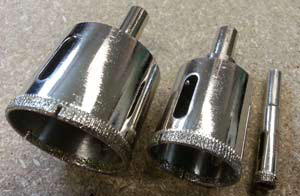
Diamond tipped ceramic and porcelain tile saw
What is the Best Way to Use a Hole Saw?
Where ever possible, when you feel the pilot drill bit push through the other side of the surface you are drilling and this applies just as much to drilling through masonry as any other type of construction, go to the other side of the surface and, putting the pilot drill into the hole you have created, drill back through for about 10mm.
Once you have done this, go back and finish the hole from the side you first started on. This will stop the surface splitting or splintering when the hole saw cuts right through. Tis will give you a nice clean job and not leave you trying to repair faces of walls that have been blown off when due to the hole saw bursting through.
Can I use a Hole Saw with a Battery or Cordless Drill?
Yes, but the drill should be fairly powerful with a 14 volt battery at least. You should not attempt to drill through masonry with a cordless drill and a masonry hole saw as, because of the friction, the hole saw may bind and burn out the drill quite quickly.
Using a cordless with a hole saw should only be done through thin metal (baths etc) plastic and timber and (in the case of timber) then only when the material is no more than about 50mm thick.
An 18 volt drill ready with hole saw to cut through a worktop
While the teeth create little friction against the surface they are cutting, the sides of the hole saw, if it is not held at exactly 90 degrees to the hole at all times, can rub against the sides of the hole and bind the drill, stalling it and putting a lot of strain on the motor.
The image below shows a cordless drill and hole saw cutting through a 38mm worktop in order to fit a pop-up electrical socket. An 80mm hole saw and arbour was used for this and the drill held at 90 degrees to the worktop at all times. This can be a bit tricky to do so take your time when drilling.
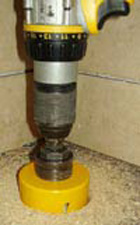
Drilling a hole through a worktop for concealed worktop socket
Drilling Tap Holes Through Acrylic or Metal Baths and Basins
One of the most popular questions to DIY Doctor is about drilling new tap holes through baths and basins. This is not a difficult procedure and is exactly the same as drilling through wood. A major concern is not to try and force the drill bit through the surface you are drilling, just apply gentle pressure and allow the hole saw to cut its way through.

Using a hole saw to cut tap holes in acrylic bath
The most important thing to remember when drilling holes through baths and basins for taps is to make absolutely sure your measurements are correct and you have accounted for the overlap of the base of the tap.
If the hole for your taps is too close to the edge of the bath then the body of the tap will overhang the bath. This will not only look terrible, but it means the water is likely to get into the hole as well. The washer that protects such an event must be fully squashed between the underside of the tap body and the top surface of the bath or basin.
Additionally, as well as taking your time when drilling holes in such materials it’s also a good idea to regularly splash or spray (using a rose sprayer) some water on the area you are drilling to keep it cool.
As with any DIY jobs, make sure you are protected! When drilling holes in masonry, tiles, timber or any other material always wear suitable eye protection, dust mask, gloves and old clothes. Fragments of tile or stone can easily be flung from high-speed drills in all directions.