When building any type of structure, be it an office block or a simple extension, adding a damp proof course is essential to prevent damp issues affecting the internal areas.
As well as at floor level, this is also the case around doors and windows and other openings, but in these situations a vertical DPC needs to be used.
With this in mind, in this project guide, we are going to look at vertical DPC’s and everything you need to know.
What is a Vertical DPC?
A vertical damp proof course (DPC) is a moisture barrier installed vertically to prevent dampness from moving laterally through walls or structures.
While traditional horizontal DPCs are designed to stop rising damp from the ground, vertical DPCs are used to block moisture that penetrates walls horizontally, particularly in areas where walls meet or are exposed to high moisture levels, such as basements, retaining walls, or extensions.
In terms of where they are most used, vertical damp proof courses are usually inserted around windows or doors when they are being installed in a cavity wall, as the cavity must be closed around the frame to ensure it’s stable and fitted correctly.
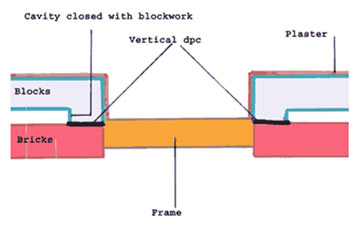
A vertical DPC membrane between closing cavity walls
By closing the cavity, it then allows it to be plastered and finished, however one downside is that closing the cavity brings the internal and external walls into contact, which can allow moisture to transfer from outside to inside.
A vertical damp proof course (DPC) is inserted between the walls around the frame to act as a barrier, preventing water from traveling through the external wall into the internal wall. This is essential to protect against damp and water damage.
While standard damp-proof membranes are designed for horizontal use, they are not really suitable for vertical applications around windows or doors.
Instead, insulated vertical DPCs, specifically designed for this purpose are what should be used. These can be found at most DIY stores or builders’ merchants.
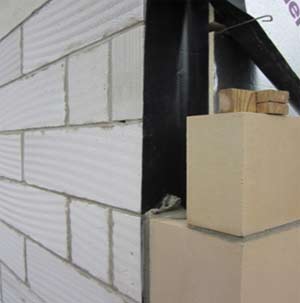
Hold the vertical damp proof course in place until the cavity is closed
What Does a Vertical DPC do?
Vertical DPCs act as a barrier against water infiltration that can cause structural damage, unsightly mould, and harmful indoor dampness.
Installed along the interior or exterior of walls, they are typically made from durable waterproof materials such as bitumen, plastic membranes, or chemical coatings.
By isolating one section of the wall from another, they ensure that moisture from adjoining structures or the ground doesn’t seep through.
When Are Vertical Damp Proof Courses Necessary?
In terms of when you need to install a vertical damp proof course, it’s generally for one of the following scenarios:
- Building Extensions: To prevent damp from the older section of a property transferring into the new extension.
- Basement Construction: In below-ground spaces, lateral water movement from surrounding soil can be blocked by a vertical DPC.
- Retaining Walls: When walls are in constant contact with soil or water, a vertical DPC stops moisture from penetrating the masonry.
- Raised Ground Levels: If the ground outside a building is higher than the internal floor level, a vertical DPC helps protect walls from damp ingress.
- Around Window and Door Frames in Cavity Walls: When installing windows and doors, any cavity should be closed to secure the frame, which in turn joins internal and external walls, creating a bridge. A vertical DPC prevents moisture travelling between surfaces.
- Other Structural Alterations: When making structural alterations e.g. adding openings, conversions and anything else that that involves closing cavities that could allow moisture transfer.
Heat Loss Around Windows and Doors Due to Cavity Closures
When the cavity around your windows or doors is closed, the warm inner wall comes into direct contact with the colder outer wall. Without proper insulation, this connection allows heat to escape from your home more easily, as the warmth from inside transfers to the colder external wall.
This contact doesn’t just result in heat loss, it can also let the cold from the external wall travel inward, making the surrounding area colder. These “cold spots” can increase your heating costs, as your system works harder to maintain a comfortable indoor temperature. Additionally, cold spots often attract moisture from the air, leading to condensation, which can encourage the growth of black mould—a potential health risk.
To combat these issues, fitting an insulated vertical damp proof course (DPC) around your windows and doors is essential. These specially designed DPCs include a layer of polystyrene that acts as an insulating barrier, preventing heat loss and stopping moisture from penetrating the inner wall. This ensures your home stays warmer, more energy-efficient, and free from damp-related problems.
Insulated vertical DPCs are versatile and easy to install. They can be secured with mortar, nails, screws, or simply pinned in place during construction. As shown below, these solutions effectively block heat transfer while maintaining the structural integrity of your cavity closure.
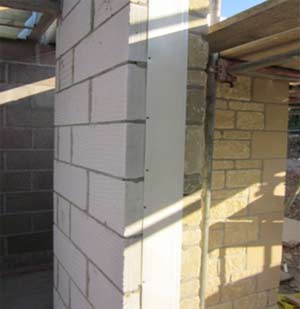
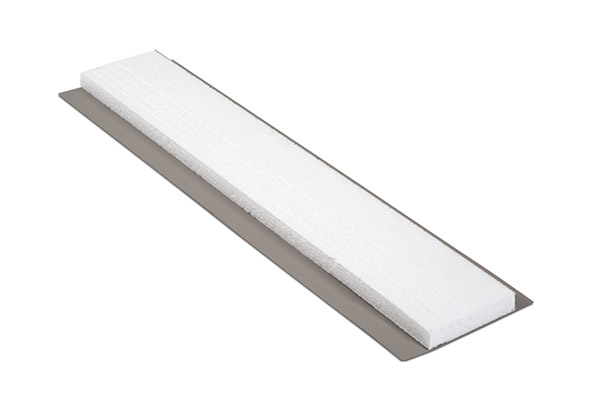
Insulated vertical damp proof course fixed in position
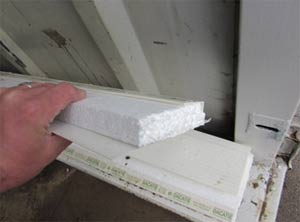
An insulated vertical DPC
How to Install a Vertical Damp Proof Course
Installing a vertical damp proof course (DPC) is a crucial step when fitting new windows or doors in cavity walls. It helps prevent moisture from transferring between the inner and outer walls, while also reducing heat loss. Follow this step-by-step guide to ensure a correct and effective installation.
A Note on Cavity Insulation
To prevent cold bridging, today, it’s recommended to insert a strip of expansion foam alongside the vertical DPC in existing cavity walls. This involves cutting a thin groove with a grinder and inserting the foam to create an effective thermal barrier.
For new builds where cavities need closing, modern building regulations suggest using “insulated cavity closers”. These closers address both cold bridging and insulation issues in one step. They are easy to install and provide a reliable, long-term solution for improved energy efficiency.
Modern insulated cavity closer
Step 1: Prepare the Cavity Wall
Start by clearing any debris from the cavity where the window or door will be installed. The cavity should be clean, free from mortar snags, and dry to ensure a tight fit for the vertical DPC.
Measure the area carefully to determine the size of the DPC required.
Step 2: Cut the Vertical DPC
Using a sharp utility knife, cut the vertical DPC membrane to size.
If you are using an insulated DPC, ensure the polystyrene side is correctly aligned to face the cavity, providing an effective thermal barrier.
Step 3: Position the DPC
Insert the vertical DPC membrane into the cavity between the inner and outer walls. The DPC should fully cover the area where the two walls meet.
Hold the membrane in place temporarily with mortar, nails, or screws to ensure it stays firmly fixed during installation.
Ensure the material overlaps the horizontal DPC to create a continuous seal.

A vertical DPC damp membrane can be inserted between two walls to limit the movement of damp from one wall to another
Step 4: Secure the DPC
Use mortar to secure the vertical DPC in position. Apply mortar evenly around the edges to seal any gaps and prevent moisture penetration.
Ensure the material overlaps the horizontal DPC to create a continuous seal.
If you are installing an insulated vertical DPC, ensure the polystyrene side is snug against the cavity to block heat loss effectively.
Step 5: Complete the Installation
Once the DPC is secured, check that it is properly fitted and fully covers the cavity closure. You can now proceed with installing the window or door frame.
Make sure the cavity is sealed completely to avoid cold spots or water ingress around the reveals.
If you are unfortunately experiencing any form of cold spots on your walls, then these can cause various issues including cold areas, black mould and the likes. To find out how to resolves these issues, see our Cold and Damp Spots project.
A properly installed vertical DPC protects your home from damp and condensation while improving overall energy efficiency in the home. By creating a barrier between the warm internal wall and the cold external wall, they stop heat loss and prevent moisture issues like black mould. For long-lasting results, always use high-quality DPC materials and ensure a snug, secure fit.