Timber decay can seriously weaken a structure and in extreme cases, it may even lead to it’s collapse or demolition.
In this how-to guid, we cover everything you need to know about timber decay: how to spot the signs, what causes it, and the best methods to repair and prevent further damage.
What is Timber Decay?
Timber decay is the gradual breakdown of wood caused by moisture, fungal growth or insect damage. When timber becomes damp for long periods, often from poor ventilation, water leaks or rising damp, it creates the perfect environment for fungi and wood-boring insects to thrive.
This kind of decay can weaken structural wood in homes, including floor joists, beams, rafters and wall plates. If left untreated, it may lead to serious safety issues and costly repairs. The most common types of timber decay in UK homes are dry rot, wet rot, and woodworm infestation.
Recognising the early signs, such as soft wood, musty smells, cracking or visible fungal growth, is key to preventing further damage. In many cases, timber decay can be treated and the affected areas repaired using specialist products or professional help.
What Types of Timber Decay are There?
There are three main types of timber decay commonly found in UK homes: dry rot, wet rot, and woodworm infestation. Each has different causes, signs and treatments, but all can lead to serious structural problems if ignored.
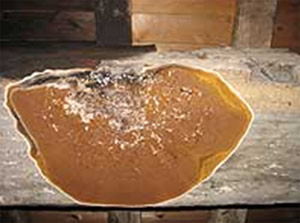
Dry rot is caused by a fungus that thrives in damp, poorly ventilated areas. It spreads quickly through timber, breaking down the wood fibres and leaving it brittle and crumbly. You may notice a musty smell, cracking wood or a white or orange fungal growth. Dry rot is one of the most destructive forms of decay and often requires professional treatment.
Wet rot also develops in damp conditions but is usually confined to the source of moisture, such as leaking pipes or gutters. It causes timber to darken, soften, and shrink. Unlike dry rot, wet rot doesn’t spread as far but can still weaken important structural timbers if left untreated.
Woodworm is caused by the larvae of wood-boring beetles. These tiny insects tunnel through wood, leaving behind small holes and fine dust (known as frass). Over time, woodworm can seriously damage furniture, floorboards, and roof timbers. Infestations are more common in unventilated lofts and basements.
Other causes include poor ventilation, leaks, heavy loads or natural wear over time. Cracks, splits, and moisture traps make timber more likely to rot or attract pests.
The good news? With the right tools and techniques, repairing timber decay is a task most DIYers can handle. We’ll show you how below.
Dry Rot Causing Damage and Decay to a Roof Timber
The Problem With Damp and Moisture
Dry rot starts when timber holds 18% or more moisture. Reducing moisture is key to stopping fungal growth, especially in structural wood.
Replacing damaged timber is one option, but it can be costly. For more on this, see our full timber repair guide.
Modern wood treatments like Cuprinol 5 Star Preserver or Everbuild Lumberjack offer a simpler solution. They treat dry rot, kill fungi, and help timber dry out, often avoiding the need for full replacement if caught early.
Always fix the source of the damp first, or the problem will return.
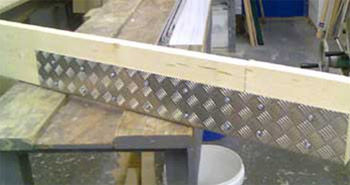
Splicing in a new piece of timber using Joist Splice Plates
Using Boron – What is Boron for Timber Treatment?
Important: Since 1st September 2022, UK law only allows licensed professionals to use boron-based timber treatments due to safety concerns. Boron can irritate skin and is harmful if swallowed.
Boron, also known as disodium octaborate tetrahydrate or Borax, is a natural water-soluble compound. It’s highly effective at stopping timber rot and insect damage.
Boron kills wood-boring insects and fungi but is safe around mammals, including protected species like bats, making it ideal for eco-sensitive areas.
Although now restricted to professional use, boron remains a trusted treatment for structural timber. To find qualified specialists, visit the Property Care Association (PCA).
Essential Safety Tips for Using Boron Treatments
When boron is applied by a licensed professional, follow these key safety measures:
- Wear Protection: Always use gloves and long sleeves. If the product touches your skin, rinse immediately and seek advice if irritation occurs.
- Shield Your Eyes: Safety goggles are essential. Flush eyes with clean water if exposed and get medical help.
- Use a Dust Mask: Avoid breathing in boron powder by wearing a face mask during mixing or application.
- Read the Label: Always follow the manufacturer’s safety instructions and guidelines.
- Stay Safe Around Food: Keep treatments away from food and drinks. Don’t eat, drink, or smoke while using boron. Keep kids and pets out of the area.
- Wait Before Re-Entering: The HSE recommends staying out of the treated area for at least one hour or until the surface is fully dry.
DIY Timber Decay Treatment
If you want to fix timber decay yourself, several effective products are available. To get the best results, follow these simple steps carefully. Note: These steps work for both dry rot and wet rot treatment.
Step 1: Eliminate Moisture Sources
Dry and wet rot develop when timber moisture reaches 18% or higher. To effectively treat rot, first fix the root cause, whether it’s leaks, poor ventilation or damp conditions.
Remove any coverings like floorboards to expose the affected area. Tackling the moisture problem at its source is key to preventing rot from returning.
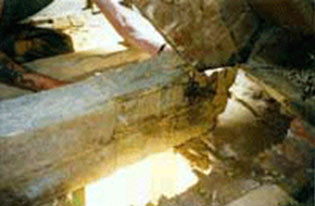
Damaged timber joist caused by damp and moisture
Step 2: Check the Damage
Once you’ve stopped the moisture at its source, it’s time to check how bad the damage is. Look for signs of dry rot, wet rot or insect attack like woodworm.
Not sure what you’re dealing with? Visit our quick guides to identify dry or wet rot and spot woodworm damage.
Use a screwdriver to gently prod the wood. This helps reveal how deep the damage goes. Check all nearby timber, like joists, floorboards and stud walls, as well as surrounding brick or masonry, since rot can spread beyond just wood.
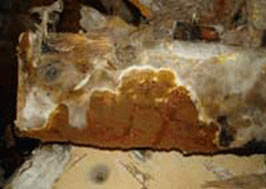
Damage to brick caused by dry rot
Step 3: Replace Damaged Timber
If a screwdriver pushes easily into the wood, the timber is too far gone and must be replaced. Check how much is affected, if it’s widespread, replace the full length. You can either remove the old timber or fit a new piece alongside it.
For small areas of damage, like rotting ends, a timber splice kit can be a quick fix. See how timber splicing works.
Another option is using joist repair plates to connect new wood to solid, undamaged timber. View our guide to joist repairs.
When cutting out damaged wood, go at least 500mm beyond the last visible sign of rot to stop it coming back. Always use pre-treated timber for long-lasting repairs.
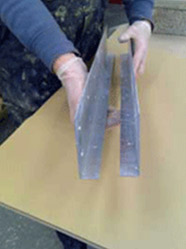
Joist repair plates used to repair timbers
Step 4: Treat with Fungicidal Solution
Use a scraper and stiff brush to remove all visible mould and fungus. Bag the debris safely and wear a mask to avoid breathing in harmful spores.
Thoroughly clean the area and nearby surfaces to stop the spread of contamination.
Next, apply a strong fungicidal and insecticidal treatment to kill hidden spores and any wood-boring insects.
Let everything dry fully. Drying time depends on how damp the timber was to start with.
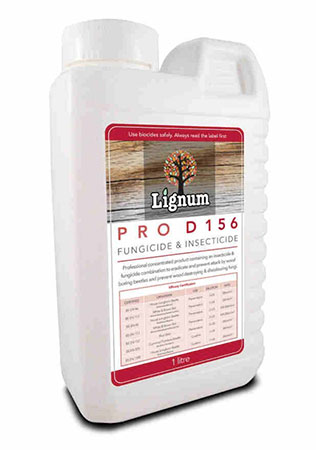
Good quality fungicidal and insecticide wash
Step 5: Protect the Timber
Once the area is fully dry, brush or spray on a high-quality timber treatment like Cuprinol 5 Star Wood Treatment across all exposed wood.
This helps shield both old and new timber from rot, fungal decay and insect damage.
Let it dry fully, following the product instructions. After that, you can move on to repairs like refitting floors or rebuilding walls.
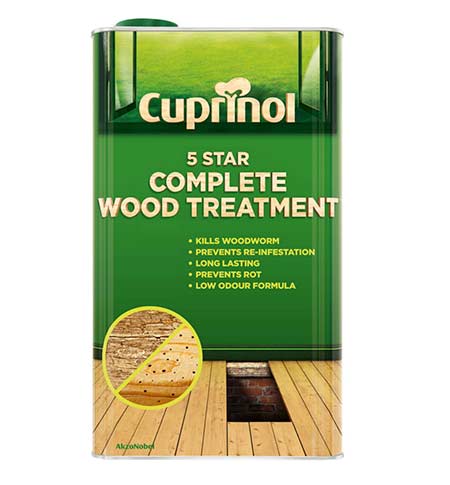
Cuprinol 5 Star Wood Treatment for treating existing and new timber from decay and insect attack
Step 6: Use Wet Rot Hardener
Before making repairs, treat any remaining wet rot with a specialist wet rot hardener.
If the wood is still solid but slightly damaged, the hardener soaks in and strengthens it, helping prevent further decay.
Only use wet rot hardener on non-structural wood like window frames or doors. It’s not suitable for load-bearing parts like joists.
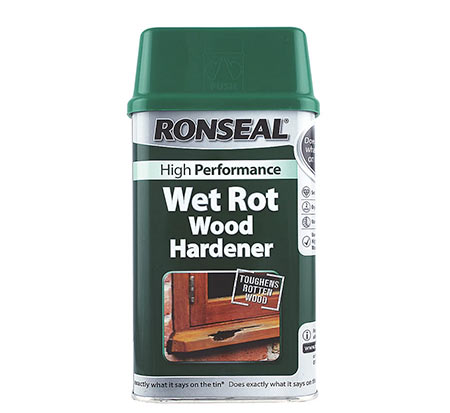
Wet rot hardener for repairing doors and windows
How to Prevent Timber Decay
The best way to avoid costly timber repairs is to stop decay before it starts.
Always use pre-treated wood for any new installations, but don’t stop there. For full protection, apply a top-quality timber treatment to all exposed areas after cleaning with a fungicidal and insecticidal wash. This adds an extra layer of defence against rot and insect damage.
Focus on treating timber in these key areas:
External Areas to Treat
- Window frames and sills
- External door frames
- Timber structures like sheds or house frames
- Wall plates, rafter ends and purlin ends
- Fascias and soffits
- Outdoor posts, telegraph poles and sleepers
Internal Areas to Treat
- Window and door frames, skirting, and stairs in damp areas
- Lath and plaster ceilings
- Support timber like joists, A-frames, bressumers and beams
- Structural parts: lintels, rafters, trusses, ridge and tie beams
If your home has signs of dry rot, wet rot or wood-boring insects, it’s vital to treat the timber straight away. Acting early helps protect your home, prevents costly repairs later and keeps your timber strong for years to come.