Hanging a door might seem challenging if you’re not a carpenter, but with some basic knowledge and patience, it’s definitely a DIY task you can handle.
This step-by-step guide will show you how to hang a door like a pro. Read on to learn how.
Types of Doors
The first step is choosing the right door, as this will guide your purchase. There are two main types of doors:
Internal Doors
Internal doors are typically hollow, except for fire doors or solid options. These doors are much lighter than external ones.
They usually consist of two panels attached to a timber frame, with a cardboard honeycomb filling.
Solid internal doors are often made from pine or similar softwoods.
Common styles include the classic 4 or 6-panel designs, cottage styles, or more contemporary looks.
Due to their lightweight construction, internal doors are quite affordable, starting around £25.
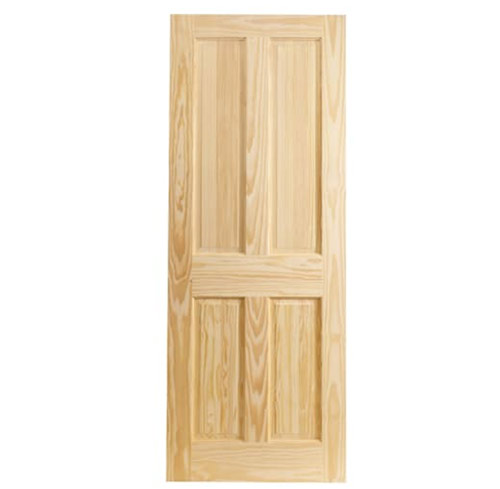
Pine softwood internal door
External Doors
External doors are built to withstand the elements, so they’re always solid, typically made from durable hardwood for longevity.
They come in various designs, including panelled, flush, or more contemporary styles, often featuring glazing for light and visibility.
Due to their solid construction, external doors are more expensive than internal ones, starting around £150.
Many homeowners now choose composite or UPVC doors for lower maintenance, as timber doors require regular upkeep.
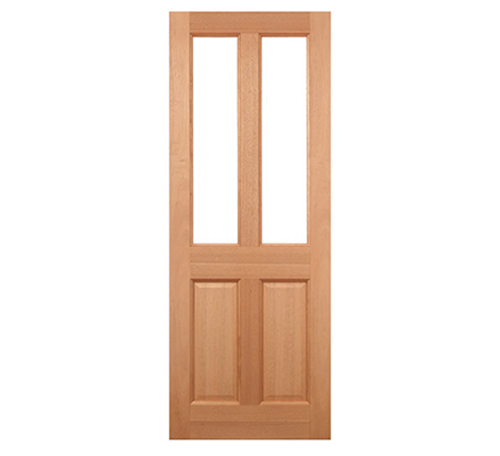
External hardwood door
Most of the time, you’ll be hanging an internal door since modern external doors are often UPVC or composite, making the task easier due to their lighter weight.
Internal doors come in two main types: "flush doors" or "panelled doors" doors.
Panelled doors are divided into sections with side rails, a top rail, bottom rail, and mid-rail, while flush doors have a flat surface on both sides without any recesses.
Both internal and external doors are available in standard sizes to fit typical door frames. Internal door thicknesses usually range from:
- 35mm (1 3/8 inches)
- 45mm (1 3/4 inches)
- 50mm (2 inches)
If you have an unusually sized opening, you can use "door blanks", which are oversized, solid, flush doors that can be cut to fit.
Internal doors are generally hollow and lightweight, but fire-check doors are also available. Fire doors are essential for safety in areas like kitchens and garages, and may be required throughout if you have a loft conversion.
Fire doors are designed to resist fire for 30 to 45 minutes, depending on their rating.

45 minute internal fire door
Intumescent strips can be added to seal gaps, swelling when exposed to heat to block smoke. Automatic door closers are often required to limit the spread of fire in loft conversions.

Intumiscent door strip
If you need more information on fire doors and closers, check out our Fire Doors and Closers Project.
When choosing internal doors, it’s common to match them with existing doors or to complement your home’s interior design. The same goes for selecting door furniture like handles and locks.
With the vast array of door styles and furniture available, you’ll easily find something to suit your taste.
Standard Internal Door Sizes
Standard internal doors are designed to fit common door frames, making installation straightforward in most modern homes with minimal trimming needed.
While other sizes are available, these are typically the most common options found in DIY stores. For non-standard sizes, you may need to visit a builders’ merchant.
| 525mm x 2040mm | Metric size door for metric frame |
| 626mm x 2040mm | Metric size door for metric frame |
| 726mm x 2040mm | Metric size door for metric frame |
| 826mm x 2040mm | Metric size door for metric frame |
| 926mm x 2040mm | Metric size door for metric frame |
| 610mm x 1981mm | 2ft x 6ft 6 inches |
| 686mm x 1981mm | 2ft 3 in. x 6ft. 6 in. |
| 762mm x 1981mm | 2ft. 6in. x 6ft. 6in. |
| 838mm x 1981mm | 2ft. 9in. x 6ft. 6in. |
Choosing the Right Door
Selecting the right door involves more than just size and style, it’s crucial to choose one suited for its location.
First, consider whether the door is for internal or external use. External doors should be solid and preferably hardwood to withstand weather and provide security. Internal doors should match the style of other doors in the home and may need to be fire-rated if installed in kitchens or garage doorways.
Also, think about the door’s swing direction. Typically, internal doors open into a room and away from the wall with the light switch for easy access. If the door is designed to fit a certain way, ensure the hinge placement allows it to open correctly with the desired face outward.
Lastly, make sure there’s enough material on the door for trimming to fit your frame without compromising its structural integrity.
Measuring for Replacement Doors
Accurate measurements are crucial when replacing a door to ensure you purchase the correct size. The door must fit the frame, not the other way around, so precise measurements of the frame are essential.
Follow these steps to measure correctly:
- Measure Width: Measure the frame width in 4 to 5 evenly spaced spots from top to bottom. Newer frames should have consistent measurements, while older frames might show variations due to bowing.
- Measure Height: Take 3 height measurements from floor to the top of the frame. Consistent measurements indicate a level frame; differences suggest a bowed head or uneven floor.
- Check Frame Square: Use a frame square to ensure each corner is a perfect 90° angle.
- Check Floor Level: Use a spirit level to check floor level. If uneven, you may need to trim the door at an angle to fit properly.
After measuring, choose a door that fits the largest dimensions of your frame to ensure a proper fit.
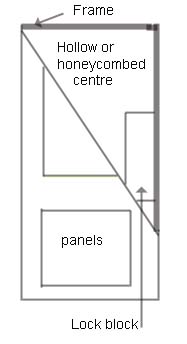
Parts of a Door
Most doors, regardless of type, share the same basic components. Understanding these parts is key to fitting your door correctly:
- Top Rail
- Mid Rail
- Bottom Rail
- Left and Right Upright Stiles
Additional components may vary depending on the door type. For internal doors, the top rail often indicates the side with the lock block, helping you determine hinge placement.

The parts of a standard door
How to Prepare for Hanging a Door
Before you hang a door, there are a few key steps to follow to ensure a perfect fit.
Start by double-checking the measurements of both the door and the frame. Ensure that the frame is square, as older homes often have shifted over time, causing door frames to warp or twist.
Remember, always fit the door to the frame, not the other way around. If the frame is too distorted, consider replacing it for the best results.
Begin with a square frame and trim the door to match.
Next, allow the door to acclimatise to the room where it will be installed. Lay it flat in the room for at least three days to adjust to the room’s temperature and humidity.
When trimming the door, make sure any cuts, especially on the stiles, are even on both sides to maintain balance.
Lastly, avoid attaching any hardware, such as handles or hinges, until the door is properly cut and hung.
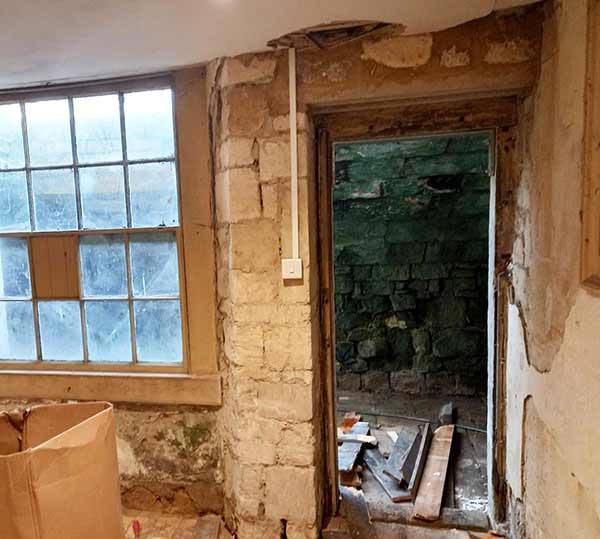
Very old and warped door frame
Optimal Hinge Placement for Doors
Proper hinge placement is crucial to support the door and prevent sagging over time.
While opinions vary, these general guidelines work for most doors:
- Top Hinge: Position it 125mm to 150mm from the top of the door.
- Bottom Hinge: Place it 200mm to 230mm from the bottom.
- Centre Hinge (if needed): Install it in the exact middle of the door, typically for heavier doors.
For heavy doors, like fire doors, add an extra hinge 50mm below the top hinge for additional stability and to prevent wear.
Use the following guide to determine the number of hinges required:
- Doors up to 1525mm (60 inches) high: 2 hinges
- Doors 1525mm to 2000mm (60 to 80 inches): 3 hinges
- Doors 2000mm to 2500mm (80 to 100 inches): 4 hinges
- Doors 2500mm to 2780mm (100 to 110 inches): 5 hinges
- Doors over 2780mm (110 inches): 6 hinges
Essential Tools and Products for Hanging a Door
Here’s a list of tools and materials you’ll need to hang a door:
- Your chosen door
- Carpenter’s square
- Sharp hand saw
- Circular saw
- Long straight edge or spirit level
- At least 2 clamps
- Pencil or pen
- Tape measure
- Sharp chisels or palm router
- Hammer or mallet
- Appropriate hinges
- Drill/driver
- Door holder or clamps
- Workbench or Workmates for cutting
- Manual or electric plane
- Sander or sandpaper
- Screwdrivers or wooden wedge to prop the door during fitting
- Drill bits, including a 3mm pilot drill
- Mortice gauge
- New door frame or repair timber, if necessary
How to Hang a Door
In this guide, we’ll show you how to hang a new door in an existing frame, but with some differences, we’ll also cover how to reposition the hinges on the opposite side of the frame, so the door opens the opposite way.
Step 1: Ensure the Door is Correctly Oriented
Before you begin, confirm the door is the right way around and upright.
For hollow doors, check the lock block information, usually marked on the side or top. If unmarked, tap the door’s centre rail—the lock block side will sound more solid.
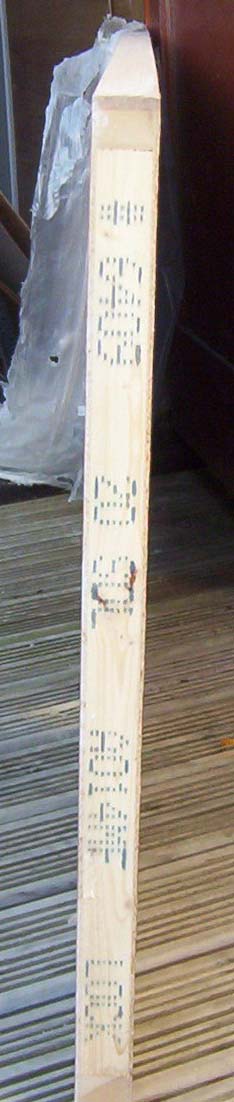
Lock Sign on side of door
In 4 or 6 panel doors, the bottom stile is typically thicker than the top.
Honeycomb door cross section
Decide which way the door will swing, usually inward, and mark the hinge side to guide your cuts.
If possible, hang the door so it doesn’t block the light switch, avoiding the inconvenience of walking around the door to turn on the light.
Step 2: Inspect the Frame
After positioning the door, check the frame for squareness. Modern homes typically have square frames, but older homes may not.
Use a spirit level against the inner and outer edges of each upright stile to see if the frame leans inward, outward, forward, or backward.
Check the level of the frame head and floor as well. Then, use a carpenter’s square to ensure each corner is at a 90° angle, indicating if the frame is leaning.
You can also measure multiple points along the stiles and from the frame head to the floor to verify alignment.
If the frame has only minor imperfections, you can likely leave it as is. However, if it’s significantly warped or bowed, consider replacing it.
For detailed instructions, refer to our door frame installation guide.
If the frame is too large but otherwise sound, you can re-line it by cutting or planing timbers to reduce the opening to fit a standard door size, as we demonstrate below.
Step 3: Measure and Fit the Door to the Frame
To ensure the door fits the frame, first hold it in place to mark where cuts are needed.
In the example below, the frame was a non-standard size, so we added timber to adjust it. This timber was cut to size and secured to the existing frame, saving time and money.
If the frame is significantly out of alignment, it may need replacing, but minor adjustments like adding timber can be an effective solution.
Position the door flush against the modified frame and mark the inside edges on the door with a pencil. You might need assistance to hold the door steady.
As you mark, use a spirit level to ensure the door is level. This will help achieve a precise, square fit after cutting.
Step 4: Cutting the Door to Fit
Once marked, you can cut the door to size using either a hand saw or a circular saw. For precise, square cuts, a circular saw is the best tool to use.
To ensure accuracy, measure the distance from the side of the saw blade to the edge of the base plate. Mark this distance inside your cut line, then repeat the measurement at another point along the line.
Align a straight edge or spirit level with these marks and clamp it securely. This will serve as a guide for your circular saw, ensuring a straight and square cut.
Repeat this process for any additional cuts. If using a hand saw, apply the same technique but ensure the blade stays flush against the straight edge for a clean cut.
For more tips on achieving a true cut, see our cutting timber project.
Remember to account for the saw blade’s thickness, typically around 3mm. Cutting directly along your marked line will make the door slightly smaller than intended. Instead, cut just outside the line, leaving it visible. This way, you can make fine adjustments with a plane if needed.
Leaving your marking line ensures precision! You can always remove more material, but you can’t add it back!
Step 5: Fitting Hinges to Your Door
With the frame and door cut to size, it’s time to install the hinges. Most doors use standard butt hinges, though you can explore other hinge options here.
While there are no strict rules for hinge placement, a common method is to position them about 125mm from the top and 230mm from the bottom of the door.
Measure and mark these positions on the hinge edge of the door. Make sure the door opens in the correct direction by checking the hinge orientation.
Attach the hinge at the marked positions, ensuring it is perpendicular to the door. Avoid using a hobby knife to mark the hinge outline as it can be imprecise and dangerous. Instead, use a pencil and, if needed, a mortice gauge for accurate marking.
Using a sharp chisel or a palm router set to the correct depth, carefully cut out the hinge mortise. Tap firmly with a mallet to avoid damaging the chisel. Cut just inside the pencil line to ensure the hinge sits flush with the door edge.
Ensure the hinge is flush with the door and not protruding or recessed, as this can cause the door to bind. Practice on a scrap piece of wood to perfect your technique, especially if you have multiple doors to install.
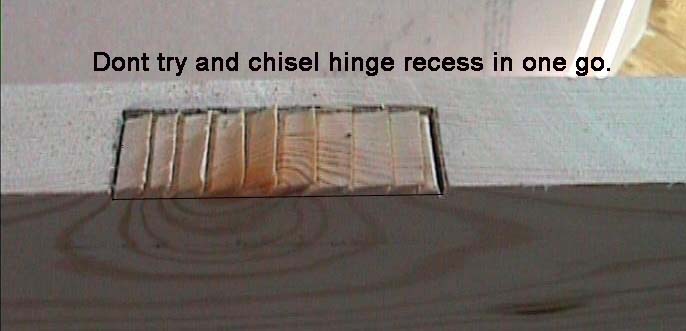
Cutting out hinge recess
Step 6: Drill and Screw the Hinges to the Door
With the mortises cut, reposition the hinges and mark each screw hole with a pencil.
Drill pilot holes at the marked spots, ensuring they are centred in the hinge holes. Misaligned screws can push the hinge out of place.
After drilling, use the provided screws or 8x40mm wood screws to secure the hinges. Screw through each hole to firmly attach the hinges to the door.
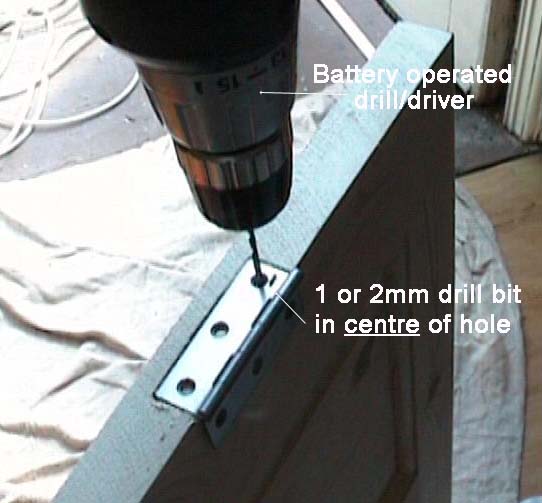
Drill driver screwing hinges down
Step 7: Check the Gap Around Your Door
With the hinges installed, position the door in the frame using wood wedges or screwdrivers. Ensure the gap around the door is even on all sides. Refer to the image below for an example of a uniform gap.
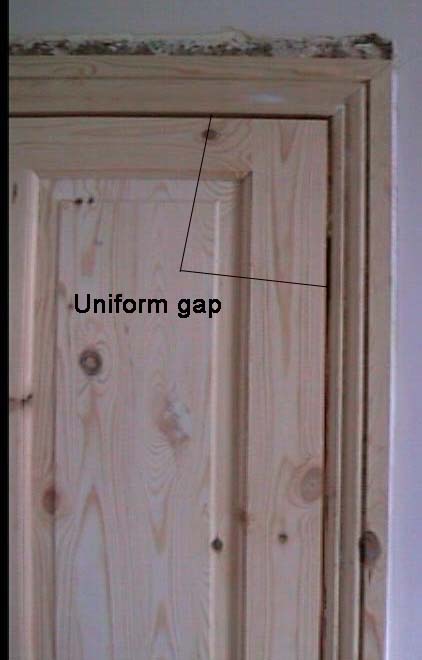
Uniform gap around the newly fitted door
Check that there’s enough clearance below the door if you plan to install carpets later.
Position door precisely in frame
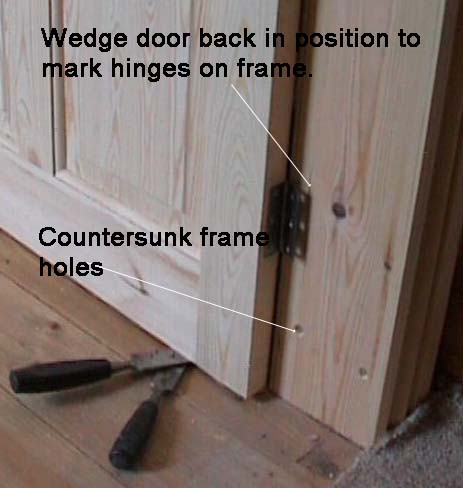
Step 8: Mark the Hinge Positions on the Frame
With the door in place and the hinges attached, mark their positions on the frame. You can trace around the hinge as shown in the image below.
Alternatively, use a mortice gauge set to the hinge width and a carpenter’s square to outline the hinge position on the frame.
Another option is to remove a hinge, position it on the frame, and draw around it to mark the placement.
Once marked, chisel or route out the areas to fit the hinges.
Door hinge position on door frame and marked
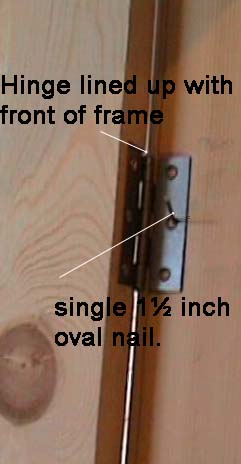
Step 9: Attach the Hinges to the Frame
Once the hinge mortises are cut, secure the hinges to the frame and hang the door. Use wedges or screwdrivers to hold the door in place. If you’re working alone, pin the top hinge temporarily with a small nail to prevent movement.
Start by securing the top hinge to support the door’s weight, then attach the bottom hinge for easier alignment. Screw into each hinge hole to firmly fix the hinges in place.
With the hinges secured, your door is now hung. Complete the installation by adding a door stop and any additional hardware.
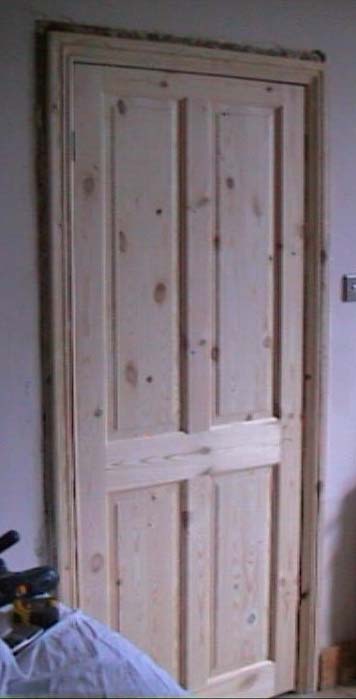
Finished job of a door fitted to frame
Step 10: Fixing the Doorstop, Lock, and Hardware
Your door should now swing smoothly and fit squarely in the frame. The final step is to install the doorstop (see image below).
With the door closed and flush against the frame, mark its edge on the frame with a pencil. Measure the frame’s width and height, then cut a doorstop from 8mm or 12mm x 32mm timber.
Attach the doorstop by hammering lost head nails into the marked spots—two for the top and three for each side. Use a spirit level to keep the doorstop upright. Ensure the door touches the stop when closed, then add more nails for secure fitting.
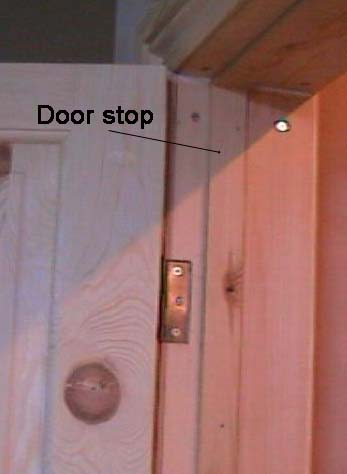
Doorstop fitted to door frame
Next, install door handles, locks, and any other hardware. For detailed instructions on fitting these, check out our related projects:
- How to fit a door handle
- How to fit a door chain
- How to fit a door bolt
- How to fit a cat flap
- How to fit door numbers
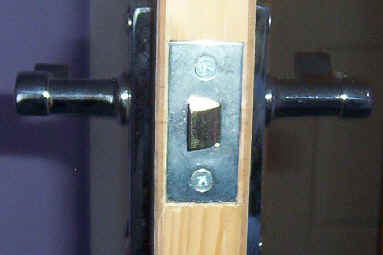
Lock fitted to newly installed door
Step 11: Filling Old Hinge Recesses and Finishing Touches
Once you’ve installed the door hardware, it’s time to tidy up and finish the job.
If your new door is hung on the opposite side of the old one, you’ll need to fill the old hinge recesses. Use filler to cover the recesses, sand smooth, and then paint over them. Alternatively, you can "scarf" the area by cutting a timber block to fit, gluing and pinning it in place, then sanding it flush with the frame.
Ensure all gaps are filled for a seamless finish. When painted, the repairs should be invisible.
New to DIY? Hanging a door might seem challenging, but with careful attention and following these steps, you can achieve a professional finish on your own.