Cavity wall insulation is usually done with a man-made product which is used to reduce heat loss from a structure through its cavity wall construction.
What are Cavity Walls?
In cavity wall construction there are two layers (or skins) of wall constructed at equal widths apart, this itself leaves a void which is known as the cavity. Typically this is found on the external walls of the building.
Cavity wall construction ready for cavity insulation
The earliest use of cavity wall was way back in Greek and Roman times, but it wasn’t until much later that things have got interesting.
In early days of using cavity wall construction (1920’s) in modern domestic buildings, the cavity was thought to be enough of a barrier for damp penetration. No one really considered heat loss and this procedure continued up to 1995.
When cavity walls became the norm in construction after the Second World War, the cavity was predominantly seen as a moisture barrier although it would certainly have provided some thermal benefit. This is because the air in the cavity is a good insulator.
From this period the cavities were built into walls with no consideration to adding any insulation as the cavity was deemed to be all that was required. This being the case, there are some challenges to adding insulation retrospectively to this huge section of the building stock.
Filling cavities in walls with insulation after they have been built is not an ideal DIY project as there are a lot of things that might cause problems later along the line.
For more information about how insulation is injected into cavities see our project on pumped cavity wall insulation here.
If you are adding insulation to a wall that’s already been built, the first step is to establish if you have a cavity in the first place.
How to Tell if Your Walls Have Cavities
A really good indication is the age of the property; if you home was built from the 1930’s onwards it is likely to have a cavity, and you can be almost certain of this if it was built after the War.
After the 1990’s it is likely that the cavities will have been filled during the construction, as the building regulations changed to include this.
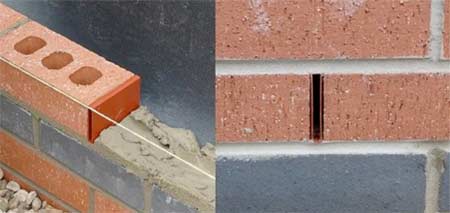
You can check if you have cavities in your external walls relatively easily by looking at the construction method of your external brick work.
If the brick’s have been laid lengthways next to each other (stretcher bond) then it would be expected to have a cavity.
If the bricks have been laid length ways with alternating bricks showing their end (Flemish bond) then the wall construction is normally of solid form.
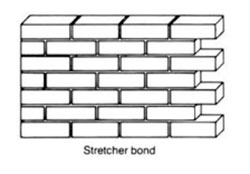
Brick wall constructed using stretcher bond method
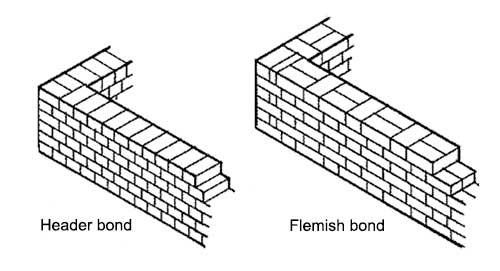
Brick walls constructed using both Header bond and Flemish bond methods
We go into much more detail about the different types on bond used to build walls with bricks and block here, should you be interested.
As technology increased, heat loss of a structure, now calculated with the use of (U-Values) was realised and new methods of controlling heat loss were incorporated into the construction of external cavity walls.
This was achieved with the introduction of putting various forms of insulation into the cavity to help with heat loss.
In older properties that have a cavity wall construction. Glass Wool or Cellulose insulation was pumped or blown into the cavity. This has now been replaced with the use of pumping varying foams into the cavity to produce the effect of insulating the cavity, as we mentioned above.
How to Add Insulation to the Cavity While Building the Wall
With modern methods of cavity wall construction an insulation layer (cavity batt) is placed into the cavity void to increase the thermal retaining properties of the structure.
As the Building Regulations have become more and more stringent (see Part L of the Building Regulations) external wall have needed to become more insulating when they are built.
Insulation can either fill the whole cavity or partially fill it (as show in the image below).
Cavity batts are built in with a cavity wall
The insulation should be fitted to the inside layer/wall so that if there is a void this will be next to the outside layer/wall.
This allows air to circulate without too much heat loss, so reducing the effects of damp. Also is any moisture does condense it will be on the outside wall and not on the inside one which would potentially be much more problematic (see below).

Options for Fitting Insulation in a Cavity Wall
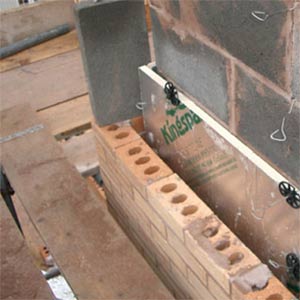
The insulation boards are held in place by retaining clips. These are plastic retaining circles which clip over the wall ties and which keep the insulation boards in place.
They are placed between block and brick courses in a cross formation as the wall is constructed to lock the two leaves of block/brick work together. When the insulation is placed into the cavity, the whole cavity does not need to be filled, as we mentioned, as the air void itself works as a thermal break.

Retaining clip on wall tie to hold insulation in place in wall cavity – Image courtesy of Timloc
Cavity Walls to Stop Damp
The big benefit and the original reason for using cavity walls was that any damp or moisture that did manage to penetrate the outer layer would then run down the inside of the cavity and not penetrate any further.
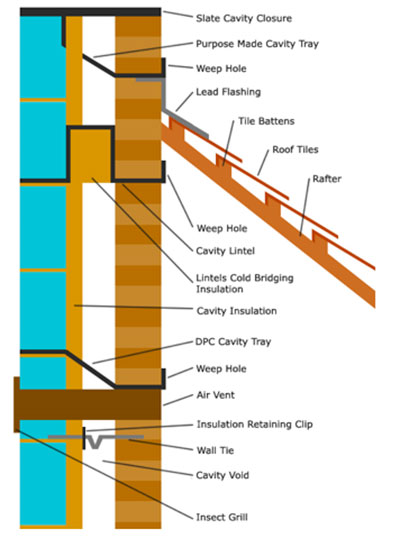
Cavity trays are used to direct any water that does find its way into the cavity out through weep holes.
Weep holes built into the construction of the wall to allow any build-up of moisture in the cavity and cavity trays to escape and these are normally positioned at 450mm centres.
These are little plastic grill inserts which are placed on the vertical of a course of external brick work and come in a colour range to match your brick or mortar finish.
Weep holes in brickwork allow cavity water out – Image courtesy of LABC
Cavity trays should be used over anything that crosses the cavity as they will then direct water out from the cavity and stop it moving down into whatever it is that is in the cavity.
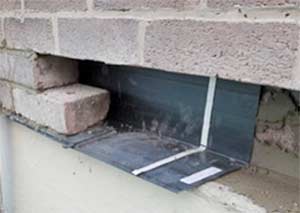
Cavity trays over a lintel
Examples of places where a cavity tray should be used include:
- Lintels over windows and doors
- Any airbricks, ducts or pipes that cross the cavity.
- Where an extension is constructed against an existing wall
- Where a roof abuts a wall
- At the bottom of a wall if the cavity does not extend 225mm below the DPC.
- Above an beams or slabs
- Any situation where an existing external wall becomes an internal wall as a result of an addition to the property
As you can see it is much easier to add the insulation as the wall is build, however you will not generally have this luxury unless you are building and extension.
In this case you will need to have insulation injected. Many local councils offer grants for help with the installation of cavity wall insulation. The video below shows this scheme operating in Northumberland.