• Skip to primary navigation
  • Skip to main content
  • Skip to primary sidebar
  • Skip to footer
DIY Doctor

Main navigation

      • Project Type A - E
      • All Projects
      • Brick, Block, Masonry and Concrete
      • Damp, Condensation, Rot and Woodworm
      • Doors, Windows and Conservatories
      • Electrical
      • Project Type F - G
      • Fencing, Decking, Paving and Patios
      • Floors, Walls, Ceilings and Lofts
      • Garages, Sheds and Outbuildings
      • Gardening and Landscaping
      • General Building, Self Build and Renovation
      • Project Type G - J
      • General Repairs and Cleaning
      • Green Living and Eco DIY
      • Ground, Foundations and Drainage
      • Heating, Central Heating and Boilers
      • Joinery and Carpentry
      • Project Type M - P
      • Materials, Fixings and Fixing
      • Painting, Decorating and Finishing
      • Planning Regs, Project Management and Safety
      • Plastering, Plasterboard and Rendering
      • Plumbing
      • Project Type R - T
      • Roofing and Gutters
      • Tiling and Tiles
      • Tools, Appliances and Access
      • Useful Tips
      • DIY Tips
      • Find a Tradesman
      • Contract Download
      • Working With Tradesmen - Ultimate Guide
      • Home Improver Protection
      • Price Doctor
      • About DIY Doctor
      • What we do
      • Trade Shows and Exhibitions
      • Master Classes
      • Book Store
      • Contact Us
      • Feedback
      • DIY Competitions

Home > DIY How To Projects and Tutorial Guides > Boxing in Pipes – How to Box and Hide Pipes

Boxing in Pipes – How to Box and Hide Pipes

Boxing in pipes: How to hide water, toilet (or waste) and central heating pipes. Boxing in your central heating pipes make it more efficient and attractive. In this project we show you how to box in pipes such as waste pipes and central heating pipes. We show you how to construct a simple box section that hides your pipework that you can then decorate so that it blends in seamlessly with the rest of your decor.

TwitterFacebookPin ItBuffer

Don't want to do this job yourself? Let us help you find a tradesman local to you

Project Page Menu
  • How to Tutorial
  • Video
  • Find Tradesmen
  • Help

In the picture below you can see we have shown a simple pipe boxing. A & B represent, in this case, two walls, with the pipes fixed or running up wall B. This could just as easily be a box fixed between the wall and the floor if your pipes are running horizontally. With A representing the floor and B, the wall or skirting. The principle is the same in both cases. The materials you will use will vary depending on the size of your box but for most applications either ¼ inch plywood or plasterboard is good.

Remember as with all carpentry related projects. Measure twice-Cut once.

Read all of this project before starting work. When the two sides of your boxing meet, there will be a join. Ideally you would like this joint as discreet as possible. If you use the diagram and the instructions below, the joint will always be seen on the same face as the board you have fixed the batten to.

D represents two battens, usually 50 x 25mm is a good size although in most applications 38 x 19mm is fine. Fix these battens to the surface, as close to the pipes as possible. For masonry walls you will need a 5.5 or 6mm masonry drill bit, red wall plugs, 2 inch number 8 screws and a hammer action power drill, for plasterboard walls see our fixing to plasterboard project. For lathe and plaster walls see our fixing to lathe and plaster project.
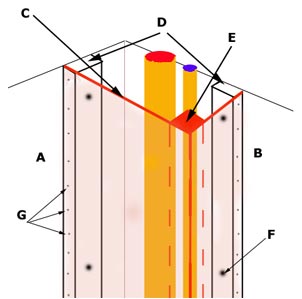
Boxed in pipes diagram

Boxed in pipes diagram

The screws, shown as F to the right, should be about 400mm apart. Next you need to measure along the line of C, I.E. from wall A, to the face of the batten you have fixed on wall B. Then measure the length of the piece of board you need from floor to ceiling or whatever two surfaces this box is between.

Having cut the board C you now need to fix batten E to it. The size of this batten again depends on the size of your boxing but normally 38 x 38mm is fine. Batten E is cut to the same length as your boxing and maybe just a mm or so longer. This will give it enough length to fit tightly between the two surfaces and give the boxing greater strength. Be careful not to cut it too long and damage the ceiling or walls as you push it into position. The batten can be fixed with either screws or panel pins, but whatever you use for any of the surface fixings, remember you may need to decorate so get the heads of the fixings slightly below the surface of your box. The holes can be filled later. We always use a little wood glue on these joints as well.

Having fixed board C to batten E place them in position against the batten on wall A. A little glue and some panel pins or screws (as shown by G) will hold the board in position together with the tightness of batten E "wedged" into position.

Next cut the other side of the board and glue, pin or screw into position. If you are using plasterboard for your boxing then its best to use drywall screws as they are guaranteed not to rust and bleed through either your plaster or paint. Fill all the screw holes and pin holes and you can then run around the edges with some decorators caulk (Flexible filler in a tube applied using a sealant gun) to hide the joints between box and walls/ceiling. If this box is in a bathroom and you intend to tile it, use an undiluted coat of PVA adhesive to paint the boxing before you tile. This allows the tile adhesive to stick properly on the surface you have used.

All project content written and produced by Mike Edwards, founder of DIY Doctor and industry expert in building technology.

TwitterFacebookPin ItBuffer

Video

Back to the Top

Find a Reliable Local Tradesman

Back to the Top
Don't fancy doing this project yourself? We work with the industries best to ensure that we recommend only reliable and trustworthy tradesmen.
Let DIY Doctor help you find a tradesman

Find a tradesman now!


More Help

Back to the Top
Related Projects That May Help You:
  • How to Bend Copper Pipe
  • Different Ways to Cut Copper Pipe and What Tools to Use
  • Connecting Waste Pipes to Main Drainage
  • How to Connect a Toilet to a New Soil and Vent Pipe
  • How to Fit a New Soil and Vent Toilet Waste Pipe System
  • How to Build a DIY Pallet Chicken Coop
  • How to Make a Comfy Office Chair From an old Car Seat
Give us Some Feedback!

We love feedback on our DIY tutorials it helps us to make them the best they possibly can be so if you have any comments you would like to share with us, click the button below and let us know.

Primary Sidebar

Master Basic DIY - By DIY Doctor

Our Book - Master Basic DIY

Grab your copy now for all the DIY help you need right at your finger tips!

Buy it Here!

Signup for our Newsletter

Keep up to date with our DIY projects, tips and latest deals

Sign Me Up!

Our Sponsors

Find out about advertising on DIY Doctor

Advertisments

Other Similar Projects
  • How To Connect Waste Pipes To Most Plumbing In The Home And Boxing Them In
  • How To Cut Copper Piping And Boxing In For Neatness
  • How To Change Cast Iron Soil Pipes For Plastic And Then Box Them In
  • Fitting A Soil And Vent Pipe Part 2 - Joining From The Toilet To The New Upright Connected To The Main Clay Drainage Pipe And Fitting The Toilet
  • How To Bend Copper Piping And Boxing In To Hide Them

Footer

DIY Doctor company logo

Here at DIY Doctor, we offer completely free DIY and construction help and advice to any and all, from professional tradesmen, exactly as they would do it.

We have hundreds of DIY project tutorials covering all aspects of building and DIY that provide step by step instructions on how to complete your given task.

If you need a little help then we also have an active question and answer forum and a find a trademan service and much more.

Site Menu

  • DIY Doctor Ltd,
    The Workshop,
    Newbury Works, Somerset,
    BA3 5RX

  • 0845 6342 179

  • Contact Us

  • Company Number: 05863375
  • VAT Number: 811134774

Other Stuff

  • About DIY Doctor
  • Contact DIY Doctor
  • Media and Press
  • DIY Projects
  • UK DIY Forum
  • DIY Doctor Suppliers
  • DIY Webinars

DIY Doctor Social Channels

  • Advertise
  • Competitions
  • Terms and Conditions
  • Privacy Policy
  • Cookie Information
  • NHIC
  • Sitemap

DIY Doctor are members of:

© DIY Doctor Ltd 2025 All Rights Reserved