If you have a suspended timber floor in your home, sometimes it may be necessary to replace it with a solid concrete floor known as a concrete slab.
In this DIY guide we run through everything you need to know about replace a timber floor with a solid concrete one.
Why Replace a Timber Floor With Concrete?
Timber floors are common in older UK homes, but over time they can suffer from problems such as rot, woodworm or even movement caused by damp. When these issues become severe, replacing the timber with a solid concrete floor is often the most practical solution.
A concrete floor provides long-term stability and removes the risk of hidden decay or infestation beneath the surface. Unlike timber, it does not warp, shrink or creak, making it a strong base for modern flooring finishes such as tiles, vinyl, laminate or carpet.
Another key benefit is improved insulation and damp resistance. By installing a concrete floor with the correct damp-proof membrane, you reduce the risk of moisture rising from the ground, a common cause of timber decay. This can also make your home more energy efficient and comfortable to live in.
Finally, concrete floors require far less maintenance than timber. Once installed, they are built to last for decades, making them a cost-effective upgrade for many property owners looking for a durable, low-maintenance alternative.
Is a Concrete Slab Better Than a Timber Floor?
Whether a concrete slab is better than a timber floor really depends on the property, budget and long-term needs.
In many UK homes, especially older ones, timber floors are common. They are lighter to install, easy to repair and give a natural, warmer feel underfoot.
However, timber can suffer from damp, woodworm, rot, and movement over time, especially in homes without proper ventilation or damp-proofing.
Concrete slabs, on the other hand, provide a solid and durable base that requires very little upkeep. They are highly resistant to damp and pests and once laid, they can last for decades with minimal maintenance.
Concrete also offers better insulation options when combined with underfloor heating or modern insulation boards, making it a popular choice for homeowners carrying out major refurbishments or extensions.
That said, concrete slabs can be more expensive and disruptive to install, especially retrospectively, than simply repairing or replacing timber joists.
They can also feel colder underfoot unless extra insulation or underfloor heating is added. For many UK homeowners, the decision often comes down to whether they want the traditional character and flexibility of timber, or the strength, stability and long-term reliability of concrete.
What are the Advantages of Concrete Floors Over Timber Floors?
Concrete floors offer several clear advantages over traditional timber floors, especially in UK homes where damp and long-term durability can be concerns.
One of the biggest benefits is strength. A well-laid concrete slab can carry far heavier loads than timber, making it ideal for kitchens, extensions, garages and areas where you plan to place heavy furniture or appliances.
Another major advantage is resistance to damp, rot and pests. Timber floors can weaken over time if exposed to moisture, leading to costly repairs.
Concrete floors are also easier to insulate effectively. Modern insulation boards and underfloor heating systems can be combined with a slab to create a warm, energy-efficient surface.
Finally, concrete requires very little maintenance. Once installed, it will last for decades with minimal attention, whereas timber often needs regular checks, treatment or repair.
To summarise, main advantages include the following:
- Strength and weight-carrying capacity
- Resistance to damp
- Resistance to rot and pests
- Easier to insulate
- Very little maintenance involved in their upkeep
What are the Main Issues That Affect Timber Floors?
Timber floors are popular for their warmth and character, but they can face several problems that reduce their strength and lifespan. Here follows some of the most common ouse they face:
Woodworm and other pests are another major concern in UK homes. These insects bore into the timber, leaving tiny holes and tunnels that weaken the overall structure. Without treatment, an infestation can spread quickly and cause serious damage.
Rot is also a frequent issue. Wet rot occurs when timber stays damp for long periods, while dry rot is a more aggressive fungus that can spread beyond the original source. Both reduce the floor’s strength and may lead to costly repairs if not spotted early.
General wear and tear plays a big part. Over time, heavy use, foot traffic and movement of furniture can cause boards to loosen, creak or crack.
While some of these problems can be repaired, regular inspection and maintenance are key to keeping a timber floor strong and safe as if the damage goes too far then the only option may be replacement.
The Problem With Dry Rot
Dry rot is one of the most serious issues that can affect timber floors. If your ground floor timbers are damaged by insects or dry rot, replacing them with a concrete slab may seem like a permanent fix.
However, simply laying concrete will not solve the problem if the rot is left untreated. Dry rot is highly aggressive and can spread across masonry, brickwork and even concrete once it takes hold.
Before installing a new floor, it is essential to fully treat and remove all traces of dry rot. Without this step, the fungus can continue to spread through the building and cause further structural damage, even beneath a newly laid slab.
What Causes Dry Rot and Insect Attack?
Dry rot and insect damage are common in suspended timber floors, usually caused by poor sub-floor ventilation. When air bricks are blocked by debris or ground levels are raised, airflow is restricted and moisture cannot escape. Leaks from pipes or drains can make the problem worse.
Damp, humid conditions create the perfect environment for timber-destroying insects and fungal decay. To prevent this, it is vital to keep air moving freely around joists and floor timbers. Find out more about sub-floor ventilation in our air bricks guide.
In severe cases, rot and insects can cause such extensive damage that the floor becomes unsafe. At this stage, replacing the timber with a concrete slab may be the only solution. This is a major job and requires careful planning, but it can provide a long-term fix if all underlying issues are properly treated first.
What to Think About Before Laying a Concrete Slab
Before pouring a concrete floor, check these key points to avoid any potential future problems:
- Treat dry rot first: Any rot in the old timber floor must be removed and treated, or it can spread into skirting boards, joists and even concrete edges. Clear out all debris and rake soil thoroughly for chips of wood. The soil should also be sterilised to kill spores or fungus. See soil sterilising tips here.
- Check hardcore rubble: Fill material can also carry rot spores. Make sure rubble or brick is treated the same way as soil before use.
- Protect the Damp Proof Course (DPC): The DPC, often made from bitumen, slate or plastic, stops rising damp. Pouring a slab too high can “bridge” the DPC, letting moisture into walls. If this happens, a new DPC may need to be injected at the right level. See our damp proofing guide.
- Consider your neighbour’s property: If you share a Party Wall, raising the floor may also bridge their DPC. Under the Party Wall Act you must get permission before starting work. If needed, tank the wall to stop damp transfer. Learn about Party Wall rules here.
- Seal floor-to-wall joints: Even good builders sometimes leave gaps where the slab meets the wall. These gaps can let water vapour rise, causing rot and plaster damage. Prevent this by sealing joints with an epoxy grout.
- Plan for pipes and services: Gas, water, electricity and waste pipes may run under the floor. These must be placed in ducts and sealed properly. Always follow safety regulations and consult a professional before covering any services.
- Treat remaining timbers: If insect damage is the reason for replacing the floor, ensure all other timbers and skirting boards are treated before pouring concrete to stop further infestation.

Dry rot present on timber joists
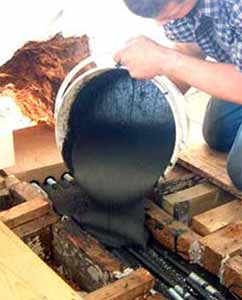
Epoxy pouring resin used to fill gaps
How Thick Should a Concrete Base be?
A common question we hear is: How thick should a concrete base be?
The exact depth depends on the type of project and local building rules, but it’s important to think about the whole build-up of the base, not just the concrete layer. This includes the hardcore, concrete, insulation, screed, and even the thickness of the damp proof membrane.
For a detailed look at foundation sizes and how they are built to meet local authority standards, see our Foundations Project.
What Building Control Points Do You Need to Comply With When Constructing a Concrete Floor?
When laying a new concrete floor in the UK, you must follow specific building control requirements to ensure the work is safe, long-lasting, and legally compliant. These rules are there to protect your home from issues such as damp, poor insulation, or structural weakness.
Damp Proofing: A continuous damp proof membrane (DPM) must be installed to stop moisture rising from the ground into your floor. In many cases, this needs to be linked to the existing damp proof course in the walls to prevent any bridging.
Insulation: Current UK building regulations require floors to meet certain energy efficiency standards. This usually means adding rigid insulation boards beneath the concrete or screed to improve thermal performance and help keep heating bills down.
Ventilation and Drainage: Adequate ventilation is vital where any timber remains in the floor construction. If your floor design alters air flow under the house, extra measures may be needed. Surface and ground water must also be managed properly to avoid damp problems later on.
Load Bearing: The floor must be a flat, level and uniform surface, strong enough to carry the intended load. For example, a domestic floor must support everyday use, while a garage or workshop slab may need extra thickness and reinforcement to take the weight of vehicles or machinery.
Services and Access: Any pipes, ducts, or cables running through the floor must be installed in protective sleeves and sealed correctly. Building control officers will also check that future access is possible where needed.
Before starting, it’s always best to check with your local authority building control team. They can confirm the exact standards for your property and help avoid costly mistakes.
Dealing With DPC Bridging
When installing a new concrete floor in a home with cavity walls, it is essential you are aware of DPC bridging.
This often happens at doorways where the floor screed meets the door frame, allowing damp to travel across the cavity.
To avoid any such problems, always check how the new slab connects at these points and use the proper methods to keep the damp proof course effective.
For more guidance, see our Cavity Walls Project as this covers how to join into existing DPC’s and maintain any and all damp proofing.
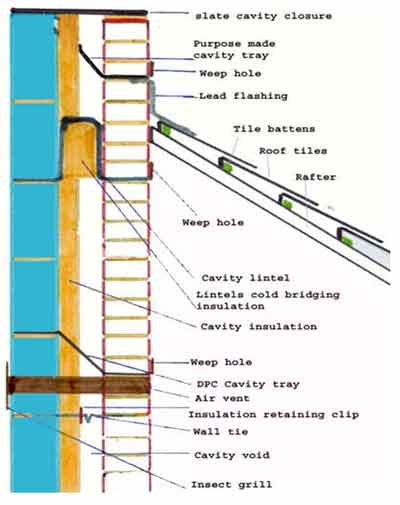
Cavity wall cross section
How to Lay a Concrete Slab in Place of a Timber Floor
If you are replacing a timber floor with concrete, there are a few key points to get right. A concrete floor must meet building standards, provide proper support and protect against damp.
Before you start, make sure you understand the essential design requirements that go into a safe and long-lasting slab.
How a Concrete Base Should Be Formed
Laying a concrete base must follow strict standards to ensure it is safe, durable, and fully compliant with any relevant regulations. The sketch below shows the most common method of concrete slab construction, but designs can vary depending on the project.
Always check with your local Building Control officer before starting. They will confirm the correct design, materials and thickness and issue the Building Regulation approval you need.
If the work involves a new building or certain alterations, you may also require Planning Permission, which must be approved before you begin any form of work or excavation.
Where insulation is included, it must match the specification set out by your architect or Building Control. Using the wrong type or thickness can lead to damp or poor energy performance later.
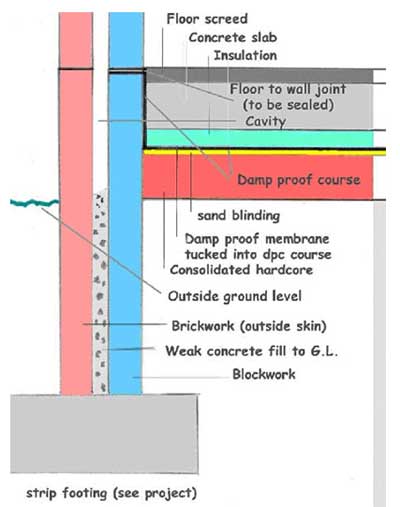
Cross section of how to construct a concrete floor slab
Step 1: Remove the Existing Timber Floor
Start by carefully lifting the timber boards and joists of the original floor. Take note of any existing damp-proof course and check whether the ground beneath is flat and level.
Dispose of old timber responsibly, as rotting or damp wood can harbour mould and pests. Your local recycling centre is the best option for this.
Sweeping and clearing the sub-base thoroughly, removing any and all rubble, debris etc. will make the following steps easier and the overall job more successful.
Step 2: Prepare the Sub-Base
A stable base is vital for long-lasting concrete as if not, the base can easily crack, subside and ultimately fail.
When creating a solid stable foundation for your concrete pad, the very first job to do is to lay a solid base.
Lay a compacted hardcore layer (crushed stone or rubble) around 100–150mm deep. Once you have poured the stone and spread it over the base area, use a plate compactor to ensure it is well-packed down and level.
It is essential that it is solid as if not, it will move over time and again this will cause the concrete to fail.
Once the base is laid, on top, add a layer of sharp sand, spread it out over the compacted hardcore to smooth out the surface and again compact it down gently. This will help the concrete settle evenly.
Step 3: Install a Damp Proof Membrane
One of the biggest issues with concrete bases is damp rising up from the ground below.
To prevent any possibility of rising damp, roll out a heavy-duty polythene damp proof membrane across the entire base area.
Where a join is needed, overlap joints by at least 150mm and tape them securely so that they are sealed and no damp can penetrate.
Ensure that you bring the edges of the DPC membrane up the surrounding walls so the finished slab remains fully encapsulated and protected from moisture coming through the ground from any point.
Make sure the DPC membrane is securely held in place so that it doesn’t move during the concrete pour.
Step 4: Pour the Concrete Slab
Depending on the size of the base you are creating, it is quite often much better to buy in pre-mixed concrete rather than try and mix and pour it yourself.
When mixing and pouring yourself the base will inevitably dry and different rates and regardless of how concise you are with quantities, mixes will differ slightly and all of these factors can effect the overall success of the job.
If however you do mix yourself, then a typical ratio is 1 part cement, 2 parts sand, and 4 parts grave and use only clean water, however as said, in pretty much every situation you are better of buying in ready mixed concrete. For more help and advice, see our mixing concrete project.
Any concrete should be poured to a depth of at least 100mm for standard domestic use, increasing to 150mm if the floor will bear heavy loads.
As it’s being poured you will need to spread and tamp the concrete level. Make sure it’s tamped down well and that you spread it fully so there are no gaps or air pockets then finally smooth the surface with a steel float for a clean finish.
Step 5: Curing and Finishing
Once poured and smoothed the concrete then needs time to strengthen and properly cure.
A general rule of thumb is that the longer concrete has to cure, the more flexibility it has so it’s a great idea to keep the slab damp for at least seven days by covering it with polythene sheeting or regularly misting with water.
After curing the slab is now pretty much ready for insulation, screed or your chosen floor covering.
If you have followed all the advice above then the result should be a durable, modern, damp-proof floor that will outperform timber for decades to come.
Repairing a Concrete Floor
Concrete floors are tough and long lasting, but they can still develop issues if the base was not laid correctly. Cracks, uneven areas, or surface wear may appear over time. The good news is most problems can be fixed with simple repair methods, helping you restore strength and extend the life of your floor without needing a full replacement.
Potential Concrete Floor Problems
Even though concrete floors are durable, they can develop common issues over time. Knowing what to look out for makes repairs easier and helps prevent bigger problems later.
- Gaps at walls: Open joints between the slab and walls can let damp rise, leading to stained plaster, rot in skirting boards or mould growth.
- Cracks: Often caused by subsidence, weak foundations or concrete drying too quickly. Cracks may spread if not repaired promptly.
- Holes and voids: Poor pouring or uneven foundations can leave weak spots. These may cause hollow patches, local damp or in severe cases, collapse.
- Damaged membranes: A punctured damp proof membrane allows moisture to seep through, lifting tiles or floor coverings and leaving damp patches behind.
- No membrane at all: Without a damp proof course under the slab, moisture rises through the floor. This often causes mould, lifted coverings and damage to carpets, vinyl, laminate and many other internal areas.
Causes of Damp Patches on Concrete Floors
Damp patches are one of the most common signs of concrete floor problems. Before attempting any repair, always rule out a leaking pipe or radiator first. Fixing a leak is often quicker and cheaper than repairing a damaged damp proof course (DPC).
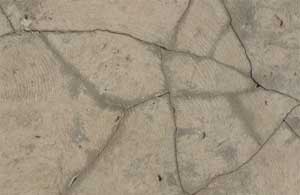
Cracked and broken concrete floor
If cracks, gaps, or voids have developed, seek advice from a Structural Engineer. Once the cause is confirmed, repairs usually fall into five main categories:
- Open joints: Cut a slot (25mm x 25mm) at the floor edge, clean it thoroughly, then fill with Structural Epoxy Pouring Grout.
- Cracks: Open and clean to 25mm x 25mm without damaging the membrane, then fill with epoxy grout to seal and strengthen.
- Holes and voids: Excavate carefully to the full depth of the defect. If DPC is damaged, excavate enough to clear 6 inches around damage and then patch repair, fully sealing the patch. For small holes use epoxy grout; for larger ones, use grout as a base layer with concrete filler, then finish with levelling screed mixed with SBR to reduce shrinkage.
- Punctured membranes: Dry the floor using a dehumidifier, mark damp areas, then excavate and expose and repair the damaged section using patching or a suitable method and then use epoxy grout or grout plus concrete to fill holes. Finish with screed containing SBR for extra durability.
- No membrane: Remove coverings, dry the floor fully, clean it, repair defects, then seal floor-to-wall joints. Apply two coats of Epoxy Sealer; sand the second coat if adhesive flooring will be used.
Pouring and constructing a concrete pad to replace an existing floating timber floor can seem like a massive task, however as long as you work in stages and ensure that each is carried out fully and correctly, you can be sure that you will end up with a successfully poured and cured concrete floor.