
Cupboard door indicating different sides
How can you Adjust a Kitchen Cupboard Door?
One of the most popular questions asked of DIY Doctor is how do I adjust the concealed hinge on my kitchen cupboards. In this project you will learn all about adjusting kitchen cupboard doors and hinges and how to adjust door hinges and concealed hinges.
The door above represents an ordinary kitchen cupboard. There are many ways it can be adjusted with a simple crosshead screwdriver.
- The door can be lifted higher, ie from line C-D to line A-B
- The door can be lowered from line A-B to line C-D
- The top of the door can be moved right from point A to point B
- The top of the door can be moved left from point B to point A
- The bottom of the door can be moved right from C – D
- The bottom of the door can be moved left from D – C
- The whole door can be moved right from line CA to line DB.
- The whole door can be moved left from line DB to Line CA
- The top of the door can be lifted at point A also lifting the bottom at point C
- The top of the door can be lifted at point B also lifting the bottom at point D
How to Adjust a Kitchen Cupboard Door Concealed Hinge
All of these adjustments can take place while the door is in position. The images below is a close up of a concealed hinge, each adjustment screw is numbered. Follow the instructions below to adjust the door to the number of the adjustment above.
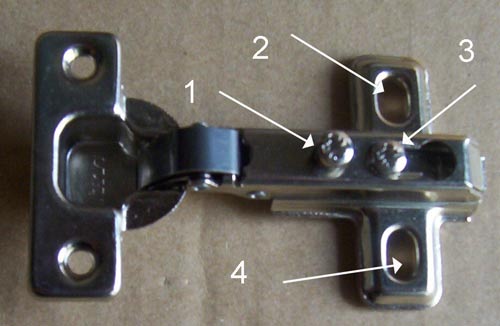
Concealed hinge indicating different adjustment screws
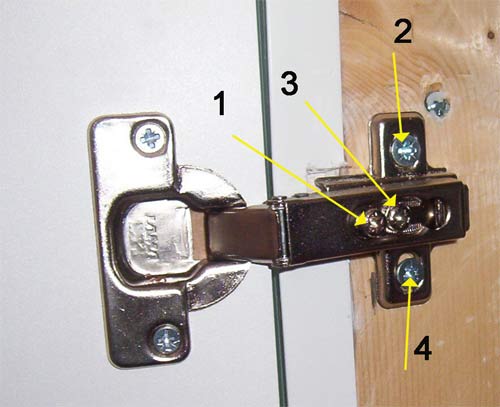
Concealed hinge fixed to cupboard
Please note screwing tight is a clockwise turn, unscrewing is anticlockwise
- Door lifted higher: is done by undoing screws 2 and 4 on both hinges and lifting door to required height. Hold in position and tighten screws
- Door lowered: As above but lower door and tighten screws
- Top of the door moved right from point A: Screw tight number 1 on the top hinge and/or unscrew number 1 on the bottom door
- Top of the door moved left from point B: Unscrew number 1 on the top door and/or screw tight number 1 on the bottom door
- Bottom of door moved right from C: Unscrew number 1 on the top door and/or screw tight number 1 on the bottom door
- Bottom of door moved left from D: Screw tight number 1 on the top hinge and/or unscrew number 1 on the bottom door
- Whole door moved right from line CA : Unscrew number 3 on both hinges, move door over and tighten
- Whole door moved left from line DB: Unscrew number 3 on both hinges, move door over and tighten
- Top of door lifted at point A: See adjustment 1
- Top of door lifted at point B: Screw tight number 1 on the bottom hinge
Any one or more of these adjustments can be made at the same time, for example if the top corner (B) of the door needs to go up a great deal, you can make the adjustments shown in adjustment 5 while at the same time unscrewing number 3 in the bottom hinge and pulling out slightly
Remember that moving a door left or right by just using screw 1 will tilt the door also, This can be compensated by unscrewing the equivalent screw on the other hinge or making necessary adjustments with screw 3.
If you would like to know how to measure and fit a concealed hinge, see our project here.