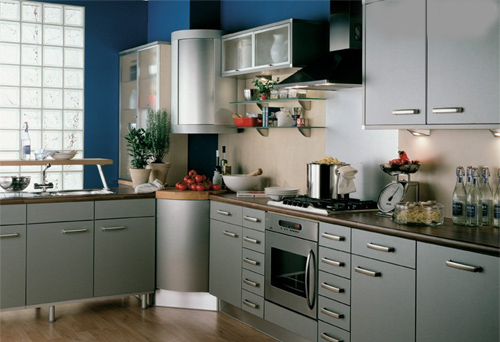
A Modern Kitchen Design Works well in a Modern House
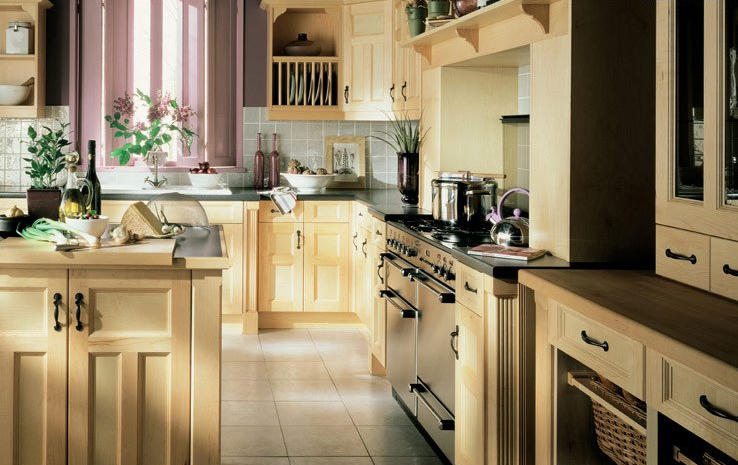
Traditional Kitchen Units work best in Period Homes
Do you want a new fitted kitchen and fancy doing it yourself? Follow this guide to fitting a kitchen and click on the links and images to buy incredible value units, appliances, worktops, sinks, taps and everything else you need to fit a kitchen.
Even if you decide that you want to employ someone else to fit your kitchen you will still find this guide useful when designing your kitchen to give you the best layout and style for the way you use the room.
Kitchen design is a personal thing but we will talk you through the components you need to consider, when planning your kitchen.
The style of kitchen cabinets you choose is also a personal choice, but very modern kitchens can look great in new apartments and houses, or in traditional period homes. More traditional and cottage-style kitchens look best in older properties.
Choose kitchen tiles and paint for the walls that complement or contrast with the colour of the units.
Choose flooring and floor tiles that echo the colours in the kitchen worktops for a consistent design effect.
Kitchen sinks come in many shapes and designs and you should consider whether you need a single or double sink and the different effect that you will get from choices between ceramic, stainless steel or moulded sinks.
Small changes to design elements can make your room more personal to you. Choose kitchen taps and the handles for your kitchen units carefully as these can make all the difference to your overall design.
Lighting is very important in the kitchen. There should be plenty of light in the work areas but you might want to be able to alter the lighting if you are also going to eat or entertain in the kitchen. See our kitchen lighting project for ideas and information.
Skills Required to Fit Your Own Kitchen
Fitting a kitchen yourself does require a great deal of skill, to get it looking right and to make sure it lasts for years. This is because kitchens have to deal with heat as well as damp and humid conditions, and kitchens are the rooms that are often getting the heaviest wear in the house.
Fitting the kitchen to a professional finish is important to the look and style of the room, but also to ensure that the materials used are working to their best advantage in what is after all the heart of the home. For this reason fitting a new kitchen is a project most suited to the more advanced DIYer.
There are a wide range of skills involved, and you will need to have knowledge in the following trades; Carpentry, Plumbing, Electrical and Tiling.
Safety First
There are many safety factors involved in fitting a kitchen. The kitchen is a potentially dangerous mix of electricity and water plus many kitchens also have a gas supply.
Drilling Holes
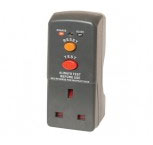
If you need to drill holes in the walls or floor you must always check for electrical cables and water pipes, using a pipe and power detector. You will find examples of these in our shop.
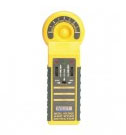
Pipe, Cable and Stud Detectors are available in our DIY Superstore
The one pictured above also detects studs in the walls. This is very useful for when you want to make sure you have a solid fixing for attaching kitchen units to the wall, especially wall units. If you do not have a solid anchor to a stable surface then whenever you put weight on the fixing it will be at risk to giving way.
Think how much weight is on a wall unit filled with plates or mugs and then think about how strong a wall fixing directly into a stud or solid wall would be when compared to fixings into a plasterboard wall. You get the point.
If you have to fix to plasterboard make sure you use special plasterboard fixings.
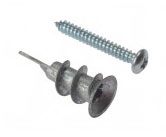
Specialist Plasterboard Fixings will make Wall Units more secure
Using Power Tools to Fit a Kitchen
You will want to use power tools when fitting a kitchen to make the job quicker and easier. These can be tools that you already own, or that you buy or hire especially for the job. However, when using power tools in the kitchen or bathroom you should always use a Safety RCD. An RCD (Residual Current Device) is a safety device which will cut off the electrical supply to the power tool if you accidentally damage the cable or get the equipment wet, which could risk electrocuting you. For more information on RCD protection devices go to our Cables and Fuses Project.
Use an RCD to protect against Electric Shock when using power tools in damp conditions
Check Your Tools
Always check that all power tools and leads are in good condition. If you notice damage to the tools or their electric leads do not use them until they are professionally repaired, or replace them.
Safety Equipment
You should also always wear safety equipment that is appropriate to the task you are completing. If you are in any doubt what protective equipment or clothing you need, then consult the instructions that come with the tools and materials you are using.
Gas
Remember, it is law that gas appliances should only be disconnected or connected by an engineer who is Gas Safe Registered – see the useful contact details below.
Electricity
Take care when working with electricity. If in doubt call in a qualified electrician. Please see the project on Part P of the building regulations as most work in the kitchen must now be certified as part of the building regulations.
To Complete This Project You Will Need
If you are intending to fit your own kitchen you will a number of specialist tools. Don’t be tempted to try to use a tool that is not suited to the tasks you are doing as this will lead to frustration and an inferior finish.
Here is a list of tools you will need to make sure you can effectively fit your own kitchen:
- Basin Spanner
- Bolster Chisel
- Cabinet Accessories
- Cabinets
- Claw Hammer
- Crow Bar
- Doors
- Drill
- Drill Bits
- Electrical Screwdrivers
- Gloves
- Hammer
- Handles
- Kitchen Sink
- Kitchen Taps
- Masking Tape
- Measuring Tape
- Phillips Screwdriver
- Pliers
- Pump Pliers
- PVA Wood Glue
- Safety Goggles
- Saw
- Silicone Sealant
- Slotted Screwdriver
- Spanners
- Spirit Level
- Wire Pipe and Power Detector
- Worktops
You should value your time when you are doing DIY. Although there is an initial expense to buying new tools and accessories you need to factor in that the right tool will save you time, and should ensure less waste of materials by helping to prevent mistakes and damage as you go along.
Measuring Your Kitchen
Carefully measure up your kitchen in millimetres making a precise scaled plan on a piece of graph paper or using a kitchen planner computer programme of your choice.
Measure in a clockwise direction, starting from the main entrance door, and note which direction the doors open.
Mark in any permanent features such as a window, chimney breast, steps or beams that will affect your planning.
Mark any existing plumbing and waste fittings, boiler flues and extractor fittings. These can be altered but it will be cheaper to keep them in their existing locations if possible.
Take note of the sizes of appliances that you want to fit in your new kitchen and what units will be required to fit them
Make a note of any kitchen appliance or furniture that you already have, or that you feel is a ‘must have’ item in your new kitchen. Have accurate measurements of these appliances to help you plan where they should go in your new design.
Think about the sizes of kitchen cabinets you will need for the equipment, utensils and appliances you own or want to put into the units.
Points to Note When Measuring
Be careful to check the following:
- Take the ceiling height at several points; to be sure there are no differences in heights around the room. If there are then you will need to allow for these discrepancies in your plan
- Ensure the kitchen is square by measuring diagonally (or compare opposing walls). If it is not square you will need to adjust worktops, and you may have to cut down kitchen unit, accordingly
- Carefully mark the location of existing power points, plumbing, gas supply, air vents and any permanent features such as windows, sills, radiators and boilers
- Always check dimensions, if in doubt measure it again
- Note the space required for your kitchen appliances
- Finally check what the walls are made of to ensure that you buy the correct fixings for your units
Planning Your Kitchen
It’s important to design a kitchen that revolves around your needs. Creating a tight ‘work triangle’ between your cooker, sink and fridge will make a better working environment. This work triangle is simply the distance between the most regularly used areas of your kitchen – the cooker (or oven and hob) the sink and the fridge. We also suggest you carefully consider the location of the bin (and recycling) as this is also one of the most used sections of the kitchen, but is often overlooked. Well it isn’t very glamorous is it?
You should also have sufficient work areas around each of these work areas to allow you to put down hot items removed from the oven or hob, to pile up dirty dishes ready for washing up, to drain clean dishes and enough space for food preparation. In smaller kitchens you will probably have to make these areas multi-purpose, but try to think about how one person will move around the room, and then how two or more people will use the room, to try to make sure you will not be in each other’s way as one person is washing up and another is making a cup of tea, for instance.
Planning fitted kitchens this way ensures that your workspace is never cramped, allowing you to move freely between appliances. The layout you choose will depend on the size and shape of your room – and the position of windows and doors. Plumbing and electrical points can usually be moved, so do not let these restrict your design.
Design Layouts
Most kitchens fall into four basic designs:
- a single line of units
- a double line of units also called a galley kitchen
- an L–shaped kitchen
- a U–shaped kitchen
Larger kitchens may also feature an island unit, and/or an eating area or breakfast bar.
By combining kitchen cabinets imaginatively within these designs, it is easy to totally transform your kitchen to suit your lifestyle.
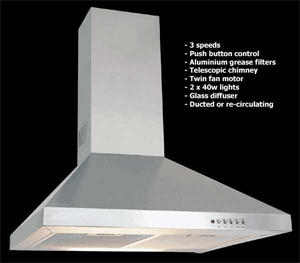
Cooker hoods for disbursing steam and smells
Working out the Details for Your Kitchen
Designing a kitchen can be a daunting task so we share with you some dos and don’ts to help you avoid some common mistakes we have come across.
The following list of dos are advice that will help to reduce the work and keep costs down as well as ensure your safety when fitting kitchen units and later when using the kitchen.
Definitely do
- Position electrical sockets a minimum distance of 150mm above worktops
- Position extractors or cupboards a minimum distance of 750mm above hobs
- Use heat or fireproof cable on cookers or hobs
Suggest you do
- If you are using paper to plan then cut out the units on the plan you have drawn and copy them across to another outline plan. This will allow you to move the units around your kitchen to settle on the best design
- Think about positioning kitchen sinks by a window, so you have a view
- Locate your dishwasher and washing machine close to the sink to minimise plumbing work
- Ensure that wall and floor units are similar widths, so that the doors line up to give a more ‘designed’ look
- If you are using them, keep tall units at the end of the worktop runs, to maximise the working area
- Place your hob and oven, or free-standing cooker, in a position that minimises the distance you need to carry hot pans across the walkways in the kitchen
- Allow at least 300mm of clear space each side of the hob to allow for protruding pan handles
- Position extractor fans on (or close to) outside walls to make sure they are most effective
- Allow adequate space around free-standing appliances for easy access, (refer to manufacturers fitting instructions).
Definitely don’t
- Locate a cooker or hob beneath a window where curtains could catch fire, gas flames could blow out, or where it is dangerous to reach over to the window
- Plan a wall unit above a hob without an extractor fan
- Plan a hob next to a tall unit, corner wall or at the end of a run
- Position a cooker next to or near to opening doors
- Box in boilers or other gas appliances as these require air flow to operate properly and safely
- Put a cooker hob under or near electrical sockets
- Block up existing air vents if there are gas appliances in the kitchen
Suggest you don’t
- Plan appliances in a corner
- Put an inset sink near worktop joints
- Position kitchen sinks near or next to opening doors
- Position cookers next to fridges or freezers
Consult a plumber if you are in doubt about the positioning of a sink or dishwasher as it is not always possible to reposition them – you will need to take into account the positions for waste pipes and drains.
It is also important to consult a Gas Safe registered fitter about any gas appliances including hobs and boilers, and they should also be consulted about fitting, blocking or moving any air vents.
You will need to consult a qualified electrician about electrical work as a kitchen is an area that is a high risk work area.
Once you have decided on your units and worktops don’t forget the other exciting accessories that can add those finishing touches – such as plinths, pelmets, cornices, handles, decorative legs and wirework.
Useful Contact Details
Gas Safe Register
- enquiries@gassaferegister.co.uk
- PO Box 6804
- Basingstoke RG24 4NB
- 0800 408 5500
- www.gassaferegister.co.uk
CIPHE – The Chartered Institute of Plumbing and Heating Engineering
- info@ciphe.org.uk
- 64 Station Lane
- Hornchurch
- Essex RM12 6NB
- 01708 472791
- www.ciphe.org.uk
NICEIC – National Inspection Council for Electrical Installation Contracting
- enquiries@niceic.com
- Warwick House, Houghton Hall Park
- Houghton Regis
- Dunstable LU5 5ZX
- 0870 013 0382
- www.niceic.com
Removing Your Old Kitchen
Don’t remove your old kitchen until you are ready to fit the new one. Make sure you have the tools you need, your new kitchen units and appliances, and the time you need to get the job done.
If you are ordering units to be delivered, make sure you have them and have fully checked your delivery is correct, before you take out the old units.
Likewise, you should only start to dismantle your old kitchen when you have already bought your new Take Away kitchen and appliances – just in case you can’t get everything you want.
Getting The Kitchen Ready
You may want to use another room as a temporary kitchen – an electric kettle and microwave are particularly useful while your kitchen is out of use.
First of all clear everything out of your kitchen. Be sure to empty all the cupboards and clear all worktops. Turn off the kitchen electricity at the main fuse board.
Turn off the water supply at the mains – make sure you fill the kettle first! Then disconnect all lines to the sink and drains. Next, disconnect any appliances.
Removing Old Cabinets
Wear safety gloves and goggles when removing the cabinets – two people will be required to remove the wall cabinets.
First remove all the drawers and doors from the cabinets.
Next remove worktops by looking underneath to locate the attachments to the base cabinets. Remove any screws and fasteners and ease the worktop off. If it has been glued down, you may need to use a crow bar to pull the worktop off – remember to protect the wall by putting a piece of waste wood between the wall and the crowbar.
Now you simply have to unscrew the cabinets, detach them and clear the kitchen.
Making Good
This is a good time to make any repairs to the walls, you can fill holes or if the surfaces are not good, you might want to skim plaster the walls. See our projects section on plastering and screeding for more advice on preparing surfaces.
If your walls are in good condition you can now apply a first coat of paint.
Now is also the time to lay new flooring, for boxing in pipes and getting any professional help such as an electrician or plumber should also be considered at this stage.
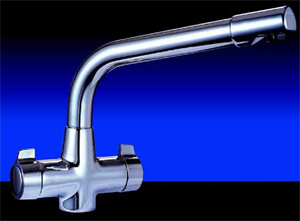
Contemporary kitchen tap
Installing Your New Kitchen
Starting in the corner where you plan to begin your installation, use your spirit level to ascertain if the floor is level.
If the floor is not level mark where the highest point of the floor is on ‘wall 1’.
From this mark, measure up 870mm from the floor for the height of the top of your base cabinets. This measurement includes 150mm to allow for plinths and legs.
Then use a spirit level, or laser level, to make a level line for the top of the base cabinets. If you are using a spirit level you will find it more effective to use a longer level, we would recommend a metre or longer for accurate measurements.
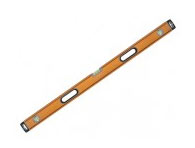
Use a Spirit Level to Ensure your Kitchen Units are Level
Next you should decide where you want your wall units on the wall – mark level lines for the top and bottom of the wall cabinets at the right height for you.
Double check your level lines to make sure they are straight and level. This will ensure that your cabinets are straight, even if your walls are not.
Cabinet Assembly
Although the units are easy to put together, do read the assembly instructions before you start work as you’ll be more familiar with the task in hand.
Hints and Tips
- Clear a large area to assemble and store new cabinets
- Do not attempt to lift or carry boxes alone
- Open one box at a time and assemble each cabinet before moving on to the next
- Avoid scratching surfaces by assembling on a carpet or on an empty cardboard box
- Match each assembled cabinet to the corresponding door by sticking on masking tape and then numbering
- Fit the wall units before you fit the base units
Installing Wall Cabinets
When fitting kitchen wall units work methodically, starting with a corner cabinet and working out in both directions.
Make sure someone is there to assist you, to steady the cabinets while you check levels and fixings.
Hints and Tips
- Make sure the wall unit is pulled out from the corner to match your layout plans and template lines
- On plasterboard walls, use cavity wall fixings to attach cabinets if the fixing positions do not coincide with wall studs. Alternatively you can fix battens to the wall fixing to the studs behind and then use these to fix the wall units to
- Check adjoining wall cabinets are level and straight before moving on to the next cabinet. Fix the bracket to the wall, hang the cabinet and then adjust the screws that affix to the bracket to ensure it is level and as close to the wall as is possible. Your spirit level is essential!
Installing Base Cabinets
Begin in the same corner as you did when fitting kitchen wall units earlier. Make sure the cabinet matches your plan – and is correctly positioned in relation to the wall cabinet above.
Once again, you need to make sure that the first cabinet is level, even if your floor isn’t. Follow the marking lines.
Leave the doors and shelves until last, as it is much easier to adjust an empty unit!
Before affixing the base cabinet to the wall, rotate the legs to adjust the height, making sure all the units are level. Once the height matches the marking line, the other units, and is level in all directions, then use the appropriate fittings to secure cabinet to the wall.
Hints and Tips
- Do not screw cabinets tight to wall until the levels of any adjoining cabinets are checked
- Drill holes for pipes before installing the sink cabinet
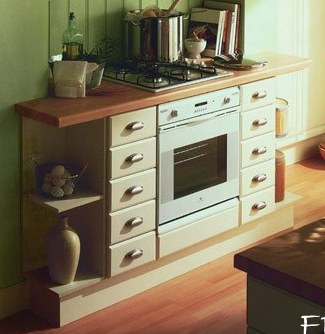
Kitchen base units with fitted cooker
Fitting Kitchen Worktops
If the kitchen is fitted with three worktops i.e. one at the end and the other two running at right angles to it in a ‘U’ shape, you will need to install the end one first.
Measure the distance from one end to the other end of the cabinets and cut the worktop to the required length. You may want to cut the kitchen worktops flush with the edge of your unit, or you may want a slight overlap (space allowing).
If the end is butting up to walls at either end you will need to allow for any defects in the walls, or awkward angles. If in doubt cut a template of any odd shapes.
If you are using Formica worktops, seal all worktop edges with PVA then, if you are using them, fit joining strips to the worktops using silicone sealant to seal the ends and edges of the worktops.
When all the kitchen worktops are cut, position them on the base units and check that they all fit. Make any adjustments to ensure that all joints are tight fitting and flush.
Fix the worktops down using suitably sized woodscrews and check the joints to make certain they are level and square.

Fitting Kitchen Worktops is easy once they are cut to size and shape
Installing an Inset Sink and Taps
The tools you require and the amount of plumbing needed will vary depending on the type of sink and taps you have chosen.
Start by carefully measuring and marking out the sink outline – a template is usually provided with the sink. NB. Remember you’re not usually measuring out to the full width/length of the sink as a lip around it will hold it in place. Once marked out, carefully cut out the hole with a jigsaw.
With the sink on its face, seal around the rim and then fit the securing clips to the sink – this ensures the sink is firmly attached to the worktop.
Now is the time to fit your taps, following the instructions you receive in the packaging.
Mixer taps are the best choice for kitchen taps. Pick a style that is easy to turn on and off with messy fingers.
Mixer Tap Installation Tips
- Look to see whether the hot pipe is on the left as you look at the sink
- When undoing the cap nuts of each connector and you’ve slipped the nut and olive onto each pipe, use a spring-clip clothes-peg below each pipe to stop them slipping off.
- Read and fully understand the instructions before you start
- You might also want to consider buying a tap that has a hose option for rinsing utensils and the sink area
- There are taps that deliver filtered water, and even boiling water taps so you can make hot drinks directly from the tap or use boiling water for sterilising and cooking without having to wait for water to boil. See our project on installing a boiling water tap.