Proper kitchen lighting is crucial for safe food preparation, especially when using knives and other tools. Inadequate lighting can create shadows, particularly if your body or wall units obstruct the light source.
To address this, we offer a light box designed to mount on your kitchen ceiling. This light box provides ample illumination to cover the entire kitchen, eliminating shadows and enhancing visibility while adding a stylish touch.
What to Consider for Kitchen Lighting
When designing or upgrading your kitchen lighting, consider a few key factors to ensure optimal visibility and safety.
Proper lighting is essential to avoid dangerous shadows in cooking and preparation areas (more on this below).
Fluorescent tube lights are commonly used because they provide even, diffuse lighting without casting harsh shadows. However, they may not offer the most modern look.
For a more contemporary solution, consider spotlights. These can be strategically placed to illuminate any shaded areas and enhance overall visibility.
Also, think about power sources. Ideally, install new lights or your light box in the same location as previous fixtures to use existing wiring and switches, simplifying the installation process.
Kitchen Lighting Options
Kitchen lighting typically falls into three main categories:
- Fluorescent Tubes
- Downlighters
- Spotlights (single or on a bar)
While traditional fluorescent tubes provide even lighting, they are outdated and inefficient. Upgrading to LED tubes offers better light quality and energy efficiency. Learn more about LED lighting here.
Downlighter’s are a modern alternative, offering focused light. When spaced correctly, they eliminate dark areas and work well in kitchens. Some models are adjustable, allowing you to direct light as needed.
Spotlights are another versatile option. They can be installed individually or on a bar, with each light adjustable to target specific areas.
Installing new lights may require some ceiling or floor access for wiring, but replacing existing fixtures with your preferred option often simplifies the process.
What is the Best Lighting for a Kitchen?
Choosing the best lighting for a kitchen involves balancing functionality with your chosen look and feel.
A well-lit kitchen not only enhances its appearance but also makes cooking and food preparation much easier and safer. Here are some points to consider:
Ambient lighting: This provides the general illumination needed to light the entire room. Down lights/spot lights or flush-mount fixtures are popular choices for this as they distribute light evenly across the space. For a modern touch, dimmable LED lights can be adjusted to your needs throughout the day.
Task lighting This is featured in areas where precision is crucial, such as countertops and cooking spaces where knives and hot items often heavily feature. Under wall cabinet lighting is a great option here, as it illuminates work surfaces without creating shadows. Pendant lights above an island or bar area also offer focused light in these areas while adding a stylish element to the kitchen.
Accent lighting This type of light is used to illuminate items such as backslashes or display cabinets. LED strips are ideal for this and can be installed inside glass-front cabinets or along architectural features to create a warm, inviting atmosphere.
Important Electrical Regulations
When working with electricity, safety and compliance are crucial. It’s vital to ensure that all electrical work is performed correctly to prevent accidents and meet legal standards.
Any electrical work in your home must be conducted by a qualified Part P registered electrician. Failing to do so could not only break the law but also invalidate your home insurance.
However, some tasks, such as replacing an existing light fitting, can be done on a DIY basis. For instance, you can swap an old strip light for a modern spotlight bar, as long as no new wiring or modifications are involved. If wiring changes are needed, only a Part P electrician is qualified to perform the work.
In our light box project below, since new wiring was required, all electrical work was completed by a professional electrician. To save time and costs, we pre-installed the wiring around the light box, leaving the electrician to handle the final connections and light installation, after he had fully inspected the work that we had carried out.
One point to note is that as we are indeed in the trades, we know a fair bit about electricity and wiring, due to our years of experience, and as we know the electrician carrying out the work well, he fully trusted us to do the wiring work to full regulation standards.
However, if you are undertaking this project you may not be so lucky, as, at the end of the day, any work you do, the electrician connecting it up is responsible for, so he or she may insist on doing the work themselves, so you may need to discuss this point with your electrician.
Warning: To complete electrical works you must comply with Electrical Regulations – Find out all about electrical safety here.
Tools and Products Needed for Building a Light Box
In order to build your kitchen light box, you will need the following tools and products:
- 2×2 timber to build framework
- Plasterboard to construct box work
- Chosen lighting (downlights etc.)
- plasterboard saw
- Utility knife
- Spirit level, straight edge etc.
- Reciprocating mitre saw, hand saw etc.
- Screws
- Drill/driver
- Selection of drill bits
- Tape measure
- Plasterboard screws
- Skrim tape
- Angle beads
- Skim plaster
- Mixing buckets
- Paddle mixer etc.
- Plastering trowels
- Clean water
- 1 or 1.5mm 2 core and earth cable
- Cable cutters
- cable stripping tools
- Selection of hole-saws
- 16 amp junction box, Wago box or similar
- Paint brushes
- Chosen colour finishing paint
- White matt paint (for mist coat)
How to Build a Kitchen Light Box
We’ve designed a kitchen light box that not only adds a stylish feature to your ceiling but also provides diffused lighting, reducing shadows without requiring major renovations like removing flooring or ceiling sections.
We won’t specify bulbs, wattage, voltage, or wiring details here because lighting needs vary by room, and kitchen wiring often involves Part P regulations. It’s strongly recommended to build the light box yourself and leave the electrical work to a qualified electrician.
To create your own kitchen light box, follow the steps outlined below:
Step 1 – Clear the Area
Before starting any work near electrical components, isolate the circuit by turning off the MCB in the consumer unit or removing the fuse.
With the circuit safely isolated, remove the old light fitting. Start by taking off the ceiling rose cover to reveal the fixings, or unscrew the unit from the ceiling. Hold onto the fixture to prevent it from falling.
Next, loosen the terminal screws securing the live, neutral, and earth wires, then carefully disconnect and remove the old light fixture.
Step 2 – Mark Out Your Frame
Next, mark the dimensions of your light box on the ceiling in your desired location. Typically, the light box will be square or rectangular, but you can choose other shapes if you’re comfortable working with them. Keep in mind that complex shapes can make plaster-boarding more challenging.
For our rectangular 4m x 3m kitchen, we opted for a simple rectangular light box. We measured 1m in from each wall and marked out a 2m x 1m rectangle in the centre of the ceiling. This placement ensures even lighting, with the light reaching all areas of the room.
Since we haven’t specified specific bulbs, wattage, or products, you have the flexibility to design the light box according to your own preferences. If you need guidance, consult your electrician for advice on the best type and quantity of lights to meet your needs.
Step 3 – Build and Secure Your Frame
With your layout marked, it’s time to construct the light box frame. We used 2 x 2 inch sawn timber for this project.
Using 2 x 2 inch timbers is preferred over 4 inch timbers, as it allows for easier access for the electrician and better air circulation around the electrical components, reducing the risk of overheating. Although this means the frame is built in two layers, it provides practical benefits.
Start by cutting three timbers to length and screwing them into the ceiling along the existing ceiling joists. Ensure they are even at the ends and square before securing.
Next, cut and fix timbers across each end at a 90° angle to the joists. Then, construct a second identical frame and screw it onto the first, creating a frame 4 inches (100mm) deep.
Ensure the bottom frame timbers are spaced no more than 500mm apart, while the top timbers should be fixed at 400mm centres.
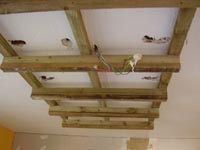
Kitchen Lighting Box Frame fixed to kitchen ceiling
Step 4 – Install Cables
To save on electrician costs, we pre-ran the necessary cables from the power source to each light location.
We left a 4-inch loop at each spot where a light would be installed. This allows the cables to be easily pulled through and ready for the electrician to complete the connection.
In terms of what cable to use, as this is a lighting circuit, you should use either 1mm or 1.5mm twin and earth, which is the correct cable to use for lighting circuits.
Step 5 – Cut and Attach Plasterboard
Next, clad the frame with plasterboard, ensuring all gaps are covered.
Cut the plasterboard to the required dimensions and secure it to the timber frame using plasterboard or drywall screws.
Cover each open side, ensuring the plasterboard overlaps the depth of each section.
Lastly, cut a piece to cover the open base, making sure it overlaps the sides, but don’t attach it just yet.
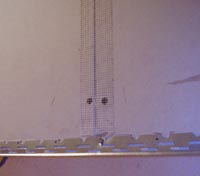
Step 6 – Cut Holes for Your Lights
The size of the holes for your kitchen lights depends on the manufacturer’s specifications. If you’re installing downlights, the instructions should specify the exact hole size needed.
Carefully measure and mark the positions for each light along the longest sides of the frame, ensuring symmetry and that they are central within the depth of the box.
For our lights, we needed 38mm diameter holes, so we used a 38mm hole saw to drill at the marked positions.
After drilling, pull each cable loop (or “tail”) through the holes, ready for the electrician to wire the lights.
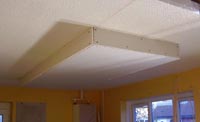
Kitchen Lighting Box Cover with plasterboard
Step 7 – Wire Up the Lighting
Since our frame was centered over an existing light fixture, the power source was already in place. Our electrician began by installing each light in its designated spot.
Next, the electrician connected the new wiring to the existing power source using a junction box, ensuring the circuit was isolated by checking that the MCB or fuse was still turned off in the consumer unit.
After the wiring was completed, the final piece of plasterboard was secured in place, fully enclosing the light box.
Step 8 – Apply Scrim, Angle Beads, and Plaster
With the lights installed and the frame fully covered, start by applying self-adhesive scrim tape over the plasterboard joints. This tape prevents cracking in the plaster.
Next, attach galvanised angle beads to all external corners. Angle beads provide a clean, sharp finish and resist rust.
Bead and scrim tape applied to joints and corners of the lighting box
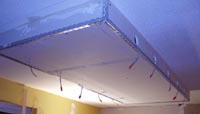
Angle beads and scrim added, ready for plastering
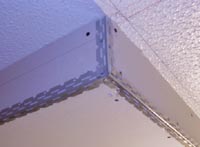
Close-up of corner beads on the lighting box
Once the angle beads are in place, plaster the structure. If you’re new to plastering, refer to our skim plastering guide for detailed instructions.
Step 9 – Finish with Painting
After the plaster has dried completely, usually taking 3 to 4 weeks, proceed with painting the light box. Typically, you’ll use the same colour as the ceiling, but you can choose a different colour to make the light box stand out as a feature.
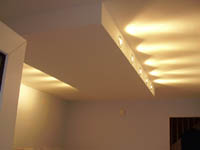
Kitchen Light Box completed job with lights on

Kitchen Light Box showing illumination effect on room
Building a kitchen light box is a straightforward project that allows for custom sizing and design. Just make sure your design provides ample light to brighten the entire kitchen effectively.