What is an Instant Boiling Water Tap?
Having boiling water for a cup of tea or coffee instantly is a dream! It is very true that a watched kettle never boils but with one of these little marvels, who cares?
Fitting or installing an instant boiling water tap is not difficult. The manufacturers instructions are usually very clear on which hose goes where so we will not touch that subject as there are a number of makes and applying our instructions to another make of tap could result in accidents. The overall installation is the same throughout however.

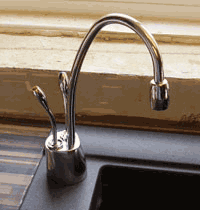
Double lever instant boiling water tap
Built-in Water Filter
The one shown in the image above has the added luxury, as many of them do, of supplying filtered water through the cold tap. The levers pull forward gently and its boiling and filtered water on tap. With taps that feature filters it is a good point to note that in most cases these filters will need replacing at some point.
Types of Boiling Water Tap
There are several different types of these taps:
- Boiling water only
- Boiling water, cold water and hot water
- Boiling water, cold water and hot water all filtered
The above tap types are a bit of a generalisation of those available as each tap from each different manufacturer has slightly different features but the majority will fall into one of the above types.
Some taps will require a new hole to be cut in either your sink or worktop (as in the image at the top of this page) and some are a direct replacement for your existing sink tap unit such as the one here.
When it comes to installation, again there are several options depending on the manufacturer. Some insist on the unit being installed by one of their team and some come as a DIY kit, while others provide you with both options.
Costs of a Boiling Water Tap
It has to be said the 3 way taps are not cheap to buy but with the instant water heater under the sink being thermostatically controlled it is no more expensive to run one of these than it is to boil a kettle.
Depending on the type of boiling water tap you want will dictate the cost. Taps on their own range from £30 to well over £100 while the full kits (tap, pipes, water heater etc….) range from £150 to over £1500 and as with many things these days, you get what you pay for.
In respect to running costs a rough guide is that it will cost you just under a penny to heat enough water for a mug full of tea using either a hot water tap or a kettle. When you think about it, most kettles have a minimum water fill amount and this will usually be a fair bit more than a mug of tea so most of the time you are actually boiling more water than you need costing you more, so you could actually save money in the long run with a boiling water tap.
They are a lot more attractive and a lot more convenient in that you do not have to find space on your worktop for a kettle.
Fitting an Instant Boiling Water Tap
As mentioned, there are numerous different types of tap available and each will need to be installed in a slightly different way. Having said that, regardless of the type the basic installation principles will be very similar. To these ends, below we will deal with fitting a boiling water tap into a sink unit.
Drilling the Hole in the Sink
To get the tap into the sink you have to drill a hole in the sink itself. This can be a bit of a daunting job but the manufacturers instructions will tell you the diameter of the hole you need to drill and hole saws can be bought or hired fairly cheaply.
It is only when you try and save money by drilling a tiny hole and filing the rest of it out, that you risk messing the job up. Every single job in the building industry, from shoveling dirt to installing a boiler, is done best with the right tools.

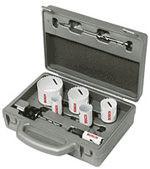
Hole saw kit with arbor
In this particular tap we had to drill a 38mm hole in the resin sink. Hole saws need a centre piece, called an arbor, to do two jobs. One of the jobs is to provide a small drill bit in the centre of the hole saw so it cannot wander off line and the other job is to provide a shaft to put in the drill chuck.
Once the arbor is attached to the drill and you are sure you have marked out the correct position for the tap, you can drill the hole.

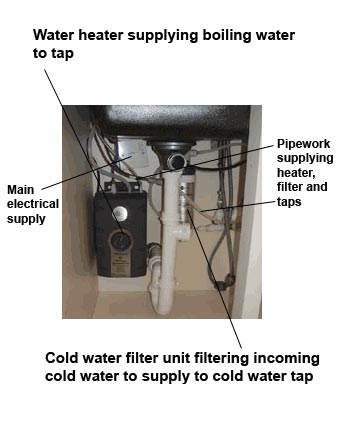
Boiling water tap heating unit, filter and and associated pipework
Fitting the Boiler Unit, Filter and Pipework
The above shows how the water heater and the filter sit neatly under the sink and the great thing about this kind of boiler is that it can plug directly into a 13 amp socket. The boiler is a neat, compact unit and fits easily into any under sink space.
You should select a spot under the sink to mount the tank vertically. With a DIY install, pretty much all kits will come with mounting brackets for both the filter and heating units and screws. When screwing in the fixings or brackets make sure it is level across the top.
The screws provided are usually wood screws for use in ordinary kitchen units and you will find installation easier if you drill a couple of 3mm pilot holes first.
The tap is then slotted into position and tightened. In most cases this will be the same way as most monoblock taps so if you go to our project you will be able to see how to do this.
With each unit in place you should then be able to see what pipework you will need and how much. Normally, all the pipework you will need will be supplied with the unit. Connect all pipework up according to the manufacturers instructions.
The tap is then connected to the top of the heating unit using the manufacturers instructions and the amins power supply lead is plugged into teh socket.
The whole job should take around an hour from start to finish. Here is a small trouble shooting guide should anything go wrong.
How Safe are Boiling Water Taps?
As I’m sure you are aware, a kettle is a dangerous thing and we are all taught from a young age to take great care when using them. A boiler water tap is certainly no different.
Most taps on the market have built in safety features in the form of a button that needs to be pressed or released to enable you to turn that tap on in boiling water mode.
Most taps will automatically shut off the boiling water supply once the safety button is released.
Boiling Water Tap Troubleshooting
Water and steam spit without turning on?
Depress the tap lever to release some water from the tank. Adjust water temperature using dial on the hot tank front.
Water is not hot ?
Make sure the unit is properly connected to the electricity supply and the circuit breaker and/or fuses are all ok. Check the socket is switched on.
The light on the front of the unit is not on?
See above
Water is too hot or not hot enough?
Adjust the thermostat slowly, then depress or twist the tap handle for 20 seconds to bring in fresh water to be heated at the new setting. Allow 5 – 7 minutes for the new settings to take effect and the water to boil.
Water is dripping from the spout or vent intermittently ?
Unplug the unit. If the dripping doesn’t stop after a few minutes, check the supply valve to ensure that it is fully open and there are no obstructions in the water line. Unscrew spout end and clean out any debris.
Water is dripping from the spout end constantly?
Debris in the water line may be in the tap valve seat causing a slow water leak. Unscrew spout end and clean out any debris. Depress or twist lever 7 – 10 times to flush out tap and lines
The water stream seems divided?
Probably debris in the end piece. Unscrew spout and clean out any debris.

