Laying floor tiles follows the same basic steps, whether using quarry tiles, vinyl, or other materials. The process involves measuring and marking the room, applying adhesive, and fitting the tiles—cutting where needed to fit around obstacles.
While the tiling method remains consistent, different floor surfaces require specific preparation. Ensuring a smooth, stable base is key to achieving a professional finish.
This guide covers essential steps for laying all types of floor tiles, including surface preparation, adhesive application, and cutting techniques.
Please note, the fixing of any permanent, or semi permanent floor covering will affect access to pipes and cables running under the floor. Please check that access to these cables etc is not required under building regulations and if it is make alternative arrangements for access.
Different Types of Floor Tiles
When choosing floor tiles, it’s essential to pick the right type for your space. Below are some of the most popular options, each offering unique benefits.
Stone Flooring and Wall Tiles
Natural stone is durable, easy to maintain, and improves with age. It’s a timeless choice for both floors and walls. However, installing stone tiles requires expertise, so professional fitting is recommended for the best results.
Stone flooring is proven to be healthier than carpets, reduces dust mites, and adds value to your home.
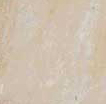
Marble Tiles
Marble offers a luxurious, long-lasting flooring option. Polished marble suits formal spaces like entrance halls and dining rooms, while honed marble provides a softer, more understated look, ideal for bathrooms.
Polished Tiles
Polished tiles have a high-gloss finish that enhances elegance but may show fine scratches over time.
Honed Tiles
Honed tiles have a matte finish, making them a popular choice for floors as they offer a sleek look while being easier to maintain.
Popular Marbles Tiles
Nero Marquina

Crema Marfil
Rossa Alicante
Carrara C
Crema Marfil Rosso Alicanti
Granite Tiles
Granite is one of the toughest and most durable tile options, suitable for both indoor and outdoor use. Its polished surface creates a sleek, modern look, while honed or flamed finishes add texture and improve slip resistance.
For homes, the most common granite tile size is 30.5 x 30.5 x 1cm, available in a wide range of colours. Prices vary depending on the rarity and extraction difficulty of the stone.
Granite’s versatility makes it ideal for everything from kitchen worktops to floors and walls, offering a stylish yet practical design solution.
Popular Granite Tiles
Jasberg

Supreme Black
Galaxy Grey
Sunrise
Limestone Tiles
Limestone tiles offer a natural and timeless flooring choice, ideal for kitchens, bathrooms, dining rooms, and living spaces.
While beige is the most common shade, limestone is available in other colours to suit different styles. For a rustic, aged appearance, antiqued finishes are also an option.
Popular Limestone Tiles
Mirabelle Limestone
Jura Beige Limestone
Boisvillon Limestone
Belgium Blue Limestone
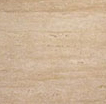
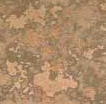
Travertine Tiles
Travertine is a dense form of limestone, often classified as marble. Naturally, it features surface voids that can be left open for a rustic look or filled with resin or grout for a smoother finish.
Filled or Unfilled?
Travertine’s unique texture includes surface holes that range from tiny pinholes to larger irregular voids. These can be pre-filled with resin at the factory or filled during installation using grout. Whether filled or unfilled, these natural voids enhance the tile’s character and distinctive appearance.
Popular Travertine Tiles
Travertino Romano Classico
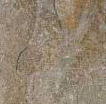
Sandstone Tiles
Sandstone has a rougher texture than limestone, making it ideal for non-slip areas like pool surrounds and pathways.
It can also be used indoors for a rustic, natural look. Often referred to as ‘Yorkstone,’ it offers durability and timeless appeal.
Popular Sandstone Tiles
Pistachio Sandstone
Morisca Sandstone
Slate Tiles
Slate is a great choice for kitchens, offering durability and style. It comes in two main finishes: Riven, with a natural textured surface, or Honed, which is smooth and matt. While often linked to grey, slate is available in a range of rich, vibrant colours.
Popular Slate Tiles

Black Slate

Montauk
Oyster
Can You Tile Over Existing Floor Coverings?
Many ask if it’s okay to tile over existing lino, vinyl, or quarry tiles. In short, No, this is not ok!
Your new tiles may stick well, but if the layer beneath isn’t secure, you risk future issues.
If you must tile over an existing surface, ensure it’s firmly attached with no loose edges, cracks, or movement. Clean thoroughly, removing grease, dust, or flaking material.
For better adhesion:
- Vinyl surfaces – Scratch with a wire brush.
- Vinyl over vinyl – Apply adhesive directly.
- Quarry tiles over vinyl – Use an undiluted PVA adhesive coat first.
- Vinyl over quarry tiles – Smooth with a self-levelling compound.
- Quarry tiles over quarry tiles – Apply undiluted PVA and stagger joints for stability.
While these methods can work, starting with a solid, prepared surface is always, always the best approach.
How to Remove Existing Tiles
Removing old tiles takes effort, but the right tools make it easier. For quarry tiles, use a hammer and bolster chisel, or hire an electric chisel for a faster job.
Wear gloves and goggles, as broken tiles are sharp and go everywhere. Don’t expect a perfectly flat floor afterward, you’ll likely need to level or screed it afterwards.
Vinyl tile removal is tough. A floor scraper helps, but some tiles may need prying up with a hammer and chisel.
A heat gun can help to soften the adhesive, making it easier to scrape away.
For a cleaner finish, remove skirting boards before tiling. This hides rough edges and prevents height differences from making skirting look uneven.
Tiling Over Timber Floors
Timber floors can cause tiles to crack or grout to fail due to movement. To prevent this, always lay a plywood base (minimum 18mm thick) over timber floors before tiling, especially in bathrooms.
Lay plywood sheets with joints running at 90 degrees to existing floorboards. Cut around obstacles and fix the plywood securely with 40mm screws, spaced 400mm apart, ensuring the screws are flush with the surface.
For better adhesion, apply two coats of diluted PVA (2 parts PVA to 1 part water) to the plywood. Allow it to dry fully before tiling for optimal results.
Tiling Over Concrete or Screeded Floors
Concrete and screeded floors must be clean, flat, and free from dust or loose material. If the surface is uneven and you’re laying soft tiles like vinyl, apply a self-levelling screed.
This screed comes in bags with a latex liquid to mix into a smooth, creamy consistency. Pour the mixture onto the floor and spread it with a plasterer’s trowel to fill depressions and create a flat surface.
No need to seal the surface, as it offers excellent adhesion for flooring adhesives. For quarry tiles, the adhesive will fill minor gaps in the surface.
Before tiling, wash the floor with a 2:1 PVA-water solution and lay tiles while the floor is still slightly damp. This prevents the floor from absorbing moisture too quickly, aiding adhesion and drying.
If the concrete or screed is already flat, apply two coats of PVA and you can tile directly onto it.
Marking a Floor Plan
While most tiles are square or rectangular, most rooms aren’t perfectly square. It’s normal for walls to have slight bows, and corners often aren’t exactly 90 degrees.
To lay tiles properly, mark out the room so they are laid square to each other, rather than following the walls.
Use a chalk line to mark straight lines across the room, as shown in the diagram below. This ensures tiles are aligned independently of the walls for a neat, even finish.
How to Create a Floor Tile Laying Plan
Firstly, lay one row of tiles across the room, but do not add any adhesive as yet!
Ensure that the gap at each side is roughly equal. Using the diagram below, we would dry-lay tiles 1,7,8 and space the row so that tiles 12 and 39 were roughly the same size.
Next, dry-lay tiles 2 to 45, and ensure that gaps 11 and 51 are even.
Now, mark with a pencil or felt tip, the corner of tile 1, where it meets tiles 11, 12 and 13 onto the floor. This is the starting point of your square.

Floor plan with tiles marked out
Now mark the line A—-A across the room. This is best done using a chalk line which can be bought at most DIY stores for a few quid.
A chalk line is a normal string line, contained in a plastic or metal container, which also contains a coloured (usually red) chalk.
As the line is extended and held between two points tightly, it is then lifted and dropped onto the floor (like releasing a bow string). This will "ping" a straight line onto the surface.
Before "pinging" the line, make sure that the gap nearest the wall does not exceed a full tile and does not go under about 2 inches. If this is the case, move your position to accommodate a fairly even cut all the way down. This makes cutting easier and visually, it looks much nicer
This part of the job is a bit of a balancing act because you want the tiles to appear straight as you walk into the room, but (unless your room is shaped like a parallelogram) you want it to appear fairly even at the edge.
One way to experiment with this, that is a little clearer immediately, is to find a long piece of timber and lay it down line A—-A.
This will give you a much better visual idea of how things will look.
When you have marked line A—A, dry lay tiles 1 to 6 again. Then using the diagram below, mark the cuts you will need for tiles 12 to 22.
We always like to produce and lay the cut tiles as we go. Some people like to finish the main area of the floor, allow to dry etc, then come back and do the cuts.
Cutting tiles of any kind is a tedious job and we prefer to finish a floor in one go.
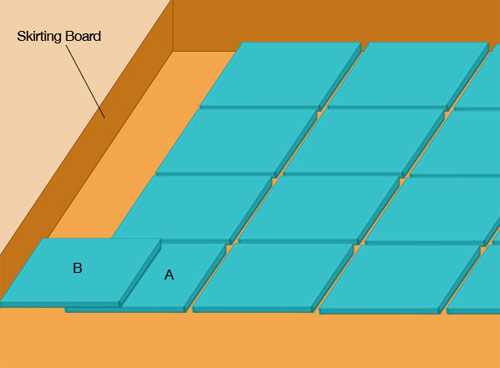
Cutting in edging tiles up to skirting
The diagram above shows tile A dry-laid, with tile B placed against it along the skirting board (or wall, if the skirting is removed). Draw a line on tile A along the edge of tile B—this is your cut line.
Once cut, tile B replaces tile A, and the cut from tile A fits neatly into the gap. Repeat this process along the entire wall.
Handling Bows and Curves
If your walls are bowed, use a "scribing" method to mark the tile.
Start by cutting a batten (about 1½ inch by 1 inch). Measure the exact width of a tile from the batten’s end, then drill a hole for a pencil or felt tip to fit tightly.
Dry-lay the tiles as shown, holding the batten against the skirting board or wall. Keep the batten at a 90° angle to the wall and pull it along to trace the wall’s curve onto the tiles.
Once cut, the marked tiles will fit neatly against the wall, and a full tile will fill the space where the marked tile was.
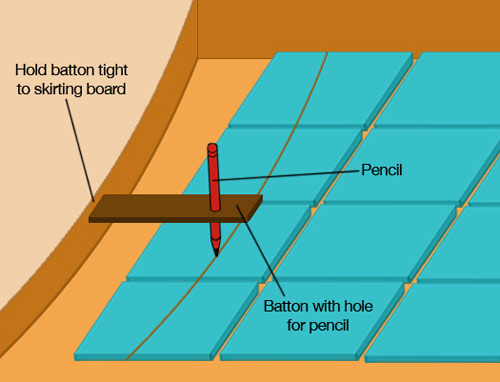
Scribing the bow in a wall on to a tile
Cutting Around Doors and Architraves
For tricky cuts around doorframes or architraves, you can create a cardboard template of the cut and then transfer the shape of the cut onto the tile.
Alternatively, use a profile gauge. The is essentially a bar with plastic or metal needles.
Press it against the profile, and the needles shift to capture the shape, which can then be transferred to the tile for accurate cutting.
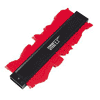
Forge Steel Profile Gauge
Keeping Tiles Square
Follow the diagram’s numbering to lay your tiles, ensuring each joint stays square to the adjacent tile.
If a tile shifts out of alignment, it’s hard to fix, so ensure that you use tile spacers to maintain even spacing and keep tiles square.
Leaving Joints and Setting Out Points
When laying quarry tiles, leave a sufficient joint between each tile. Although this means using more grout, it makes the process easier and gives you space to adjust tiles for perfect alignment.
Focus on the tiles along line A, as this is your key reference point. The success of your floor depends on staying aligned with this line.
Some tilers start from the centre, but we recommend starting from the edge. This method lets you make cuts as you go, work towards the door to avoid stepping on fresh tiles, and keep your tiles organised and within reach without cluttering the space.
Cutting Tiles
For detailed instructions on cutting tiles, check out our cutting tiles project.
To cut vinyl tiles, use a small blowtorch or hot air gun to warm the tile. This makes cutting easier and prevents the knife from slipping.
A sharp utility knife with plenty of spare blades is key. Make straight cuts using a metal ruler and curved cuts in short lines. Always cut away from your body for safety.
For quarry tiles, use a tile cutter, either hand-held or mechanical. Most thin quarry tiles can be cut with a standard ceramic tile cutter, but thicker tiles may require a more robust quarry tile cutter, available for hire at your local hire store.
What Adhesives and Grout to Use?
When it comes to vinyl flooring, always use the recommended adhesive from the vinyl tile manufacturer to avoid voiding warranties. If you use an alternative, you may not be able to claim for any issues with tile adhesion.
Most vinyl adhesives have strong bonding properties and are now available in solvent-free options. Apply only enough adhesive for tiles you can lay within 10 minutes, leaving cut areas dry for easier marking and cutting.
For quarry tiles, we prefer powdered grout, which is easy to mix in small batches. Apply generously and push it into the gaps with a grout trowel. For tight corners, use a sponge.
After covering an area of about 3m x 3m, wipe off excess grout with a damp sponge. Rinse the sponge in a separate bucket to avoid clogging the sink. Repeat this until the grout is removed from the tile surface.
Once the grout dries, polish any remaining dust off the tiles with a dry cloth.
Dealing With Steps Between Floor Areas
Raising the floor level in one room creates a step where it meets another room. This step will be the combined thickness of the ply sub-floor and tiles.
To create a smooth transition, use hardwood moulding from your local DIY store to turn the step into a gentle ramp, giving your floor a neat, finished look.
Floor Tiling Tools
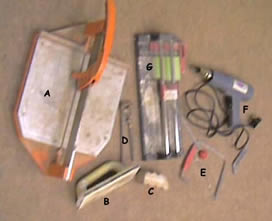
Essential tools for ceramic or quarry tiles
The essential tiling tools for ceramic or quarry tiling detailed in the image above are as follows:
- A: Tile cutter with sprung platform. The handle and blade are pushed along the tile, then the handle is pushed down. The tile breaks along the centre bar while the platform either side of the bar gives way
- B: Grout float which is used like a plasterers trowel, pushing grout into the gaps between quarry and ceramic tiles
- C: Carborundum stone, a compound of carbon and silicone, used abrasively for removing little burrs etc from the edge of cut tiles
- D: Tiling nips, sharp bladed pincers used for "nipping" shapes from quarry of ceramic tiles
- E: Tile saw, for cutting thin quarries and ceramics into shapes.
- F: Heat gun, used to warm vinyl tiles and their adhesives
- G: Ceramic tile cuter, used for cutting thin quarry tiles and ceramic tiles
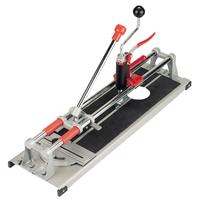
Contractors Tile Cutter
Grouting Float 220mm x 100mm
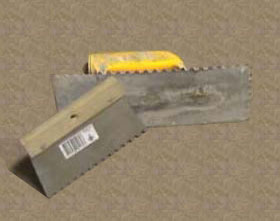
The grouting floats in the image above are called Notched Trowels (Adhesive Combs).
Notched trowels are essential for spreading adhesives on quarry and vinyl tiles. They ensure an even adhesive depth by using the notched edges against the wall or floor. The gaps left by the notches allow the adhesive to shift, helping the tile bed securely when pressed down.
When it comes to the other types of floor tiling, vinyl, carpet etc. the following tools will be needed:
- Straight edge/spirit level
- Sharp knife/utility knife and spare blades
- Desired adhesive
- Scraper
- Pen/pencil
- Tape measure
- Adhesive spreader (if using liquid)
- Pair of scissors
How to Lay Floor Tiles: A Simple Step-by-Step Guide
Once you know exactly what type of tiles you will be laying and how to correctly prepare the surface you will be laying them on, the next steps is to actually get them on the floor!
Step 1: Prepare the Surface
Before you begin laying tiles, it’s crucial to ensure your floor is clean, dry, and level.
As we have stated, remove any old flooring, dust, or debris from the area.
If the floor is uneven, you may need to apply a self-levelling compound to smooth out bumps or dips.
As stated, a flat, clean surface is essential for proper tile adhesion and to ensure your tiles fit correctly.
Step 2: Plan Your Tile Layout
Start by measuring your room to work out how many tiles you will need for the whole job and then Using the tips above for marking out a floor plan and how to lay your tiles, make your plan and figure out where you are going to start laying to.
Using a chalk line to create straight reference lines across the floor can help guide your tile placement. Avoid starting against the walls as this can lead to uneven rows or awkward cuts at the edges.
Step 3: Apply the Adhesive
Once your layout is planned and you have dry-laid some to create your starting point and your first rows, it’s time to apply the adhesive and stick them in place.
For cement-based adhesives, use a notched trowel to spread the adhesive evenly over a small section of the floor, once you have lifted a few tiles.
It’s important to work in manageable sections, so the adhesive doesn’t dry out before you lay your tiles.
Use the flat side of the trowel to spread the adhesive, then switch to the notched side to create grooves. These grooves help the adhesive bond with the tiles for a strong hold.
Step 4: Lay the Tiles
Once the adhesives down, start placing the tiles according to your plan. Press each tile firmly into place, ensuring it’s evenly aligned with the guide lines you’ve created.
If you’re using spacers, insert them between each tile to maintain even gaps for grout, ensuring you can remove them once the grout is dry. As you go, check each tile’s alignment with a spirit level to ensure everything remains straight and level.
Step 5: Cutting Tiles
When you reach the edges of the room, you may need to cut tiles to fit any uneven surfaces and walls.
Each cut should be made one at a time. Use a tile cutter or tile saw for straight cuts, and a tile nipper for more complex shapes.
If you’re cutting around obstacles like pipes or door frames, you can use a pencil to mark the tile and then carefully cut along the lines.
Always wear safety goggles and gloves when cutting tiles to protect yourself from sharp edges and debris.
Step 6: Grouting the Tiles
Once all the tiles are laid and the adhesive has dried, it’s time to grout. Mix your grout according to the manufacturer’s instructions, and then spread it over the tiles using a grout float.
Using a sponge, work the grout into the gaps, making sure each joint is completely filled. Once the grout has been applied, wipe away the excess with a damp sponge.
Rinse the sponge frequently to avoid smearing grout on the tile surface. After the grout has dried, polish the tiles with a soft cloth to remove any remaining grout haze.
Step 7: Final Touches
Allow the grout to fully set, typically for 24 to 48 hours, before walking on the floor. Once the grout is dry, you can remove the tile spacers and inspect your work for any imperfections.
If you find any gaps or areas that need touch-up, you can easily apply extra grout and smooth it out.
To finish, consider sealing the grout to prevent stains and moisture buildup, especially in high-traffic areas like kitchens or bathrooms.
If you are not familiar with tiling, especially on a floor then the first time you do it can be very daunting, however as long as you plan it thoroughly and work methodically, it’s certainly a job that can be done by anyone.