Sanding an old floor is one of the most satisfying DIY projects, turning a worn surface into something fresh and new. However, this method isn’t ideal for parquet floors, which require a specialized parquet sander for the best results.
In the below guide we take a look at how to correctly sand a wooden floor ready for a fresh new finish, and also take a look at how to sand a parquet floor, read on to find out more.
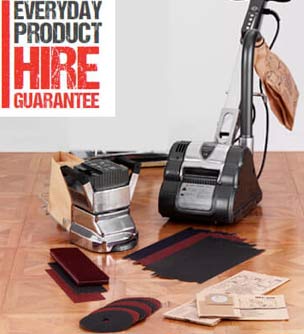
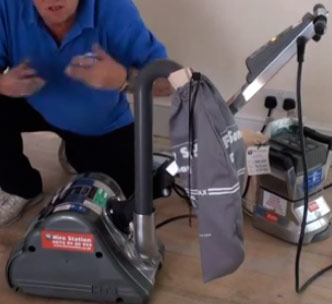
Floor Sanders and Edge sanders can be hired
Types of Floor Sander
When it comes to sanding wooden floors, choosing the right type of floor sander is absolutely essential. Each type serves a different purpose and understanding their differences can make or break your project. Here follows a list of teh most common types of floor sanding device.
Drum Sanders
Drum sanders are the most powerful type and are ideal for removing old paint, varnish, stains, and deep scratches.
These machines use a fast rotating drum with abrasive sandpaper that can strip floors back to bare wood quickly and efficiently.
While very effective at what they do, drum sanders require experience as they can easily damage your floor if not handled carefully, leaving uneven surfaces or gouges, which can easily ruin any subsequent finishes.
Belt Sanders
Belt sanders are similar to drum sanders but use continuous sandpaper belts as opposed to drums. They are easier to control and provide a smoother sanding experience.
This sander is great for large, flat areas and can also handle tougher tasks like removing thick layers of existing finishes. However, they are slightly less aggressive than drum sanders, making them a better option for beginners who need more control over the sanding process.
Orbital Sanders
Orbital sanders are lighter and more user-friendly compared to drum and belt sanders.
They use a circular motion to sand the floor, making them perfect for light sanding, fine finishing, and smoothing the surface between coats of finish, if required.
While they take longer to remove heavier finishes, they are a safer option for those new to floor sanding, as they are less likely to cause any damage to the floor.
Edge Sanders
Edge sanders, also known as edgers, are designed to reach corners and edges that larger sanders can’t access.
These can be both handheld machines or larger (similar to belt and drum sanders) with a rotating disc that can sand right up to the skirting boards or around tight spaces.
They’re a perfect companion to drum or belt sanders, ensuring a consistent finish across the entire floor.
Detail Sanders
Detail sanders are small, triangular handheld sanders that are excellent for getting into narrow, tight spaces, such as corners or between stairs.
Though not suitable for large areas, they’re great for precision work where other sanders may not reach.
Each type of sander has its advantages and disadvantages and to ensure you get a great finish, it’s essential that you choose the right tool for the job.
Curling, Cupping, Crowning, and Warping Floorboards
If you have any timber to repair or replace in a room space then before any of it is installed, it’s essential to let the wood acclimatise to the room’s humidity by leaving it there for up to three weeks. This step helps prevent issues like curling, cupping, and warping caused by moisture changes.
In new builds, this process is often skipped, especially when heating systems aren’t yet installed. As a result, the timber expands and contracts with shifts in humidity, leading to movement in the floorboards.
When sanding pine floorboards, keep in mind that even seemingly flat boards may have slight curling (dips) or crowning (bows) due to natural moisture absorption over time.
As the centre of the board dries out slower than the edges of the board, it then warps one way or the other. In these situations, without the correct equipment, it’s very easy to get an inconsistent finish.
Health and Safety When Sanding Timber Floors
For sanding timber floors, you’ll need a large sander for the main area and an edge sander for the edges and stairs.
Some machines may run on 110 volts and require a transformer, which the hire shop should provide, if not, be sure to ask for one.
It’s essential to wear a good quality face mask, as fine sawdust can still be an issue, even with dust bags.
These sanders are powerful, so keep them moving constantly to avoid damaging the floor. A steady motion ensures a smooth, even finish.

Wear face masks to sand timber floors
Filling Gaps in Floorboards
If you want to fill gaps in your floorboards, check out our detailed filling gaps in floorboards guide.
Keep in mind, when you varnish or stain the floor, the filled gaps may appear a slightly different colour due to the material’s composition.
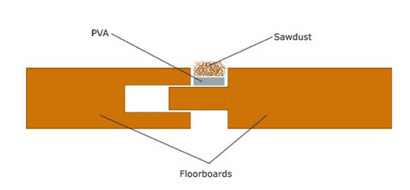
Gaps between floorboards can be filled in a variety of different ways
Understanding Sandpaper Grit Sizes
Sandpaper refers to paper or cloth with a coarse material, like Aluminium Oxide or Silicon Carbide, glued to it. The term "sandpaper" comes from older versions that used actual sand, though modern versions use more durable materials.
Grit size determines the roughness or smoothness of the sandpaper. Contrary to popular belief, a 120 grit paper doesn’t have exactly 120 grit particles per square inch. Instead, the grit size refers to the size of each particle, with 120 grit containing particles between 115 and 125 micrometers (µm). Both the number and size of the grit particles are important for effective sanding.
Using Different Grit Sandpaper to Sand Floors
For rough floors, or those with several coats of paint or varnish, start with 40 grit sandpaper, then gradually move to 60, 80, 100, and finish with 120 grit for a smooth surface.
When sanding parquet floors, use a 45-degree angle to the grain and choose a grit that matches the floor’s surface quality.
Regularly vacuum the floor while sanding to remove dust.
Avoid jumping straight to fine grit on rough floors, it will wear out quickly and cost more in sandpaper. Gradually increasing grit levels ensures an even finish and saves money. Sanding parquet with the grain can cause the blocks to cup, so avoid this.
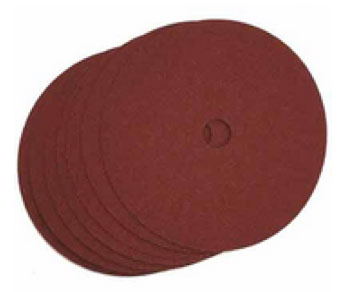
Sanding discs for floor sanding have different grit ratings
How Dusty is Floor Sanding?
Floor sanding can be extremely dusty if modern sanders with dust collection systems aren’t used. The image below shows just how bad it can get. Dust filled every room in the house and took weeks to clean!
Thanks to Katie for sharing the photo! Apologies for the image quality, the camera couldn’t capture much through all the dust!

Older sanding machines may be very dusty
Tools and Equipment Needed for Sanding a Floor
In order to successfully sand a floor, you will need the following tools and products:
- Drum sanding machine
- Edge sanding machine
- Disc sander
- Orbital sander (for smaller floor areas)
- Vacuum
- White spirit
- Old rags
- Good quality brush
- Dust pan and brush
- Selection of sandpaper
- Spare sanding pads, belts etc. for machines
How to Sand Down a wooden Floor or Floorboards
Now that you know all about the different types of sander, sandpaper and most importantly, health and safety concerns to be aware of when sanding floors, now’s time to look at how the job is actually done.
Step 1 – Hire the Right Sander
In order to sand your floors evenly and to a top quality finish you will need to make sure that you hire a decent machine, preferably a fairly new one. Most reputable hire centres will only stock and hire out decent machines, but always check beforehand.
The cheaper and older sanders tend to miss sections of flooring and also create a huge amount of dust, so definitely avoid these types of machines!
Step 2 – Knock Down Nails
Next, use a nail punch and punch down all the nail heads to about 1 eighth of an inch below the surface.
If you do not do this the nails will rip your sandpaper to pieces as it spins around, so this is an essential job.

Nail punches take floorboard nails below the surface
Step 3 – Fit the Right Sandpaper
You need to start by fitting 40 grit papers to both machines for the first sanding pass, to remove as much paint, varnish or other finish as possible. As said, once tis has been done you can then work through the different grades, getting finer and finer each time until you have a smooth finish.
Tilt the roller back so the paper is off the floor and press the trigger to get the feel of the machine. You can see how this is done in the video at the foot of the page.
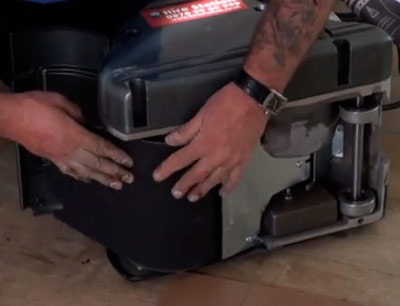
How to change the paper on a floor drum sander
Step 4 – Sand Around Edges
The first job is to run the sander around the edges of the room as close to the skirting as possible. This is essentially cutting in but with a sander.
To apply the sander to the floor, its necessary to tilt the sander up and down to make contact. This can, in inexperienced hands, lead very easily, to huge gouges in the floor, so be very wary of this and proceed with caution.
Once the sander is down and ready to go, most belt-type sanders use a circular sandpaper belt that runs between 2 driven rollers. Top engage the rollers and rotate the belt, this is normally just simply done by squeezing a clutch-type lever.
When the sander is running, don’t dwell too long in one place or you risk removing too much material. Work carefully and steadily around the room, ensuring you don’t touch the skirting. Also, always sand with the grain, never against it.
As we have mentioned above, ensure that you wear suitable PPE at all times, including a good quality mask.
Once you have sanded all around the edges of the room, run the vacuum around to collect any remaining dust that was missed by the machine itself.
The finish with this machine doesn’t have to be 100% perfect as we will later run around the edge with a disc sander to do the final finish.
Hire a drum sander from DIY Doctor
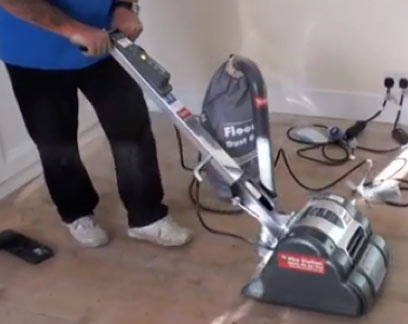
Step 5 – Sand Remaining Floor Area
After sanding around all of the edges, the next job is to sand over the main Area of the room, this is generally done using a larger drum sanding machine.
As with the edging, start with a 40 grit paper, if there is paint or varnish already on the floor, then 80 grit and finally a finer 140 grit. If you’re starting with bare timber you can start with a finer grade paper, 80 or possibly even 100 grit.
As before, to start sanding, start the machine and then lower it to the floor gently and let it pull you along at a steady rate. You can stop it any time you like so don’t get into a panic when you get to the end of the room, just turn it round and come back.
As mentioned, it’s always better to sand with the grain than across it, as this may cause scuffing and damage.
However, despite this, for floorboards heavy with varnish or paint, the sander should be applied to the floor going diagonally across the grain until all of the paint or varnish has been removed.
When this has been achieved, start sanding with the grain. Under no circumstances should you use a sanding machine at right angles to the wood grain in the floorboards if they are bare timber.
Keep at it with the large drum sander until you have the main area sanded down to the new wood, there will probably be a few undulations in the boards, which will prevent you getting the big sander into some of the marks, but you can get them with the edge sander later.
Work steadily and methodically from one end of the room to the other, not dwelling in one place too long ro rush, let the machine do the work for you.
As before, once you have completed, run a vacuum around to such up any remaining dust.
Drum sander positioned on floor, ready for sanding
Step 6 – Using an Edge Sander up to the Skirting Boards
The Edge sander is a disc sander which will take the sandpaper disc right up to the very edge of the floor. An edge sander will have a couple of small wheels on the back of the machine which allows you to tilt it back to lift the disc from contact with the floor.
Care must be taken with the edge sander as the discs are very powerful and they can gouge lumps out of the floor in no time at all.
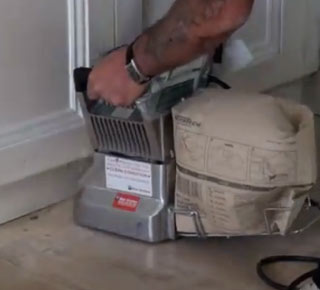
Edge sander taken right up to the end of a room
Once the main area of the floor has been completed, it’s time to then go back over the edges using the edge sander to get right up close to the skirting boards and to remove and dips, crowns, warps, marks or scratches in the main area of the floor mentioned above.
Getting to the skirting boards with an edge sander
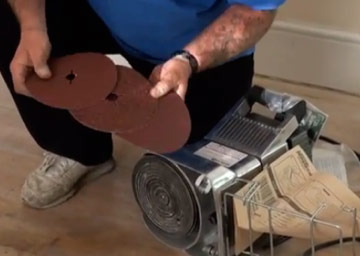
Again, as above, start with 40 grit to remove the bulk of any paint of varnish, and then change the paper to 80 grit and repeat the process and finally with the 120 grit.
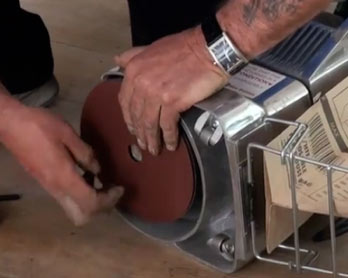
Changing the sand paper on a flooring edge sander
These final passes are really to erase the scratch marks made by the first pass with the 40-grit paper. Once you have completed the edges, then run over any dips, warps etc. in the main floor until totally smooth and back to bare wood.
When you are happy that the floor is as smooth as you can get it, you are now done with the sanding part.
Hoover the floor completely, then leave for a couple of hours and repeat to ensure that you have removed as much dust as you possibly can.
When you are sure the place is dust free, give the floor a wipe over with a rag soaked in white spirit. Wear gloves for this. This will clean up any surplus resin that has come out of the timber and generally de-grease the floor. Allow the spirits to evaporate for at least a couple of hours.
As you wipe over the floor you will also be able to feel just how smooth and flat it is. If you notice any high or low points these can be rectified easily now. If this is the case, you can hand sand these.
Step 7 – Add Your Final Finish
Once you have successfully sanded your floor down, the final job is to then coat it with your chosen finish.
In most cases, this will either be paint or varnish and to find out exactly how to do this, see our painting a wooden floor project.
Sanding and Restoring Parquet or Engineered Hardwood Flooring
If you are lucky enough to have a parquet floor then sanding such a floor down needs to be done a little differently than a standard floor and you will need to use what’s aptly known as a parquet floor sander.
The parquet floor sander is the ultimate floor finishing sander, ideal for veneered floors, parquet and all hardwood strip floors and wooden flooring, or engineered hardwood floors. They are a real pleasure to use.
Parquet Flooring Sanders leave a floor absolutely perfect with hardly any effort.
Normal floor sanders can be used for sanding parquet or engineed hardwood flooring but real care must be taken and our advice is to practice first so you feel fully in control of the machine.
When sanding Parquet Flooring it is essential that you check that all the blocks are stuck down tight. A loose block can easily break the sander.

Professional floor sander
If you have a timber floor then sanding it down and giving it a nice coat of paint can totally transform the entire room and in many cases it’s a job that can be done on a budget and certainly on a DIY basis.