A damp garage floor can be a real pain at the best of times even when you’re just using it to store the car or objects you don’t have room for in your home, let alone when you want to convert it into a living space.
In this guide we look at how to damp proof a garage floor so that it can be converted to a living space or simply used for dry storage.
Why Your Garage Floor is Damp!
Garage floors were not typically laid by the builder of your property to the same standards and guidelines as floors that are going to form part of the living space.
As they are not going to be part of your inhabited area there is no need to go to the time and expense of ensuring that they are damp proofed to the same standards as internal floors would be.
Similarly, the walls were not usually constructed to cater for a living space and therefore if you convert your garage into a living space, bear in mind you may have to deal with these short-comings.
These two possibilities mean that you may have to deal with three problems if you want to use your garage as a living or truly dry storage area;
- Concrete floors could be damp – There is probably no lining membrane (a plastic sheet that is laid under the concrete floor to prevent damp and moisture rising up). This might not be problem in newer, more modern homes, but is well worth checking out still. The best way of getting an accurate reading is to use a Damp Test Meter availabel from most DIY stores
- Incorrect level of damp proof course – The damp proof course in most garages normally appears above the level of the garage floor. To spot it, look out for a black line in between the mortar joints of the brick or blocks towards the base of the wall. If it is the case that the DPC is above floor level then the exposed brickwork/blockwork below it will almost certainly always be damp. The normal fix for this is to inject a new damp proof course using a Silicone Injection Cream DPC product and once you have done this you can then tank the damp lower levels of wall using a Tanking slurry
- The adjoining house wall to the garage may not feature a cavity tray or weeps above the line of the garage roof. If this is the case then the party or adjoining wall will constantly be slightly damp. This best solution for this is to fit an Air Gap Membrane, as this will also allow the wall to breathe and also allow you to plaster or plasterboard over without the fear that any damp problems will return
Investigating your Damp Garage Floor
You need to know what you are dealing with before you start any conversion of your garage into dry storage or even a habitable living space. So, to be able to cover the floor with any type of flooring you need to:
- Check your DPC level – Locate the black DPC line and then measure it’s height up from ground level
- Check for damp and moisture – use the test methods below
Checking your Garage Floor for Damp
Clear and brush an area of the garage floor so that it is totally free from any loose materials.
Now cut a small square of plastic around 100mm x 100mm and, using plastic tape, tape it to the floor area on all four sides and leave it overnight.
If there is moisture evident in the morning then this will confirm that the floor is damp.
Ways to Seal a Damp Concrete Floor
If the result sof the above test confirm the presence of damp then before you can lay any type of flooring you will need to seal the surface and also any floor to wall joints.
Currently, moisture is evaporating into the existing, well ventilated, uninhabited garage and this will generally cause no issues because it is removed through ventilation in the space.
However, when you turn it into a living space, the room will be insulated and the ventilation will be much reduced so you can heat it effectively.
If you do not seal the surface of the floor, this moisture will be the cause of some serious issues when it condenses on cold surfaces causing mould to grow and due to this can also cause rot in timbers.
If you decide to lay a wood floor it will absorb this moisture, swell, lift and eventually also rot.
It is essential that the concrete floor is sealed and made damp proof. There are two main approaches to doing this:
Use a Vapour Barrier Membrane or Damp Proof Membrane
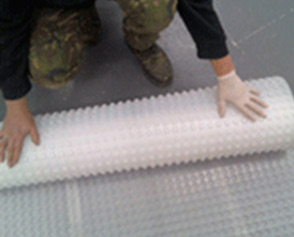
When damp proofing a concrete garage floor, a plastic dimpled membrane is required if the floor is going to be boarded (either with chipboard, plywood or similar) or if a concrete screed is going to be laid.

Rolling out damp proof membrane across a floor to prevent damp
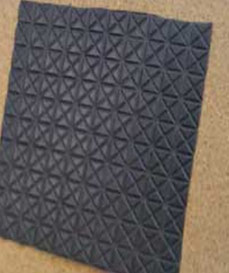
You might consider a slimline membrane which is ideal if you intend on laying carpet over your floor.

Slimline floor membrane used when laying carpet
Using a Liquid Membrane
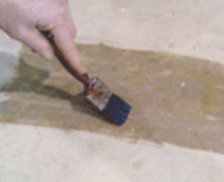
This can be painted directly on to the surface of the floor after a little preparation.
This will seal the concrete floor creating a moisture barrier preventing damp entering the garage.
Liquid membranes are a relatively quick fix to any damp floor issues, however they’re generally not quite as effective as using a mesh membrane or vapour barrier.

Applying a liquid membrane to a damp garage floor
Preparing a Damp Floor for Sealing
For your damp proofing to be effective the damp floor will need to be prepared correctly regardless of the product or technique that you choose to seal it with.
There is a joint between the floor and the wall where the two meet. This is often quite rough and open to the elements and provides the point where much of the moisture can enter your garage.
This joint needs to be opened up, cleaned and then filled with a waterproof material. This will then seal the joint between the wall and floor eliminating and potential future problems.
Opening this joint can be done with a disc cutter (angle grinder) and a stone blade. You should wear safety goggles and a face mask for this job as it is very dusty indeed. Keep the garage door open while you are doing this.
Having cut down 25mm or so into the floor, you will need a lump hammer and a 25mm cold chisel to bash out the concrete.
Smooth the bottom of the small "trench" with the chisel so there is as little variation in the depth along the length as possible.
Alternatively you can cut this joint out with a hammer and bolster chisel which is much harder work!
How to Fit Floor Membrane on a Garage Floor
Once the joint has been sealed, the floor can be coated. Whichever coating you choose, it must be laid up the wall far enough to join with the existing DPC.
If you are using the Vapour Barrier Membrane, then this should be rolled out over the floor and turned up at the edged where the floor meets the walls. This should create a ‘tray’.
It is important that the up-turned edge of the membrane is high enough to rise above the chosen flooring. This will then protect the ends of the flooring from getting damp.
The over lapping joints, where the rolls of membrane meet and the corners, should be sealed with double sided tape.
The skirting will hide the turned up edges of the membrane, or the up-stands, as they are commonly referred to. The advantages of this system are.
- It can be laid directly onto a damp floor
- It requires minimal surface preparation
Alternatively, apply a liquid epoxy membrane to a clean, dry concrete floor.
This can be applied with a brush or a roller and the amount required will depend on the absorption of the concrete and the roughness of the floor surface.
Typically this will be between 2.5 and 7 Sq m per litre. There are advantages with this system, although it is typically a little more expensive.
- It is very easy to apply using a brush and/or roller
- It raises the floor level only a few mm.
Floor Coverings for Laying Over a Sealed Garage Floor
There are a number of floor coverings that you can lay over a sealed garage floor.
The choice of floor will have some impact of the method that you should use to seal the concrete floor.
Here are a number of the more common options and some guidance about how to go ahead:
- A suspended timber floor: This will sit on joists, but they will need to be ventilated from below so that the timber does not rot. The ventilation should allow for a through draft of air at each end of the floor. One vent is not enough as it will simply let air in which will get warm and condense on any cold surface it hits. Adding another vent will create the necessary through draft which will allow the warmed air out. We recommend that any new timbers should be treated to prevent rot and woodworm. This is particularly important for any cut ends and parts that rest on or touch the walls. This should be laid over a membrane
- A floating floor: For example this could be chipboard layed on to battens. This will also require adequate ventilation and treatment to avoid rot and pests – This can also be layed over the affore mentioned membrane but the floor should also be sealed
- A screeded floor: If you choose a screed floor (see how to lay a screed floor here) you will need a minimum of two inches (50mm) of screeded concrete. You can lay this over either a membrane or even a sand ‘blinded’ Epoxy Seal. Usually a garage floor is laid 100mm below the level of the house floor. This is a building regulations requirement. Raising the floor to the existing level of the house will allow you to insert some insulation which will help with the heating bills as a not inconsiderable amount of the heat from a house escapes through the floor.
- A directly bonded floor using timber or tiles: You can lay this over chipboard, directly on a membrane or directly on to blinded epoxy seal. For this, you will need to use a product such as epoxy flooring adhesive. Using this method of flooring can only be 100% successful if the finished surface is completely flat and every single part of the chipboard (or plywood) sub-base is flat against the coated concrete floor. If there are any dips or bumps, the floor will move slightly when it is walked on and the tiles or bonded timber joints may crack with the movement. When laying tiles or wood directly onto a floor of any kind a flexible adhesive should be used.
For further information about planning your garage conversion please have a look at our project on converting a garage.

