What is a Sun Tunnel, Sky Tunnel or Sun Tube?
Sun tunnels are sometimes called sky tunnels, sun tubes, roof lights or tube lights. In most situations they can be installed into pretty much any roof structure. The process of installing a sun tunnel into the actual external roof surface is very similar to that of roof windows or Velux windows as they are also known, so if you have previously installed your own roof window then you will be very familiar with this part of the project.
We have never attempted to install one into a thatched roof so cannot comment on whether this can be done or not. Any feed back from anyone who has attempted or indeed succeeded with this would be most welcome.
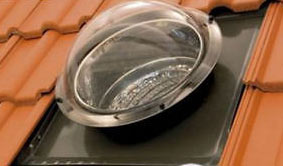
Roof dome for sun tunnel
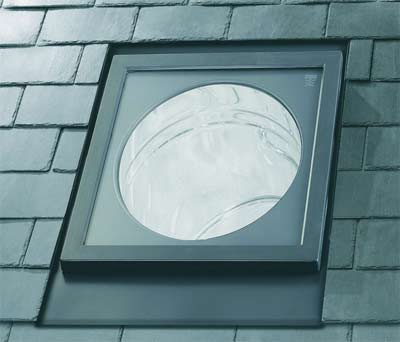
Velux window style sun tunnel roof window
Sunlight is guided down a shiny tunnel into an area which would previously only have been lit with high energy bulb lighting. Due to the fact that any lighting that is provided by a sun tunnel is free and does not require any energy to run it is extremely environmentally friendly and thus a favorite within the green community.
Sun tunnels consist of a roof dome connected to flexible or rigid reflective tubing down to an internal display lighting unit with fittings. This lighting unit acts as a diffuser which is a device which spreads the light from it’s source (in this case, the sun) evenly and minimizes shadows.
The main goal of the tube itself is to get the light from it’s source on the roof, down the tube and out of the internal diffuser fitting with as few bounces as possible, as every bounce that occurs degrades the light slightly.
What’s Best – a Rigid or Flexible Sun Tunnel Tube?
The answer to this question really depends on the situation, space available and where the sun tunnel is to be installed.
If you have plenty of access around the installation area, in both the loft and room area where the diffuser is to be installed and the roof is also easy to access then a rigid tube is always the best option as they transmit more light over a greater distance and also work much better in low light conditions.
If access to the loft, roof or ceiling area where the sun tunnel is going to be installed is limited and awkward and has to go through a series of bends then you are never going to get a rigid tube correctly fitted so a flexible tube is the ideal choice.
Flexible tubes are also marginally cheaper than their rigid counterparts so will save you a few pennies when purchasing.
In respect to this question we can sum up as follows:
- Rigid Tubes: The best choice for capturing as much light as possible, especially over long distances
- Flexible Tubes: The cheaper of the two options for both purchase and installation and more suited to shorter distances as can loose a fair amount of light energy due to the ribbed construction of the tube

Cross section of a roof showing rigid sun tunnel pipework
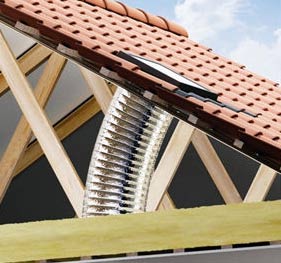
Cross section of a roof showing flexible sun tunnel pipework
How Much Light can a Sun Tunnel Provide?
In most situations a sun tunnel will produce enough light to satisfy most people’s needs during the day.
Many manufacturers claim that their particular brand of sun tunnel will generate much more light than their rivals. On the whole, and speaking to others in the profession, we have found that most brands of tunnel and tube comparatively generate pretty much the same levels of light in the same or similar situations.
Any advantage that one manufacturer has over another is in most instance just down to the statistics and is in no way noticeable to the naked eye.
Most manufacturers will give light output figures in lumens. This is a measurement for the total light emitted from a single source. In domestic situations this means very little so for the purposes of this project we will do our best to explain any output figures in the more familiar measurement of watts.
A rigid sun tunnel, installed in the ideal conditions of 1m in length and south facing, will provide the equivalent amount of light in the following sizes:
- 10 inch sun tunnel = Around 150 – 200 watts
- 14 inch sun tunnel = Around 200 – 250 watts
In the less perfect conditions outlined above, using a tube that’s installed on a non-south facing roof with only ambient light and using a flexible tube 2m in length you can expect somewhere around the following results:
- 10 inch sun tunnel = Around 40 – 60 watts
- 14 inch sun tunnel = Around 60 – 80 watts
As you can see from the results above, the amount of light generated by a given sun tunnel installation can vary quite a bit depending on where it’s installed and what materials you’re using so to sum up, the main detrimental factors for light output of sun tunnels and tubes is:
- The length and type of tube: The longer the length of tube you use to transfer the light from your roof to the ceiling below, the less light you will get at the end. This is due to the number of bounces the light needs to make in order to reach the end. Each bounce looses a fraction of the lights initial power. If the tube is flexible then it will also feature ribbed sections – each of these sections will also loose an amount of light, so the shorter, straighter and smoother your tube, the better!
- The position of the dome on the roof: The best roof position for the sun tunnel dome is south facing. This way, it will capture all available light and in turn transfer this down in to your room space. If the dome is non-south facing then only ambient light will be used. Ambient light, in this case, is the light is the light collected by the suns reflections and redirections from surrounding buildings and surfaces
The angle at which the dome or window faces the sun can also be a factor. The most efficient position is one that allows light to travel down the tube with the minimum number of bounces possible:
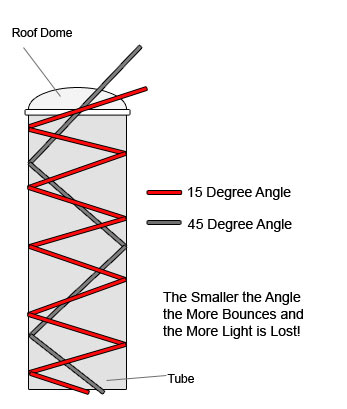
The effects of different angles on light output from a sun tunnel
You might be thinking, well, it’ll be useless at night! This is not so. In some cases a light fitting can be incorporated into the sun tunnel that can be switched on at night and used as a light in its own right!
Again, consider the position of the bulb and housing within the tube as if it is allowed to interfere and cause an obstruction to the light bouncing down in the tube this will restrict the light output from the ceiling fitting.
The area to be illuminated should also be taken into consideration. As you can imagine a 60 watt light bulb will light a small landing area or bedroom quite nicely but that same 60 watt light bulb would be totally useless at lighting something the size of a football stadium.
Cutting and Removing Timber for Sun Tunnel Installation
Before we start, this is a very important point to raise! In no circumstances should you cut or remove any structurally integral timbers in your roof without first consulting the relevant professional such as builder with the necessary knowledge or a structural engineer.
If either of the afore mentioned professionals confirm that it is ok to do so the general rule of thumb is whatever piece of timber you remove you have to put back twice, and they have to be of the same size as that displaced.
So; if you cut a section out of a floor joist or ceiling rafter you will have to put back two horizontal supports to then provide the required support.
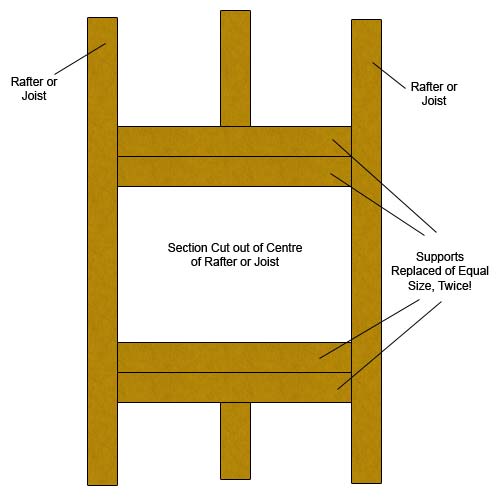
How to strengthen cut trusses or rafters
Installing a Sun Tunnel – Internal Work
Check out the Installation Area
Your sun tunnel installation depends to a degree on the sitting of your roof trusses, rafters and joists. While these can of course be moved, it is considerably cheaper to work round their existing positions. A good survey is recommended to determine the best course of action.
You should also check for any cabling or plumbing pipe work that may be in the ceiling void above where you are going to cut. If it turns out there are obstructions, then you will have to decide whether to move them or to re-think where your sun tunnel is to go. This may necessitate a move from a rigid sun tunnel to a flexible one.
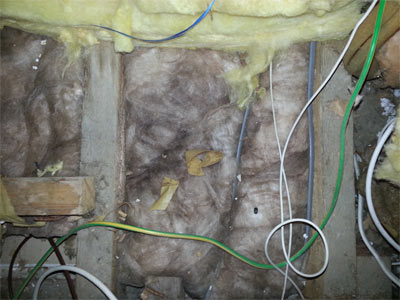
Inspect and clear the installation area in the loft
The Sun Tunnel Kit
Sun tunnel kits come with templates for cutting out holes in the roof and ceilings. Your kit should also come complete with fixing brackets for the reflective tubing.
Any holes should be cut in accordance with manufacturer’s instructions so read them in detail. This usually means cutting all internal holes first and disturbing the main roof structure last.
Cutting the Internal Hole
Remember to use eye protection because a lot of dust and debris may be in your ceiling void and this will fall through when completing this part of the installation process.
Using the provided template, carefully mark out the area to be cut in the exact position you require it on the ceiling. Ensure that you will only be cutting through the plasterboard or ceiling covering and not through any joists or noggins as this may compromise some structural integrity.
The easiest way to do this is to access your loft area, take note and measure where any joists are positioned and then transfer this to your ceiling. Failing this, you can use a stud detector to find and mark joist positions. See our project on using a stud detector.
If you are installing into a flat roof, using a stud detector will really be your only choice when it comes to finding joists as in most cases there will not be a loft area or ceiling void.

Stud detector
To cut your hole, the weapon of choice is usually a pad saw as you will be cutting plasterboard. This tool, sometimes called a jab saw and a board saw will allow you to easily follow the line to be cut. Take your time when cutting as you want to get the smoothest cut possible.
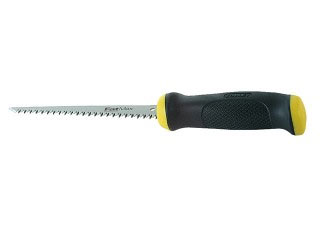
Jab saw or board saw
To give you a starting point and allow you to insert a blade (whether it’s a pad saw or jigsaw) you will first need to drill a small hole around 10 – 12mm. This should be enough to get your blade in to start cutting. Use a flat drill bit for this (as seen below).
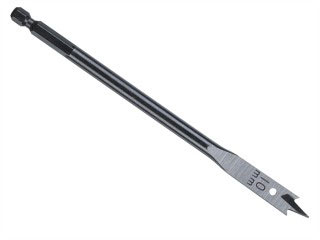
10mm flat drill bit
You can also use a jigsaw but ensure you use it in a safe manner. Cutting upside down is tricky and you can easily loose grip of the saw and drop it causing damage or injury.
A proprietary jab saw has a really sharp and strengthened point which will allow you to "jab" the saw through the plasterboard using the flat of your hand.
Once you hole is cut, remove the section of plasterboard and you should have a nice smooth, uniform hole to fit your bottom tube section and diffuser. Don’t worry too much if you have a few rough edges, once the diffuser is in place this should hide these. There will always be some making good to do with jobs of this kind.
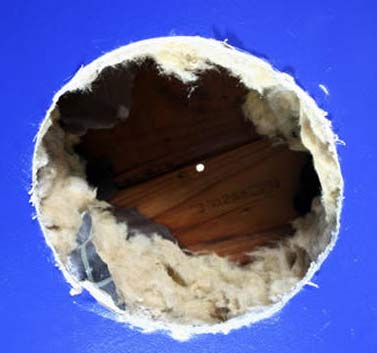
Hole cut in ceiling for diffuser and ceiling ring – Image courtesy of hgtv.com
Fix the Ceiling Manifold or Ceiling Ring
The final job now is to fit ceiling manifold and in some cases this will also involve a bottom section of pipework that the main pipework is connected to (mostly for rigid pipework). Otherwise it will simply be a ring section that is clipped into your hole.
Each manufacturer has a variation on sun tunnel fittings and fixings so please refer to the instructions, but in most cases it will either need clipping in or screwing in.
Once it is clipped in place, use the provided sealing tape to tape all the way around any gaps between the ring and ceiling plasterboard. This will prevent any dust and debris falling through into the room below.
Replace any insulation that you have had to move around the edges of the manifold.
Installing a Sun Tunnel – External Roof Work
We are now moving into the trickier parts of this job, accessing the roof in order to fit the roof dome and flashing.
Depending on the type of roof you are installing on, whether it is flat or pitched will depend on how difficult this becomes:
Accessing the Roof
The following information should help you safely access the area of your roof you need to:
- Pitched Roof: If your roof is a pitched roof above you will need to take safety precautions for access i.e. the use of scaffolding to provide a safe working platform. You will need to ensure that your scaffolding is fixed in position and will not topple over or move. Roof ladders are usually required also. These are laid up the pitch of the roof and hooked over the ridge and allow you to climb up the roof safely. These can be hired from the local tool hire shop as can all the necessary safety equipment
- Flat Roof: In most cases a flat roof will be a single story roof so accessing with a ladder should be quite easy. The difficult part comes when you need to get on top of the roof. Most flat roofs are only constructed using ply board and non-loadbearing joists so standing on it is probably not a good idea. Instead, using a second ladder, place it across the 2 available structural walls and then place a plank or piece of board on the ladder. By doing so you will then spread your weight evenly across the roof and not fall through.
Again, we have to reiterate, working on ladders, roofs and at height is dangerous so please take every precaution necessary to ensure that you are safe and will not damage yourself or your roof.
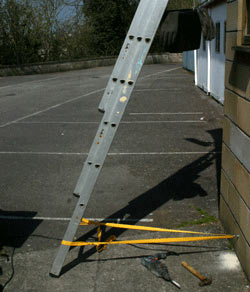
Ladder safely secured to wall with ladder strap
Once you have accessed your roof area the next task is to make the hole that you will mount your flashing and roof dome in to. Depending on what type of roof you have will again depend on how easy and straight forward this will be.
Making a Hole for a Sun Tunnel in a Flat Roof
Due to the nature of the roof being flat, the most important factor here is the drainage and water ingress. When we say flat, in most cases the roof will not be dead level but will slope slightly away from the property so ensure that no water is allowed to pool.
If we go cutting a big hole in it, as I’m sure you can imagine, this is going to compromise the drainage somewhat. To these ends we have to ensure that the hole is completely sealed so that no water or moisture can get in and rot the roof area or spoil any internal decoration.
The roof dome for a flat roof will, in most cases, come with a section or even several sections of flashing that will sit over the housing and on top of your existing roof covering, effectively sealing it down. The flashing is then sealed or glued to the roof covering creating a seal.
Depending on the type of roof dome and its manufacturer will depend on the type of flashing used and the number of layers it’s used in.
The dome and any associated covers are then placed on top, in their indicated order, with each level creating an overhang that prevents water and moisture penetrating up into the dome, very similar to the principle of tiles on a pitched roof.
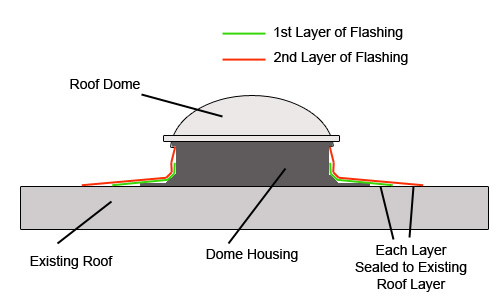
Roof dome and housing with flashing, fitted to flat roof
Due to the nature of the thickness of a flat roof, in most cases there will be little room in the ceiling void between the actual ceiling and the roof so the process of cutting the hole in the ceiling outlined above will pretty much dictate where the hole in the roof needs to be cut as you should be able to see the underside of the roof quite easily!
The tricky part here is getting the two holes to line up exactly over each other. Ensure that you accurately measure the position of the hole in the ceiling relative to any surrounding joists, in at least 2 positions and this should then give you two points to mark the hole with on the underside of the roof.
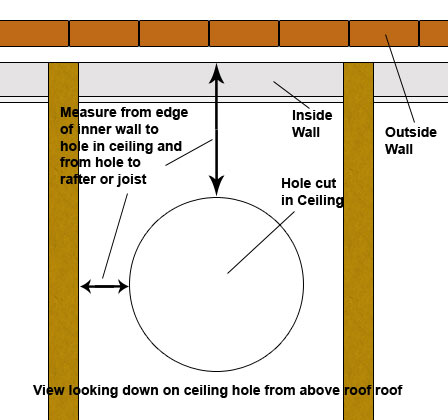
How to measure the ceiling hole to work out where to cut the hole in the top of the roof
In the image above, you will have to use your imagination slightly to picture looking down on the hole in your ceiling without the roof being there. Obviously in a real world situation the above process is not an easy one as you will only have a few inches of depth in the joist to peer in and find a suitable edge to measure from.
In most cases it will be a lot easier to cut your hole from on top the roof so now you will need to drill four holes at north, south, east and west positions, through the roof from the underside so that you can then transfer the exact position from the underside to the top of the roof.
After you have drawn the outline of your template on the underside of your roof you can drill your four holes. Make sure the holes are on the inside of the shape and butt right up to the line you have drawn
Clear as much debris from the area on top the roof as much as possible and then using the template and a decent permanent marker, draw around the template ensuring that all four holes are within the confines of your line.

Clear the top of the flat roof area from debris ready to cut hole
Using a jigsaw you can now cut your hole. As outlined above, take your time, don’t rush and ensure that you cut around the inside of your line keeping as close to the line as possible. Also do not push the saw, let the saw do the work for you.
Making a Hole in a Pitched Roof
Although slightly easier and less hassle than cutting a hole in a flat roof as essentially all you need to do is remove some tiles you will still have to make sure that all the pipework lines up if you are using rigid pipes. Flexible pipes aren’t such an issue as you can obviously bend them to fit.
As there are so many different types of tunnel and each will have its own specific setup it’s difficult for us to suggest a one-size-fits-all approach to marking out the area on a pitched roof where your roof dome needs to go other than if you have straight pipework the dome will need to go directly above the ceiling hole whereas if you have bends then it won’t
One trick here is that you can assemble all the pipework in the loft area and position it over the ceiling manifold and this should then give you an indication on the pitch of the roof where you will need to remove your tiles.
With your pipework in place, use a marker pen to roughly mark around the position on the inside of the roof where the dome will go on the outside. You can then use a piece of wire or similar object to poke through under the tiles so that you can then see it when you are outside, giving you the area that you need to be working in. Make sure that you poke the wire out as close to what will be the centre of your tubing.
Before you climb onto the roof, measure the width and height of tubing as this will give you an idea of how many tiles you will need to remove.
Before you start, use a tape measure to mark out the area of tiles that need to be removed. Use your marker as the centre point and measure out left and right and also up and down.
Using the access methods outlined above, climb onto your roof and locate the marker you used. The chances are that your tiles have been nailed in place so you will need to use a slate ripper to break any nails off so that you can then remove the slate.
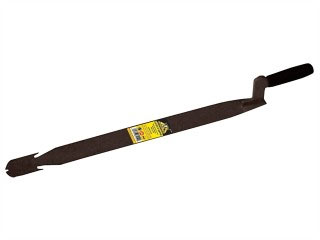
Slate ripper
Remove your tiles one at a time taking care not to drop any or fall off the roof yourself. After you have removed a few tiles you can then pass them through the gap that you have created. Use a friend or family member to help you.
You may find that you have a layer of felt under your tiles. If so you can make a small hole in this to pass the tiles through as you will need to cut out a section later. Just make sure you make any holes as small as possible and right in the centre of what will be the dome or window. Remove as many tiles as required so that your roof dome flashing fits snuggly into the gap.
NOTE: A handy tip is to remember that when it comes to anything to do with roofs and joints is that you always work up from the bottom first so that any water flows over and away from joints and not against them.
Check the Positioning of the Roof Dome or Frame
At this point it is a good idea get the roof dome frame/flashing or window up onto the roof and sit it in position to make sure everything lines up.
Also check to see where the roof trusses are in relation to the edges of the frame/flashing or window as it will need to be screwed down solidly. Fixing points for the flashing or window frame should be provided all around the edge to account for the various situations in which they will be installed.
If possible, adjust the position of the dome flashing or window so that its edges fall in the solid centre of any of the tiles above and not any of the joints between the tiles.
With your position settled on, use a pencil to mark the edges of the frame on any surrounding battens so that you can find the exact position again. Put the frame to one side for now in a safe position.
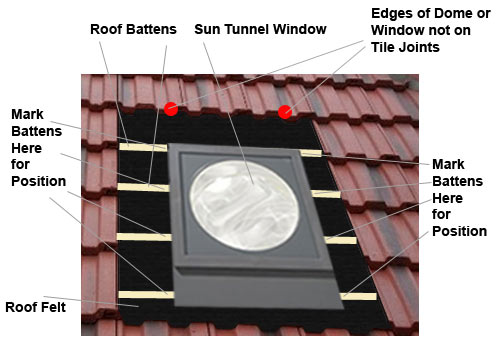
Position roof dome or window on roof and mark battens for later
Installing Timber Bracing
The dome in the roof or window, as mentioned, will require timber bracing to hold it in place and care must be taken not to compromise the integrity of the roof. Do not remove any structural timbers in the roof (such as joists or trusses) unless instructed to by an architect or building surveyor.
What you will have to do is to construct a supporting frame for the dome or window to sit on that you can then secure it to.
You should have two parallel trusses that run either side of your sun tunnel so you will need to add a noggin above and below your dome or window between these two trusses. This is best done from within your loft area as you can position the timbers correctly so that they run below the dome or window and support the weight. Screw in from either side of the truss to secure the noggins
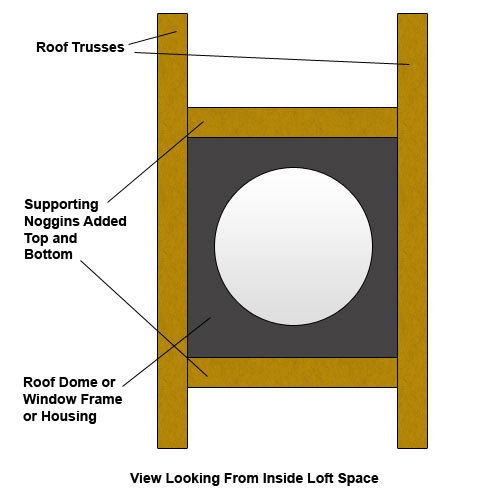
Add noggins between joists to support roof window or dome from underneath
To add support above the trusses that will support the actual frame of the window, flashing or dome housing you should be able to make use of the roof battens that are already there. In most situations the batten at the top can be used to support the top of the window or dome and you should then only need to adjust the position of the bottom batten. Start by cutting away the section of batten that covers what will be your installation gap. You can use a hand saw or battery powered reciprocating saw. Be careful not to damage any felt if it is present.
Next, refer to the manufacturers instructions for the position of the bottom support batten. In most cases it will say to measure a set distance up from the top of the bottom row of tiles, normally around 100 – 200mm depending on what you are installing. Mark this position in two places, just above the trusses if you can feel where they are.
Now, cut a section of batten the same size of your existing batten (usually 1×1/2 inch) and position it horizontally across the trusses, making sure it lines up with each mark and then fix it in place by screwing down into each truss.
If you are unlucky enough to not have a top batten to work with then you will need to repeat the above to add a top batten.
To complete your frame you will now need to add in side supporting battens. Measure vertically between the horizontal battens on either side and cut the side supports so that they fit tightly.
Before screwing them into position, take you frame, dome housing or flashing and place it over the gap once more and adjust the side battens so all edges are supported. Remove the frame and screw the side supports top and bottom or from the sides.
Cut out the Felt to Access Loft
It’s now time to cut out your felt or membrane if it is present so that you can then see down into your loft space.
Using a sharp knife such as a Stanley or hobby knife, cut diagonally from corner to corner and then peel the felt outwards and over your external frame. Nail it to the frame for now to keep it out of your way.
Installing the Flashing, Dome Housing or Window
The part of the sun tunnel that is built into your roof is the flashing kit which protects the opening against rainwater penetration. The flashing may be a separate section, part of the dome housing or part of the window.
Some kits will require you to fix the tube to the flashing before you install it (if you are using flexible tubing). If this is the case, follow the instructions on how to do this. Normally, clips will be present on the tube, that clip into a frame or housing.
Place the flashing into position as stated in the instructions and secure it to your frame using any fixings provided.
When the flashing kit is in place and secured the sun dome and any required housing can also be fitted.
Refit Your Tiles
With the flashing and any housing fitted, you will now have to refit your tiles so that they cover any open sections of felt or membrane and cover over any areas of flashing or frame.
Firstly, have a look at the instructions and find out how much of a gap the manufacturer states that you should leave around the window or dome. In most cases it should be around 30 – 50mm but this may again depend on make and model.
Starting with the bottom, left side tile, measure from its edge to the edge of the window or dome housing and then deduct the amount stated in the instructions for the gap.
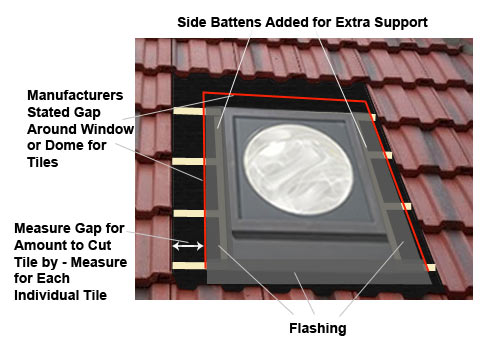
Measure the size of each tile that needs replacing around the window
Now, take one of the tiles you previously removed and measure and mark it. Do this top and bottom and then draw a line down to give you a line to cut along. Using an angle grinder and stone disc, cut along the line to create your tile.

6 inch angle grinder with stone cutting disc
When using the grinder, make sure you have goggle and gloves on that the tile is clamped securely and cannot move. Don’t try and do this in situ on the roof.
Take the tile back up to the roof and fit it to make sure it is the right size. Now repeat this all the way around for any other tiles that are needed, fixing and nailing each of them in place as you go, laying the bottom ones first and working your way up.
In respect to the row of tiles along the top – your kit may include a support bar that will need fixing that will take the weight of the bottom of the tiles. If so, fix this in place following the instructions and also fix any foam supports that may be included.
Securing the Tubing
With the ceiling manifold and dome, flashing housing or window in place now is the time to install the tubing. Depending on whether you are using rigid pipes or flexible pipes and who manufactured the kit will depend on how the tube is secured to the roof and ceiling and even how sections of tubing are fixed together.
With most kits a clip system is used to secure tubing to the roof section as this will effectively be hanging on the roof so it needs fixing correctly.
In either case, follow the instructions for fitting your pipework together which in most cases will state, start at the top by fixing the tube and then work your way down adding sections of pipe until you reach the ceiling manifold, if you are using rigid tubing.
Note: When using rigid tubes, you will need to ensure that the manufacturer provides you with exactly the right length to reach from roof to ceiling. If not you will need to trim it up and this is not an easy job!
If you are using flexible tubing this is slightly easier – Extend your tube out and then push it down through the ceiling manifold. Ensure that you pull it tight but be careful not to pull too tight and tear it. Once reasonably taught, cut off any excess.
Within the kit there should be a clip or series of clips that can be inserted to hold the tubing in place within the manifold. With clip or clips in place, carefully slacken a small area at a time and pull the tubing down to remove as many creases as possible.
Fold any excess tube back up into the tubing and tape it round using only the reflective tape that should be provided with the kit.
The final task here is to now tape all the way around the tubing that is attached to the roofing section using the tape that should be provided. This will prevent and dust or insects from getting into your loft area.
Fix Diffuser to Ceiling Manifold
With all the other items covered, you can now complete your installation by inserting your diffuser in to your ceiling manifold.
The diffuser splits the light into segments which make it easier to manage in the room and avoids shafts of sunlight hitting one spot.
When this is in place, then you’re all done! Top job!
As always with work that creates debris, dust and the use of sharp components DIY Doctor recommends the use of gloves, dust masks and eye protection.
Now that you have mastered this how to guide to installing a sun tunnel you can now use some of the principles outlined above to install a Velux window.

