There are quite a few reasons why you may or may not want to carpet your stairs. Ultimately it really depends on your tastes and how heavily they are used.
Laying carpet on stairs is not the easiest job, so if you want a really good finish then it’s best to get a professional to do it. However, if you’re on a budget and happy to have a finish that may not be 100% perfect, then you can have a go yourself, read on to find out how.
Why Should you Carpet Stairs?
As we have mentioned above, whether you carpet your stairs or not is really up to you, but even if you are undecided there are quite a few reasons why you may want to:
- Noise: Carpeting a staircase can quieten it down a considerable amount
- High Traffic: If your stairs are used a lot, apart from the noise of people thudding up and down them all day it can reduce wear
- Children: Again, adding carpet will help with noise reduction and also it will make otherwise hard surfaces much softer for landings during any slips or falls
- Repairs: If your stairs are in rough condition, adding carpet over them can help to hide the damage
- Save Time and Money: Although there is a cost to buying and installing carpet, it can be considerably cheaper and quicker then undertaking repairs, especially if your stairs and in very bad condition
Despite the numerous advantages of carpeting stairs, as with all things, there is also the obvious downsides to doing so such as the fact it’s just another surface that needs to be kept clean and vacuumed.
Also, if it’s not installed correctly it can easily move underfoot which can be very dangerous, especially for the young and the elderly, considering also it’s on the stairs. Any falls could be extremely serious!
Despite the above risks, on the whole if you are not going for the natural wood look or the timber used to construct your stairs isn’t particularly eye catching then it’s a great idea to carpet them as the advantages far out-weigh the downsides.
Methods for Installing Carpet
There are 2 different methods of installing carpet on a staircase; the French Cap, Hollywood or cap-and-band as it’s also known and also the waterfall method. Each has its advantages and disadvantages.
French Cap or Hollywood Carpet Install Methods
This is the most time consuming method for carpeting stairs but despite this when done properly, certainly gives the best finish.
Each tread and riser is covered with its own piece of carpet, so it has to be cut to the correct size. It can in some cases be done in one piece but for the best results, it’s better done a tread and riser at a time.
Essentially, a piece of carpet is cut to the correct size and is then laid out from the back of the tread and held in place by a carpet grip. It is then folded tightly over the nosing of the tread and then follows the contour around and down the riser to meet the next tread. It’s secured to the riser again using carpet grip and also staples or tacks.

Carpet fitted to stairs using the French Cap method – Image courtesy of Pinterest
Waterfall Carpet Install Method
The Waterfall method is in a way quite similar to the French Cap, however it firstly differs in that it is fitted in one piece rather than cut and fitted individually to each tread.
As above, the rear of the carpet is fitted to the back of the tread and secured in place using carpet grip.
Generally starting at the base of the stairs, the carpet is secured to the back of the riser using grips and is then run up and over the nosing and is then again secured to the back of the tread using carpet grip.
Unlike French Cap, the carpet is not secured around the nosing.
This is by far the fastest method of carpeting stairs and done correctly, will still give good results, however over time it can come loose.
This method only really works if the nosing of each tread is not pronounced so the carpet can fold tightly over it.
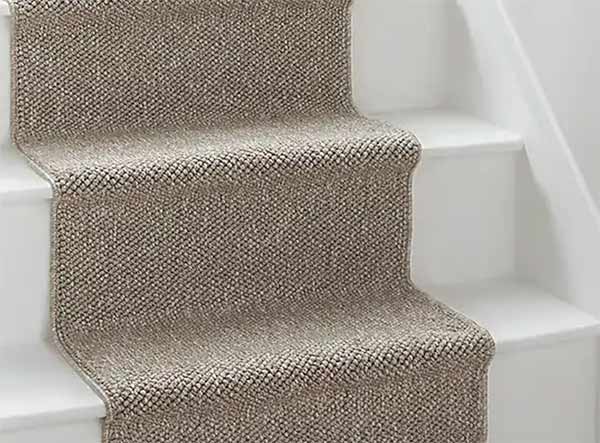
Carpet fitted to stairs using Waterfall Method – Image courtesy of Dunelm.com
Aside form the above 2 main methods there is one more know as a stair runner.
This is where a piece of carpet is cut slightly smaller than the size of the stairs, roughly 2-3 inches either side and it is then laid down the middle of the staircase, being secured in place using either grips or runner rods.
As you don’t need to worry too much the accuracy of fitting, this is again a very quick method and does look good, as long as the gaps at each side are also finished properly.

Stairs carpeted using a stair runner and runner rods
What Type of Carpet for Stairs?
At the end of the day, it’s really entirely up to you what type of carpet you use to cover your stairs, however, if you are undecided then there are a few rules to work by.
In general it’s best to stick to plain colours that match the rest of the carpets in the property or if you do want to make it a bit more interesting and use patterns, try to stick with stripes, especially those that run along the length of the stairs.
Using non-linear and complex patterns generally doesn’t work too well on stairs as it doesn’t flow particularly well.
How to Prepare Stairs for Carpeting
The very first job before anything else is to measure up your stairs so that you know exactly how much new carpet to order.
To work out how much carpet you need to buy for your stairs, measure one step from the back of the tread to the front and then down and around to the bottom of the riser.
Be sure to include the measurement of any nosing, where the tread overhangs the riser.
At the same time that you purchase your carpet you will also need to purchase the same amount of underlay, so don’t forget this!
Get the best quality underlay that you can as this will make a huge amount of difference to how comfortable everything is under foot.
When purchasing carpet for your stairs, it will be much easier for you if you can buy a standard sized runner strip of stair carpet. However, this may not be possible, in which case you will need to cut a strip to the width of your stairs. Buy a hard-wearing carpet that will withstand a lot of foot traffic. Likewise for underlay. See our laying carpet underlay project for information on different types of underlay.
Once measured for one step, add at least an inch onto this measurement, and times by the number of steps in the staircase. If you are carpeting the landing too, measure this and add on to your stair measurement.
Once all measured up and your new carpet is ordered, once you have it and are ready to fit, the staircase itself then needs to be prepared.
To get the best results possible when carpeting stairs, it’s absolutely essential that they are prepared correctly before any new carpet is laid.
Next, remove any old carpet from the stairs, along with old underlay, tacks, nails, staples, carpet grips and any other unpleasant things sticking up.
Take this opportunity to give the stairs a good clean before you start again. Using a hot water and Sugar Soap solution, dampen a rag and wipe all surfaces over before drying them thoroughly.
Finally, give everything a thorough vacuum over.
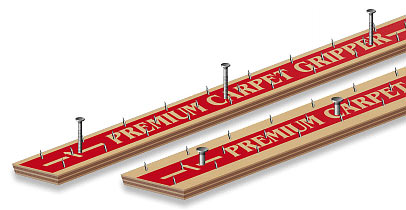
Carpet gripper – This will hold your stair carpet in place
Tools and Equipment Needed for Carpeting Stairs
In order to successfully install carpet on your staircase you will need the following tools and products:
- Enough carpet to cover your stairs (with extra just in case)
- Enough lengths of carpet grips to hold the carpet in place
- Sharp utility knife and spare blades
- Enough underlay to lay under the carpet
- Knee kicker
- Heavy-duty staple gun and carpet staples
- A hammer
- Tape measure
- Blunt 4 inch bolster for ramming the edge of the carpet down behind the gripper
- Duck tape – if you need to stick any underlay together
- Carpet joining strip (if joining into landing carpet)
Carpet fitters use hooked blades so that the blade stays sharper for longer. Also, carpet blunts blades very, very quickly with the average room needing up to 6 blades.
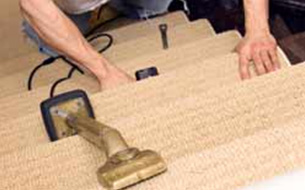
Fitting stair carpet using a knee kicker
How to Carpet Stairs
Now that we have run through all of the items you need to think about when carpeting a staircase, how everything should be prepared to get the best possible results and what tools and products you need it’s time now to look at how it’s done.
As the Waterfall method is the most straight forward, this is the technique we will be using in the explanation below.
The below is an image of what we are aiming to achieve with each of the steps below and shows where each item should be fixed.
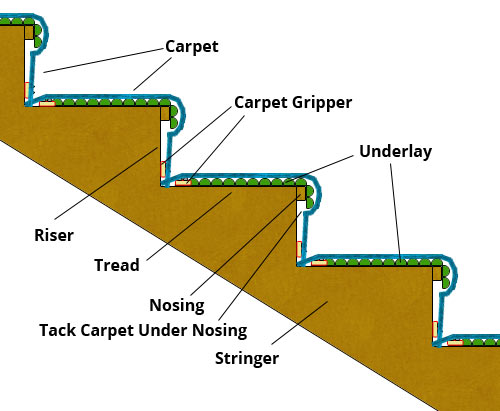
Cross section of stairs with carpet grippers, underlay and carpet laid
If you are using a stair runner that leaves a gap at either side, as mentioned the fitting instructions are pretty much the same – just make sure the gripper strips are the correct width. It will help if you mark a line on each step that you can follow to ensure you have an equal amount of space at each side of the runner.
Step 1 – Measure up and Prepare
As we have explained above, first remove any existing carpet or coverings and then any tacks, staples or the similar. Make sure that you remove any that are present so that they do not protrude through your new carpet.
Once removed, wash everything down with Sugar Soap and a damp rag, dry it thoroughly and then vacuum over the surface.
At this stage you should already have your carpet and underlay purchased and ready to go but if not, then you will need to measure your stairs in accordance with the instructions above, get down to a local carpet shop and get them purchased.
Step 2 – Fix Carpet Grips in Place
The next job now is to fix the carpet grip strips in place to each tread and riser.
Depending on whether you are carpeting the full width of the stairs or or just a runner down the centre will depend on how wide your strips will be cut to. In either case cut each strip so that it is around 10mm less than the carpet width at either end.
Starting at either end top or bottom, it’s up to you, fix the first gripper to the back of the tread so that the barbs on the gripper are facing away from you (or towards the riser). Leave a gap between the gripper and the riser 3/4 the thickness of the carpet.
Using a hammer, hit each nail down to secure the gripper to the tread.
Next, fix another piece of gripper to the riser, but this time ensure that the barbs are angled down, facing the tread. Again, leave 3/4 the thickness of the carpet between the gripper and the bottom of the riser.
Once the first step has been done, repeat the above techniques and work your way down to the bottom. Don’t put gripper on the bottom step though.
Step 3 – Cut and Fix Underlay
Once the grippers are fixed in place the next task is to then cut and fix underlay over each tread and riser.
For each pair, use a tape measure to measure from the inside of the gripper on the tread down to the gripper fixed to the riser below it and then cut a piece of underlay to size.
Put the underlay in place, ensuring it’s the right way up with the shiny side or non-spongy side facing upwards and then staple it in place using a staple gun and carpet staples.
Staple along each side every 3 inches or so and a few across the centre, this will ensure there is no movement.
Repeat this for the remaining part of the stairs until all are covered.
Step 4 – Lay out Carpet
With everything now prepared and ready, it’s time to start laying down the carpet.
Take the carpet and roll it up with the underside facing outwards and leave about a foot or so unrolled. Make sure it is positioned so that the pile is facing down the staircase so it doesn’t get rubbed the wrong way as it’s stepped on.
Staring at the bottom, place the roll on the first step and pull the unrolled section down to the base of the riser.
Push the carpet on to the barbs of the grip and gently pull it upwards to engage with the barbs and then staple the base of the carpet to the base of the riser in a few places to hold it in place.
Step 5 – Fix Carpet in Place
With the carpet tacked to the base of the bottom riser you can now start to lay and fix it in place.
Pull the carpet up and over the first step keeping it as taught as possible, and then use the knee kicker to stretch it well so that it doesn’t ruck up as it gets walked on and then push it down over the gripper on the back of the tread, making sure that it’s hooked over the barbs firmly.
Once firmly held, use the bolster to push the carpet firmly into the gap between grippers at the back of the tread.
If your steps, as stated above, have a nose this can complicate matters slightly. To deal with this you will need to tack the carpet at the top of the riser with staples for a French Cap finish, just under the nose and then pull it up and over so that it fits around it snugly.
If you don’t, it will simply stretch over the nose from the bottom of the riser and leave a gap between the carpet and the top of the riser. This will slacken over time and cause the carpet to ruck up, not only looking untidy but also causing a trip hazard. This is the major downfall with the Waterfall fitting method.
Once the first step has been completed, work your way up the remaining steps, repeating this process, until you get to the top.
If you are carpeting your landing with the same carpet, you can either continue one piece of carpet all the way along the landing. However, with the extra width needed for doorways this is not usually practical and can involve a lot of fiddly work.
A better and more practical solution is to take the stair carpet up to the top of the final riser, leaving roughly a 20mm gap at the top, unless it has a nose in which case finish it just below the nose and tack it into place and trim it off in a neat line.
To complete the job with a neat finish, pull the landing carpet down over the edge of the top step. If the step has a nose, you can fix the landing carpet to the underside of it. If not, you may need to go down to the bottom of the first riser to get a neat join.
If your stairs and landing carpets are different, you may prefer to take the stair carpet up and over the top step, then put a joining strip between the two carpets. You’ll have to decide which finish works best for your situation.
For much more help and advice on fitting carpets, please also see our projects on Laying a Carpet and also Laying Underlay.