Before we can start to get an idea of the types of stairs that are available and the various options that you can choose, you will need an understanding of the most common terminology and the parts of a staircase.
The Parts of a Stair Case
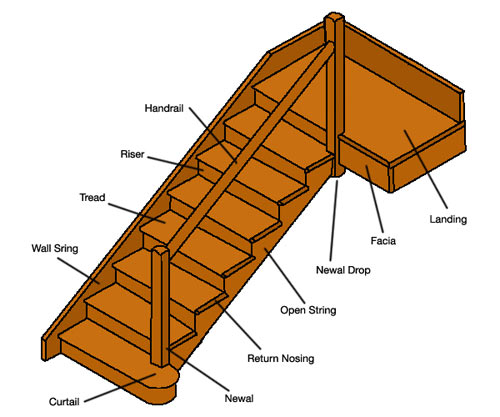
In the following diagram we cover the most common parts of a staircase, particularly the ones that you will need to know, first to choose the type and design of stairs that you need, and then to fit them if you are planning to do this yourself.

The most common parts of a stair case – Stair case jargon!
Here is an explanation of these parts of the stair in a little more detail:
- Stairwell – this is the vertical space or shaft in a building where the staircase will (or does) fit
- Newel Post – These are the sturdy vertical posts that are at the top and bottom of the staircase. They go into the stair case itself and need to be strong enough for the banisters or handrails to fit into to offer sufficient support and protection for people using the stairs. Both the top and bottom are called Newel Posts, but they are often distinguished from each other as they are fitted differently, hence we use “top newel” here. The Newel Post is a structural element of the staircase and therefore will extend below the floor so that it can be fixed to the floor joists. Typically they are 90mm x 90mm. Where the stair railings or banister ends at a wall, a half newel can be used which gives the impression that half the newel is embedded into the wall
- Newel Drop – For Newel Posts above landings the newel can extend below the level of the ceiling below as a decorative effect; this is known as a “Newel Drop”. They are used where there is an open landing and both the newel and the newel drop can be seen. If the Newel Post extends below the ceiling and down to the floor below this is known as a Newel Story, and will provide even more support to the staircase and landing above
- Newel Cap – (sometimes called a Finial) this is the decretive finished that is added to the top of the Newel post. This can be a simple cap or more ornate carved ornaments, such as balls, spikes, urns, buns, or a figure.
- Stringer, String, Stringer Board – These are the structural supports that run along either side of the stair case, often holding and supporting the treads and risers. The are several notable types of String (The Stinger is usually 220mm wide and 32mm thick. The length with depend on the Rise and Going):
- Closed Strings; Here the string support the treads and risers which typically fit into routed channels in the string. A closed string extends above and below the level of the treads and risers; above the pitch line.
- Cut (or Open) Strings; Here the string has been cut in a diagonal zigzag following the line of the treads and risers, so that they can be seen from ‘outside’ the staircase. This is only really done on the outside side of the staircase as there is no need it the stair case runs and the string is along a wall.
- Wall Sting or Inner String; this is the string that is positioned against the wall.
- Handrail or banister – This is the rail that goes up the staircase which people hold on to, obviously! They are grooved out so that the spindles fit into the underside of them
- Spindles or Balusters – These are the vertical supports that drop down from the handrail to the bottom rail. They are largely decorative, but they do stop things (and people!) falling off the stair case, under the handrail. They can be square or turned to be more appealing
- Bottom Rail – this is the rail that the bottom of the spindles fit into. This is not always present or necessary. If there is no bottom rail the spindles will fit directly into the floor on a landing or a tread on the stairs
- Step – this is comprised of a tread and riser (if present)
- Treads – Treads are the horizontal pieces that you stand on, usually timber 22mm thick but thicker if it is an open riser staircase. It should be constructed to the same specifications of the floor, at least
- Risers – these are the, usually timber, parts that rise vertically from the back of one tread to the front of the next tread. If they are timber they will typically be 9mm, but will not always be there or do not need to be complete – see the types of staircase below
Important Stair Terminology
There is some important terminology that you need to understand to be able to describe and specify the right stairs for your home. Here are the most important terms that you should understand:

Important terms used for the measurement of stairs and staircases
- Rise or Total Rise – This is the distance from one floor level to the one above that the stair case will join
- Individual Rise or Rise Height – this is the distance from top of one tread to the top of the tread above it
- Nosing Overhang or Nosing – This is where the tread above a riser overhangs it. In some cases treads might not have a nosing, and in this case the total run will equal the sum of the individual goings, otherwise it will not
- Total Going or Run – this is the distance from the end of the staircase, the front of the nosing overhang of the bottom stair to the back of the riser on the top stair
- Individual Going – This is the distance from the front of the nosing of one tread to the front of the nosing of the step above it
- Pitch Line – This is a imagined, diagonal straight line down the staircase touching the front of every tread
- Headroom – this is the vertical distance measured from the Pitch Line to the ceiling above the staircase, or any other obstacle above it. This cannot be less than 2 meters
The Key Measurements to Consider for Staircases
The Headroom for a Staircase and Limited Headroom in Lofts
In order to comply with the building regulations, the headroom (the distance from the Pitch Line to any obstruction above) must be at least 2 meters.
There is a relaxation of this rule for loft conversions as the roof is likely to be sloping above the staircase. For more details on what is allowed in the building regulations you can see our project on Part K of the Building Regulations.
Due to the limited space in lofts, this is the place to start planning your staircase then you are doing a loft conversion. The headroom will determine the locations where the stairs can be fitted which could be your limiting factor.
Stair Sizes and Critical Measurements for your Staircase
The Individual Rise must be no more than 220mm and no less than 190mm in order to comply with the building regulations.
The pitch must not exceed 42° which means that the run should never be less than 2200mm for a normal staircase. There are exceptions in the case of lofts again, where an alternating tread or space saving staircase might be user. Again, you should read the building regulations for more information.
There are no restrictions to the width of the staircase; however the “standard” is 860mm, generally they will not exceed 900mm or be less than 800mm, or 600mm for lofts.
As a general rule, if you are replacing an existing staircase and it does not conform to the current regulations you are able to fit a stair case that is the same (or better) even if it does not meet the specifications outlined in part K of the building regulations. In all other case you will have to comply. If you have any doubts you should contact your local building control.
More Staircase Terminology and Features for Describing the Perfect Design
At this point you will have read enough to get a staircase designed and specified for your home. As staircases are such a feature and will they have a huge impact on the overall design there is a lot more terminology that you should know to be able to describe the additional features and decorative options that you should consider. In this section we go into a little more detail about some of the more detailed parts of your stairs and the surrounding features:
Parts of the Staircase and stairs in more detail
- Facia or Apron – this is the board that covers the gap between the ceiling and floor at the edge of an exposed landing. (labeled 9 on above image)
- Landings – this is the floor at the top or bottom of the stairs. The rooms lead of the landing. Landings can also be used within the staircase, between flights for several reasons:
- Increase the run of the staircase, without reducing the pitch (steepness), if it is required
- To allow the staircase to turn corners (see below)
- In some countries there are limits on the length of flights stairs before a landing should be included for domestic dwellings. There are rules in the building regulations got building that are not domestic dwellings in the Regulations
- Safety; a landing can reduce the distance that a person can fall, and structurally it may be more sound to include a landing to bear the required weight
- It can be very tiring to climb a continuous flight of stairs!
- Return Nosing – This is the nosing of the tread that protrudes from the side of the staircase beyond the string, generally into the hall way. These can only be found on the outer, open string
Landings and Windings; Stairs with Turns in them
There are a number of ways of “turning corners” with stairs. The choice that you have will be restricted by the amount of space that you have and the style of stairs that you want.
- Winders – Winders are steps that are narrower on one side than the other. They are needed in order to allow the staircase to “wind” around corners without using a landing
- Spiral staircases – these are staircases which are made up entirely of winders so that they are constantly turning. These tend to be circular but can be square, with a kite winder every 3rd step
- Kite Winder – the kite winder is the middle step in a 3 step, 90° turn. It is called the kite winder because, you guessed it…., it’s kite shaped!
- Landings for Making Turns in Staircases – This is a way that a stair case can turn a corner by breaking up the flights of stairs either side of a small landing, where the turn is made. This takes up more space (for the rise achieved) than Winders but the construction and design is easier to achieve. The Landing must be at least the width of the stairs before any change of direction is made. If doors open on to a landing then there must be at least 400mm of free landing space beyond the open door on the landing. There are three types of landing that are used to make a turn in a staircase:
- Half Landings – These are landings where the width of the landing is equal to twice the width of the stairs, which allows the upcoming flight to join the landing parallel to the outgoing flight
- Quarter Space Landings – These are landing where the width and length are the same as the width of the stairs. The outgoing flight generally leaves from 90° to the upcoming flight, and there can be two out going flights, creating a ‘T’ effect in the staircase
- Split Landing – A split landing is somewhere between Winders and a Quarter Space Landing. The landing is split by a step diagonally across it as the staircase turns 90°. This is not really a landing as such, therefore does not need to be as long
- Winder Landing – The steps in a Winder that lead to or from a landing must be the same height as the other steps in the staircase. This is to say that all the steps must have a uniform rise across the whole staircase whether there are any landings or winders present
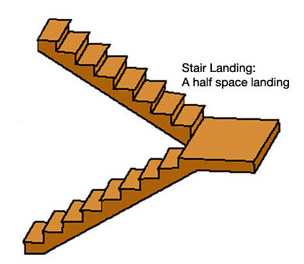
Example of a half turn landing in a staircase
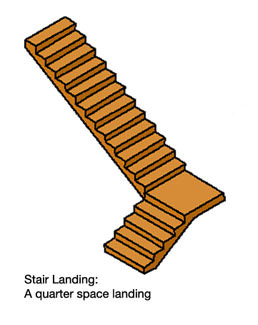
Example of a quarter landing in a staircase
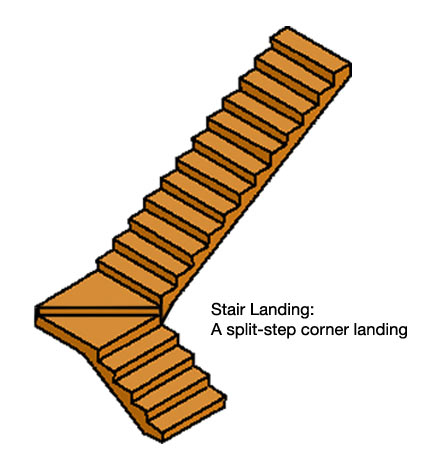
An example of a split-step corner landing
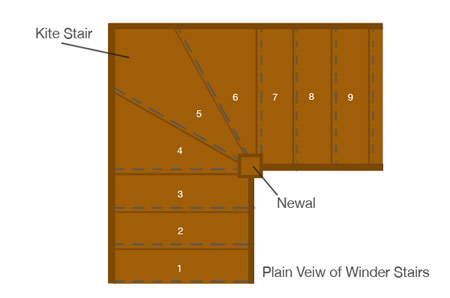
Overhead plan view of winder stairs including kite stair

Side profile view of a set of winder stairs
Starting Steps, Bullnose and Curtail Steps
There are a number of options to choose from for the first step of your staircase. The space that you have and the style of the staircase that you have chosen will determine what you choose here. There are three main styles to consider.
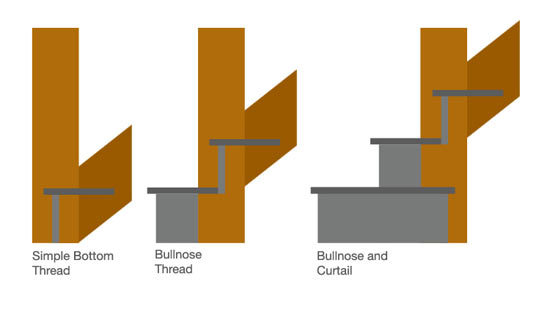
Side view showing how different types of tread and riser are formed within a staircase
- Simple Bottom Tread, Simple Starting Step or Straight Step – This is where the first step of the stair case starts at the newel post, rather than one or two steps protruding beyond it
- Bullnosse Step or Bullnose Tread – this is where the bottom step protrudes beyond the newel post. This leaves a step at the bottom of the staircase before the String starts. A Double Bullnose refers to a staircase that is not against a wall and there for there is a bullnose at both ends of the starting step
- Curtail or Curtail Entry Step – The curtail refers to the step that curves around beyond the width of the strings of the staircase. There are a range of types of Curtail Steps (as seen below):

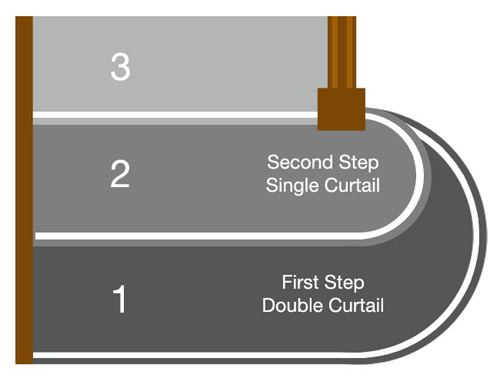
Top down view showing first step with double curtail and second step with a single curtail
- Single Curtail – this is where curve extends beyond the width of the staircase but only back a single stair tread. The curtail is the same depth as the tread of the stair
- Double Curtail – this is where the curtail extends back two steps, to the level of the riser of the second step
- Triple Curtail – This is where the curtail extents back three step. This is less common
A triple curtail in a staircase
The Curtail is not simply a decorative feature, but is often there to provide extra strength and solidity to the hand rail. Where there is a Curtail the handrail or banister often ends in what is called a Volute or swirl. By having this and a curtail more spindles or balusters can be used to made an end to the handrail that is often more sturdy than having a single newel post.
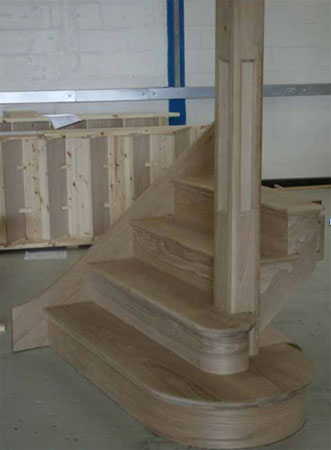
A triple curtail used during construction of staircase – Image courtesy of stairplan.co.uk
Choosing or Designing Stairs and Staircases for Your Home
At this stage you are armed with all the technical terms that you need in order to understand and describe the type and design features of the stairs that you want.
Now you can look at the types and styles of stairs that you should consider narrowing down your choice. The good news is that stairs are generally built in factories then simply assembled on site, as opposed to be built on site requiring highly skilled carpenters. This is good news for two main reasons:
- Staircase design has been standardised, while still retain a huge amount of choice. This is good news because most leading suppliers have catalogues or online apps that help you actually “design” your stairs within their parameters. This makes it very easy for you to choose the right set of stairs and options available to you, when once this was largely in the carpenters head!
- Factory production is much more efficient both in making the stairs and also requiring less skilled labour to assemble it. This is not to say it is an easy job to fit factory manufactured stairs, but it is much easier than building from scratch!
Now that you have a pretty much full understanding of the different parts of a staircase, what each part does and what rules and sizes they need to be, you should now have all the tools and knowledge you need to plan your own stairs or at least, be able to direct a carpenter or joiner in creating the staircase of your dreams.