The ceiling rose is an integral part of a light fitting and to ensure all lights on a lighting circuit work as they should, it’s essential that it’s wired up correctly and to this end, this guide works through everything you need to know about how to wire a ceiling rose.
What is a Ceiling Rose and how Does it Work?
A ceiling rose is the part of a light fitting that sits at the base that you use to secure the fitting to a ceiling or wall and it also contains all of the wiring and terminals to make the light work, so that it turns on and off correctly with a light switch.
There are 2 different ways that a ceiling rose can be wired up, the loop in method or junction box method.
With the loop in, for everything to work as it should, firstly, the power comes into the ceiling rose from either the consumer unit or light before. Each core wire in the cable, live, neutral and earth, connects to its respective live, neutral or earth terminal as does the cable leaving that carries power on to the next light.
When a light fitting is attached to the ceiling rose it could be wired straight into the Neutral terminal and the live terminal shown in the rose but it would of course be on all of the time. For it to work properly it has to be interrupted by a switch.
This is easy, in that a cable (switch wire) is added. One of the wires from the switch wire is connected to the live terminal. This takes live current to the light switch. The other wire (The earth goes straight to earth and should not be used as a live wire under any circumstances) is then connected to the switch terminal in the ceiling rose and is known as the switch live. This wire brings live current back to the rose to complete the loop.
So, we have live current going down to the switch which, when switched on, will allow the current through the switch, back up to the rose allowing live current to reach the light fitting and turn the light on.
With the junction box method, instead of the ceiling rose containing all the wiring, this is done by a junction box and the only wire that goes to the ceiling rose is the switch wire from the junction box.
The major mistake when replacing a light fitting (see wiring a light fitting project for more information) is to connect all the blue (or black) wires together and all the browns (or reds) together.
As you can see from the diagram below both switch wires are live wires so this mistake means you are, when the switch is on, connecting a live wire to a neutral set of wires which will trip the fuse or MCB.
The blue (or black) wire in the switch cable should have a little brown (or red) tape or sleeve on it to mark it out as being live. This rarely happens so please be aware of this.
What Does Loop In Mean?
Loop in is a fairly modern method of wiring for lighting circuits. It’s name comes from the fact that electrical cable loops in to a light fitting and then out again to the next, carrying power as it goes.
One of the major advantages of the loop in system is that the ceiling rose takes the place of a junction box that would traditionally be used to form the loop in and ensure power is transferred onwards to any further light fittings.
Parts of a Ceiling Rose
To understand how to wire a ceiling rose correctly, it’s essential that you also understand exactly what parts they’re made up of:
- Lamp Holder/Pendant: Houses and holds the bulb in place
- Flex: Take the neutral and live from the ceiling rose to the pendant
- Ceiling Rose: Houses all of the wiring and terminals
- Cable Entry Hole: Allows the loop in cables and switch wire to enter the ceiling rose
- Earth Terminal: Allows all 3 earth wires to be connected together
- Neutral Terminal Loop In: Allows 2 loop in cable neutrals and flex neutral to be connected together
- Live Terminal Loop In: Allows all 3 live wires to be connected together
- Switch Live: Allows switched live (neutral) from switch wire to be connected to live for flex and pendant
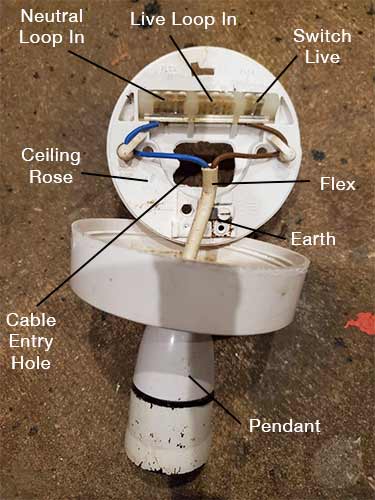
The parts that make up a ceiling rose
How to Wire a Ceiling Rose
As we have stated, there are several different methods of wiring up a ceiling rose depending on how the lighting circuits in your home have been wired. The techniques for wiring each are detailed below.
Wiring a Junction Box Ceiling Rose
Wiring a ceiling rose from a junction box is fairly simple. As there is only 1 cable that runs from the junction box to the ceiling rose, the neutral connects to the neutral loop in terminal, the live to the live loop in terminal and the earth to the earth terminal.
Despite this there is a fair amount that goes on in the actual junction box. To wire up a lighting junction box you will need a 20 amp one with at least 4 terminals and also some 1 or 1.5mm twin and earth cable.
Before any work takes place, make sure that you isolate the circuit your are going to work on at the consumer unit or fuse board!
- Step 1 – Connect Loop In Wires: First, strip the outer cable sheath and then inner core wires. Place some earth sheath over the bare earth wire. Connect both live wires to one terminal, both neutrals to another and both earths to another terminal
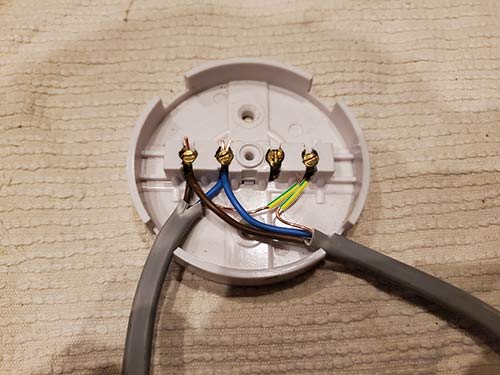
Connect the loop in and loop out wires to terminals
- Step 2 – Connect Switch Wire: Strip the sheath and core wires of your switch wire. Connect the live wire to the terminal with the other 2 lives. Place some brown tape or a brown cover over the neutral wire (to indicate switch live) and connect it to a spare terminal
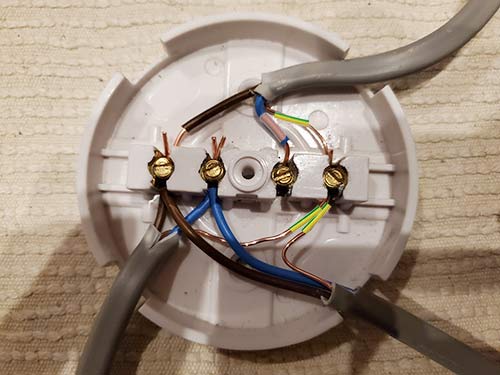
Wire up switch wire to terminals
- Step 3 – Connect Switch: In the switch, connect the live wire to the COM terminal and the neutral (with brown tape or sheath over it) to L1
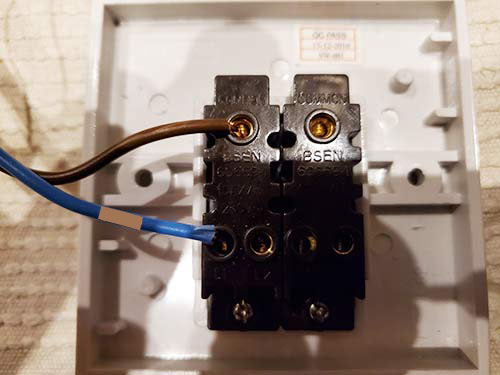
Connect the switch up
- Step 4 – Connect Light Cable: Using another length of cable, strip outer sheath and inner cores at both ends. In the junction box, connect the neutral to the neutral terminal with all other neutral wires, the live to the terminal with the switch live and the earth to the earth terminal

Connect up wire running to light
- Step 5 – Connect Ceiling Rose: In the ceiling rose, connect the neutral to the terminals with the flex neutral connected, the live to the flex live terminal and the earth to the earth terminal
Connect up ceiling rose
- Step 6 – Test: Once all connected, screw the cap on the junction box and back on to the ceiling rose and screw the face plate on to the back box, turn the power back on, add a bulb to the pendant and test. If all well the light will go on and off with the switch
Wiring a Loop In Ceiling Rose
To wire up a ceiling rose using the loop in method, again, do not do anything until you have isolated the circuit you’re working on at your consumer unit or fuse board.
- Step 1 – Connect Loop From Previous Light: Strip the sheath and core wires of the incoming loop cable and connect the neutral to the neutral loop in terminal, the live to the live loop in terminal and the earth to the earth terminal
- Step 2 – Connect Loop to Next Light: Strip the sheath and core wires of the loop cable to the next light and connect the neutral to the neutral loop in terminal, the live to the live loop in terminal and the earth to the earth terminal
- Step 3 – Connect Switch Wire: Strip the sheath and cores of the switch cable at both ends. Connect the live wire to the live loop in terminal, the neutral to the switch live terminal (add brown tape or sheath to indicate switch live) and the earth to the earth terminal

Wiring diagram of a ceiling rose
- Step 4 – Connect Switch: At the switch end, connect the live to the COM and the neutral switched live to the L1 (with brown tape or sheath to indicate live)
- Step 5 – Test: Once All connected up, screw the switch face plate onto the back box and screw the cover back over the ceiling rose. Add a bulb to the pendant and flick the light switch on. If all well the bulb should turn on and off with the switch
Learning how to wire a ceiling rose is a very handy skill to posses as you will be able to change your own light fittings without the expense of an electrician. Also, understanding exactly how it should be wired up will help you to troubleshoot in the event of any issues.