There are generally 2 types of electrical circuit found in the home; the socket circuit and the lighting circuit.
In this project guide we look at the 2 different types of lighting circuit and how they are wired up.
Regulations for Lighting Circuits
As with anything to do with electrics in the home, any work that is carried out is very tightly controlled by the Building Regulations, particularly Part P.
Essentially, any electrical work carried out in the home should only be carried out by someone with the necessary skills and knowledge to both perform the work correctly and fully test it once it’s complete and then issue a minor works certificate. With this in mind, the only person with these traits is a Part P electrician so with this in mind, any work should only be undertaken by such a person.
Part P of the new building regulations can also involve a check on any additional circuitry by qualified electricians when you sell your home. If this hasn’t been done correctly this can affect your sale, you could be breaking the law and your house insurance may not be valid.
Another factor to be aware of is that if your home is fairly old then it may have old coloured wiring as opposed to the new harmonised wiring scheme. For more information on this please also see our project on the New Wiring and Cable Colours.
If you are unfamiliar with electrics, you should stay well clear of them. For any more safety advice, see our project on electrical safety here.
Light Circuits and Switching
One of the key elements of any lighting circuit is the switching setup and how a light is switched on and off. In most cases this is decided by the type of circuit (more on this below) and the number of switches required.
If only a single light needs to be turned on and off using 1 switch then a 1 way switch and wiring setup is used.
However if a light needs to be turned on and off from 2 different locations such as a stairs light where you would have a switch at both the top and bottom, then a 2 way switching setup would be used.
In situations where 3 switches are needed an intermediate switching setup is used. This is where a third switch is added into a 2 way setup.
For an in depth explanation on everything you need to know about switching in lighting circuits, see our lights and switches project here.
Types of Lighting Circuits
In a domestic situation there are 2 different types of lighting circuit, the traditional junction box setup and the newer loop in setup.
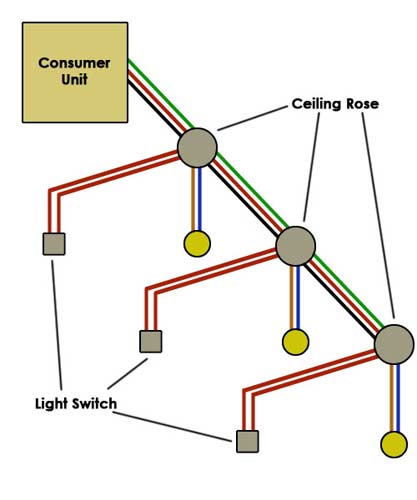
The loop in setup, shown below, takes power from the consumer unit to the first ceiling rose. It is then taken from the ceiling rose, through the switch and back to the ceiling rose where it then carries on to the next ceiling rose.
This carries on until it is looped all round the house, where it terminates at the final light. As commented, this is called the loop circuit or system. You can understand more about the ceiling rose and switch connections in our lights and switches project

The more modern loop in lighting circuit
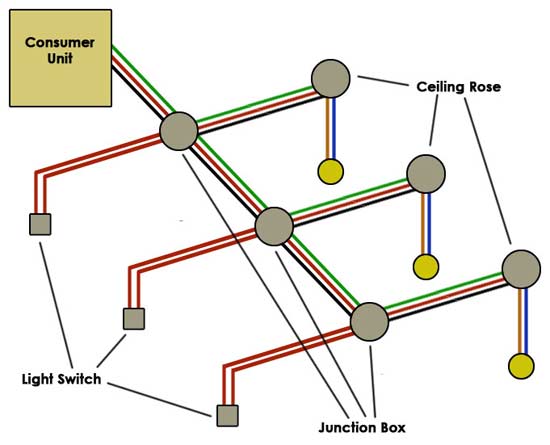
The second system, which is the more traditional type is the junction box circuit or system. Power is taken from the consumer unit to the first junction box. The live is interrupted by the switch wiring and the circuit is carried on to the next junction box. A cable is run from the junction box to the light, usually via a ceiling rose.

The more traditional junction box lighting circuit
When it comes to identifying the type of lighting circuit you have in your home, this can in most cases be done by simply isolating the lighting circuit you’re looking at and then removing the cover from a ceiling rose.
If you have multiple cables running in and out of the ceiling rose this is likely to be a loop in system, whereas if you only have a few (single live, neutral and earth) then it’s likely to be a junction box setup.
How Long can a Lighting Circuit be?
A lighting circuit can serve up to 12 x 100W bulbs on a single circuit. Using 1mm twin and earth cable is allowed for up to 95 meters of circuit length. This does not include the light switches which can be wired in switch wire which contains 2 brown (or red) cores.
If you have longer lengths that your circuit needs to cover, 1.5mm squared twin and earth cable can be used and the maximum length allowed using this is 110m.
If the correct sized cable for the length of circuit isn’t used then this can create too much draw as the circuit will use much more energy than the circuit is designed for. More energy = more heat and the increased draw on a cable can cause it to overheat and catch fire.
Why are Lighting Circuits Split?
To avoid the house being in total darkness if a fuse should blow or trip, lighting circuits are generally split into upstairs and downstairs as if one goes out you’ve generally got the other to fall back on.
In properties with a consumer unit, each lighting circuit will have it’s own MCB which should be rated at 6 amps, however if a cartridge fuse is used it should be rated at 5 amps.
Can you Spur off a Lighting Circuit?
If you need to add an additional light or extend a lighting circuit to an extension of similar you can spur off of an existing light circuit. Normally this is done by simply spurring off of a ceiling rose but you can also insert a junction box and come off of that.
As we have stated above, the one thing that you do need to be aware of is not making the circuit too long or adding too many new lights that the circuit gets overloaded and trips the MCB/RCD or fuse or worse case, overheats and catches fire.
Do Outdoor Lights Need to be on Their own Circuit?
Any outdoor circuit, this includes both sockets and lights, should be on they’re own separate RCD/MCB in your consumer unit. This is to ensure that any issues are isolated to that circuit and if it trips it doesn’t affect anything else.
There are several different types of lighting circuit in use in the home and depending on how old your home is will ultimately depend on what type of circuit you have.

