A quick and easy way to give your home a fresh look is to repaint or wallpaper your walls and also change light switches and light fittings and although this may sound complicated it is certainly something you can do yourself.
What is a Light Fitting
A light fitting or light fixture as it’s also known is the section of the light that holds the bulb in place and fixes it to the wall or ceiling.
An important point to make is that ceiling roses and light fittings sometimes get confused and although they are part of the same object they are slightly different. The job of the ceiling rose is to conceal the wiring whereas, the light fitting is the part that hold the bulb.
Light fittings come in a massive range of sizes and styles to suite any and all tastes, but by far the most common are the pendant light fittings commonly seen in most homes, such as the one in the image below.

Standard pendant light fitting
Common Mistakes When Fitting Light Fittings
The most common mistake made by many wishing to change their light fittings is that they take down the existing light and ceiling rose without marking or taking note of where each wire goes e.g. which are paired together in which terminal.
Once realised when fitting the new light, generally most then assume that all the red/brown live wires are joined together, then all the black/blue neutrals and then all the earths are connected, the light switch is then turned on and "ping" the fuse blows or the trip-switch flicks off. Why?
Well, 99% of the time one of the black or blue neutral wires belongs to the switch cable that controls that light e.g. it is the switch live. Both wires, red/brown and blue/black, are live wires in a switch as you will see a little later. The neutral switch live wire should have a little bit of red/brown tape around it, or a little sleeve on it. This makes the job of identifying the switch live cable easy.
Thus, the most important step to take when removing an old light fitting is to make sure you mark any and all wires and cables, ensuring you know exactly which wire goes in which terminal.
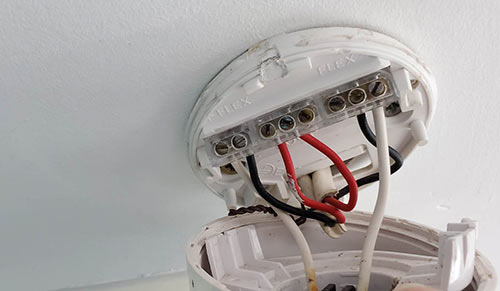
Ceiling rose for light fitting using old wire colours
How Does the Lighting Work in Your House?
When doing any DIY job around the home, especially electrics, it’s very important that you have an understanding of how it works. This not only helps when doing a given job but is also very handy for fault finding and fault diagnosis.
The diagram below shows the circuits involved. Please note that despite the fact that some older houses may be wired differently in junction boxes which will be located under the floor or in loft, the principle is the same.
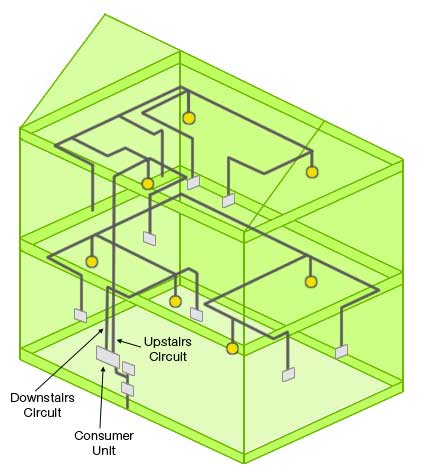
lighting circuit found in a house
Power comes into the house to your consumer unit or fuse board. The lights are fed from this via (generally) two circuits, one for upstairs lights and one for downstairs. Both of these circuits should be on 5 amp fuses or MCB’s (Miniature Circuit Breakers). This fuse, in theory, allows up to 12 100W bulbs to be used on that circuit, in practice no more than 8 are normally fitted.
The cable runs from the consumer unit, to the first light fitting in the ceiling of that floor, it enters the ceiling rose where it is looped in and out to feed the next light and so on.
At the same time a cable is connected into the ceiling rose that runs from the switch that controls that light. With ordinary "one way" lighting, i.e. one switch controls only one light, the diagrams and explanations below apply.
For two and three way lighting diagrams, which can be identified by additional yellow or black and blue or grey wires within the lighting switch cables.
How Does a Light Fitting Work?
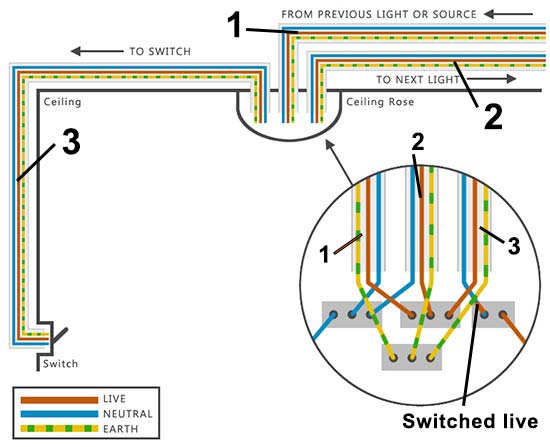
Ceiling rose wiring diagram
You can see from the above that the loop wires (all wires in this kind of lighting circuit belong to the lighting "loop") are connected to terminal blocks in the ceiling rose.
The live terminal is fed from the consumer unit and in turn gives live power to the other cables in the circuit that are connected to the same live terminal block, in this case cable 1 supplies the live power from the source or previous light, where it is taken by cables 2 and 3.
The neutrals of cables 1 and 2 are joined together in the neutral terminal block, the left terminal block in this case. This is where the neutral side of any light fitting will go.
Cable 3 is the switch cable and as you can see more clearly from our diagram here in our lights and switches project this cable interrupts the live flow with a switch. The switch simply cuts off the live current to the bulb.
The brown and blue (or red and black with old colours) wires either side of the ceiling rose are the live and neutral feed directly to the light fitting that enable it to turn on and in this case they would appear as a flex.
When you have removed your existing fitting, you will need to know which wires go to the switch. Hopefully, as we explained further below, they will be labeled with either a piece of brown (or red with old colours) tape on the blue (or black) wire, or a small brown or red sleeve to indicate the switch live wire.
Can I Change a Light Fitting Myself?
Yes, it is certainly possible for you to change a light fitting yourself. This is not only fairly straight forward as long as you have a basic knowledge of electrics but is also allowed by the regulations as you are allowed to change sockets, switches, light fittings and also add a spur.
Although the regulations do allow this, some responsibility has to be taken on your part as you do need to be honest with yourself about whether you are capable of doing it and if not, get a professional electrician in.
Staying Safe When Working Around Electricity
As we all know, electricity is extremely dangerous and if you take your eye off the ball for even a split second, this can lead to serious injury or even worse.
With this in mind, it’s essential that you pay attention to the following points:
- Before you start anything, isolate the circuit your are working on at your consumer unit or fuse box by turning off the MCB or removing the fuse
- If your property is fairly old then it may still be using the old wiring scheme. For information on how to match old and new cable colours, see ournew wiring and cable colours project
- If you do decide to give this a go, if you are in any doubt whatsoever about what to do, or don’t feel totally confident, get an electrician in
- Please remember when attempting any electrical installations at home that you are obliged to get the completed job tested by a fully qualified electrician and obtain a minor works certificate. Failure to do this may render your house insurance invalid and you may have difficulty selling your home. Please also see our project Part P Building Regulations
For any further information about staying safe when doing electrical work, see our electrical safety project here.
Tools and Products Needed for Replacing Light Fittings
To successfully replace a light fitting in your home you will need the following tools and products:
- Desired new light fitting
- Insulated small flat blade screwdriver
- Insulated Philips screwdriver
- Ladder or steps top access existing light
- Brown/red insulation tape to mark switch live
- Phone or camera to photograph existing wiring
- Masking tape to stick on existing wires and label which terminal they go in
- Pen
How to Replace a Light Fitting
How that you are aware of all the safety points and what mistakes to avoid when wiring in your new light fitting, you can now get started.
Step 1 – Isolate the Power
The very first thing before starting anything is to isolate the power for the circuit you are working on. If you have a consumer unit, this means turning off the MCB or if you have a fuse box, pulling out the fuse.
Once done, test the circuit by turning the light on at the switch and also other surrounding lights to make 100% sure that the power is defintely off.
Step 2 – Removing the Existing Light Fitting
Once isolated, the next job is to remove the existing light fitting. First, set up a ladder or set of steps to access the light. Ensure it’s easy to access, you don’t want to go stretching and struggling to reach it.
Next, unscrew or unclip the pendant cover from the ceiling rose (the part closest to the ceiling) and expose the wires and terminals.
At this point you will now be able to see what type of wiring system is in use in your home, the junction box type or the newer loop in type.
- Junction Box: There will be one cable coming into the ceiling rose supplying power to the fitting. Neutral will connect to the neutral, live to the live and earth into the earth terminal if there is one
- Loop In: Instead of using a separate junction box, the ceiling rose acts as the junction box so there will be normally at least 3 wires coming into the fitting with all neutrals in one terminal, all lives in another, earths in another one and finally the switch live connected to the live terminal of the pendant
As you may imagine, the less wires there are the simpler the job will be however don’t panic if you do have a loop in setup as the most important thing to do is to take note of where each wires goes.
Pull the cover down as far as possible so that you can see everything and then take a picture of wires and which terminals they are connected to.
Using your flat blade screwdriver, loosen the screw of one terminal and lever the wires out. Break off a small piece of masking tape and stick it over the wire sheath and write on it which terminal is came from. Repeat this for all other wires.
This may seem like overkill but it will save a huge amount of time and stress later on as you will know exactly what wire goes in what terminal.
Pay particular attention to any wires that have a red or brown (depending on the existing wires colours of your home) sheath or tape wrapped around them. This is the switch live wire and needs to be connected to the correct live terminal otherwise the it simply won’t work.
Step 3 – Remove old Light Fitting
Once all of the wires have been labeled and disconnected, use your Philips screwdriver to unscrew the screw or screws holding the base of the ceiling rose to the ceiling. Once the screws are removed, pull the fitting gently away.
As you pull, carefully push the wires back through the hole in the base and then the whole fitting should come free.
Once removed put it to one side.
Step 4 – Fitting Your New Light Fitting
Take your new light fitting and unscrew the pendant cover from the base and slide the cover down the length of flex and then using a small flat blade screwdriver, loosen each of the terminal screws enough to ensure you can get the required amount of wires in there.
Position the fitting up to the ceiling and then pop all the wires through the hole in the base. Pull them through, ensuring you haven’t missed any.
Push the fitting up to the ceiling and then screw it up using the existing holes. Depending on the type of fitting you may need to create new holes. Depending on what you’re fixing into will depend on how this is done. For plasterboard use a Redidrive, for masonry a drill and wall plug and for timber, a decent screw.
Once fitted, separate out the wires into groups (if more than 1 per type e.g. live, neutral etc.), using your labeling and pictures to ensure the right wires are together and then, a group at a time, pop them into the correct terminal and tighten the retaining screw. Repeat this for each group.
Once you are sure they are all in the right terminals and all screws are tight and no wires are loose, pop the pendant cover back on and screw it up.
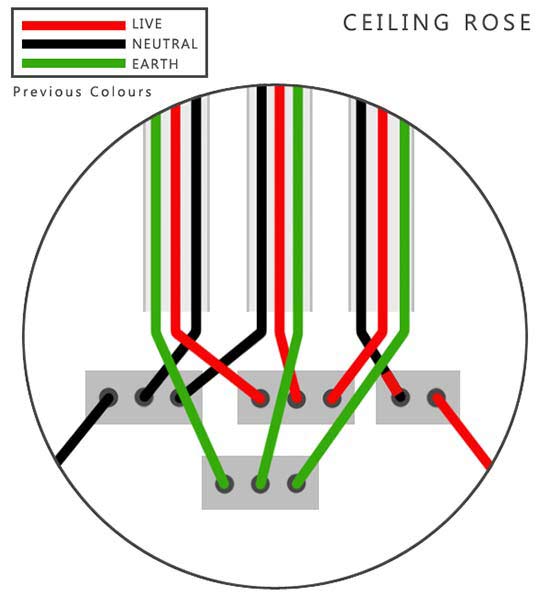
Ceiling rose diagram for old wire colours
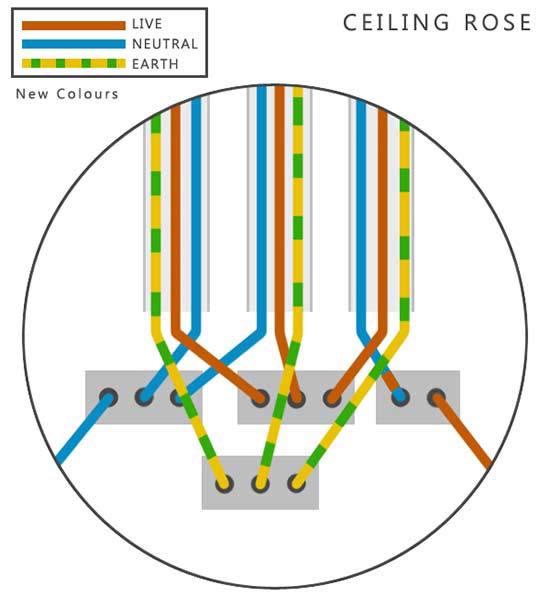
Ceiling rose diagram for new wire colours
Step 6 – Test the new Light Fitting
The final step to do is to then test the new light to make sure that it works. Go back to your consumer unit or fuse box and flip the MCB to on or push the fuse back in.
An initial sign that there is an issue will be that the MCB or fuse trips or blows right away. If it does, make sure everything is turned off and isolated and read on below to sort the issue.
If all is well go over to your new fitting and turn on the switch. Again if there are any issues the light will either be on without flipping the switch or won’t come at all. In either case, see the tips below.
However, if all is well, when you flip or pull the switch the light will come on and then when you turn it off it will go off. If this is so, then good work, you have successfully replaced a light fitting with a new one.
Step 7 – If Everything Goes Wrong
If after removing your light fitting you don’t take note of where each wire is supposed to go or after connecting everything up there’s a problem, you will need to diagnose what’s going on. In most cases it will be that you have a loop in setup and you have mixed up the wires and the switch live isn’t in the correct terminal.
If you have no indication whatever of which three brown, blue and earth wires (or red, black, earth) from the switch cable then you will need a circuit tester. To use this device is not difficult but you must turn all the lighting power off first and take out the fuses so they cannot be turned on by accident.
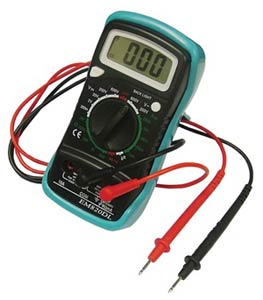
Pocket multimeter
When the power is OFF and fuses out, turn off the light switch, i.e. make sure the switch is in the off position. Now it is a case of trial and error.
Hold the red and black terminals of your circuit tester to a brown and a blue (or red and black) wire that appear in the same cable. Using the diagram above, this would mean either cable 1, 2 or 3. Next, turn on the light switch. With all power off to the lighting circuits, there is no power to the switch.
If you have connected to the switch cable, the circuit tester will indicate that you have completed a circuit. If not, it will not move and you try the next set of brown and blue wires that are in a cable together. When you have identified the switch cable, mark the blue with some brown insulating tape and even put a piece of tape around the cable sheath so there can be no mistake.
If Your new Ceiling Rose Does not fit
Ideally, your new light fitting will fit over your ceiling rose and there will be no need to take it apart. The live and neutral of the new fitting simply connect to the live and neutral the old fitting was removed from. If this is not the case, then we will need to adapt the rose connections to suit the fitting you have.
The easiest way to do that is by making all existing connections into cable connectors (minimum 5 amp) or a junction box, as shown below. The live cables will be joined as they were in the ceiling rose, as will the neutrals, and finally, but very importantly, the earths.
With these connections made, the live, neutral and earth from your new light fitting can be connected. The base of most modern light fittings is big enough to conceal these new connections but occasionally one has to make a larger hole in the ceiling to push the junction box into. The light fitting is then screwed up as normal.
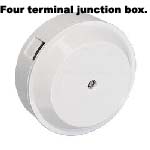
4 terminal junction box
Replacing and wiring a light fitting is certainly with the scope of most DIY’ers as long as they posses a basic knowledge of electrics. However if there is any doubt you should always get a professional electrician in!
If you would like to know more about lighting and socket and switch wiring, see also, our lights and switches project, how detailed project on wiring in wall lights and also our project onelectrical safety for more help and advice.
Some books that we find particularly useful when it comes to domestic wiring are as follows and would be a valuable asset to your electrical knowledge arsenal.

Electrical Wiring Domestic Book available on Amazon

Wiring and Lighting Book available on Amazon

