If you are looking for something a little different in terms of your home decor then you may want to consider chalkboard or blackboard paint. More common place in schools and the likes, this versatile paint has recently seen alternate use in many arts and crafts and interior design projects.
With this in mind, in this guide we take a look at how chalkboard or blackboard paint can be used by you in your home.
What is Chalkboard Paint?
Chalkboard paint creates a durable, writable and erasable surface that mimics the traditional blackboards seen in every school the length and breadth of the UK.
Formulated with tough pigments, it dries to a hard finish, allowing you to write and erase chalk effortlessly.
Once applied, the surface becomes reusable, washable, and long-lasting—perfect for notes, artwork, or labels.
Alternatively, you can leave it unmarked to enjoy its stylish matte, chalky finish as a decorative feature.
It’s a versatile option for home décor, ideal for organisation, labelling, and even a fun space for kids to draw.
Most chalkboard paints are made from a blend of talc, acrylic emulsion, water, glycol, titanium dioxide, carbon black pigment, and silica.
Some formulations may also contain industrial solvents like acetone, xylene, and propylene glycol to enhance durability and adhesion.
Ingredients vary by manufacturer and region, depending on the intended surface. It’s important to note that chalkboard paint is different from Chalk Paint®, a decorative furniture paint created by Annie Sloan.
While both dry to a matte, chalky finish, Chalk Paint is designed for distressing furniture and achieving a shabby-chic look, whereas chalkboard paint provides a physical and functional writing surface.
In terms of where chalk paint can be used, its applications are various indeed. Some of the most common are as follows:
- Doodle wall in a kids room
- Shopping/menu list in a kitchen
- To do list
- Usage notice for business/meetings rooms
- Daily agenda
- Kitchen/bathroom cabinet door – cupboard contents
- Cups and mugs
- Garden pots
- Storage containers and jars
- Fridges or freezers
- Garages or workshops
- Any surface that can be turned into a notice board or artists canvas
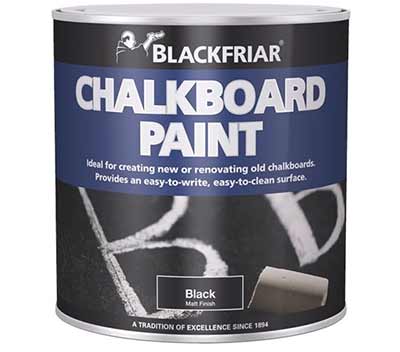
Chalkboard paint
What Surfaces can you Apply Blackboard Paint to?
As we have said, blackboard paint is an extremely versatile coating that can be used to transform pretty much any surfaces into a writable, erasable blackboard. Here are some of the most common:
- Walls: Smooth, flat interior walls are ideal for creating a large chalkboard area. Ensure the surface is clean, dry, and primed for best results.
- Wood: Works well on furniture, doors, wooden panels and tabletops. Sand rough surfaces before applying for a smooth, even finish.
- Glass: Perfect for decorating mirrors, picture frames, or glass jars for labelling. Use a primer to enhance adhesion.
- Metal: Can be applied to filing cabinets, metal doors, and fridge surfaces. Opt for a paint designed for metal or use a primer to improve durability.
- Plasterboard: Ideal for creating a blackboard wall in a home office or kids’ room. Fill any holes or cracks before application.
- Plastic: Works on certain plastics, but results can vary. Lightly sanding the surface and using a bonding primer improves adhesion.
- Ceramic and Tiles: Suitable for decorative tiles or kitchen splash-backs. Clean thoroughly and use a high-adhesion primer for best results.
- Doors and Cupboards: Great for kitchen cabinets, pantry doors, and wardrobes to add a writable space for notes or lists.
- Concrete and Brick: Can be applied to smooth concrete walls or brick surfaces. A primer helps ensure even coverage and adhesion.
Types of Chalkboard Paint for Different Surfaces
Chalkboard paint comes in various formulations to suit different surfaces. Choosing the right type ensures a successful job, including a long-lasting finish that’s easy to write on and erase. Below are the best options for different materials:
- Water-Based Chalkboard Paint: Best for walls, wood, plaster, and drywall. Low odour, quick-drying, and easy to clean with water. Ideal for indoor use in homes, schools, or offices.
- Oil-Based Chalkboard Paint: Works well on metal, glass, and plastic surfaces. Creates a highly durable, moisture-resistant finish. Requires mineral spirits or paint thinner for clean-up.
- Magnetic Chalkboard Paint: Contains iron particles to allow magnets to stick to the surface. Suitable for walls, wood, and MDF boards. Requires multiple coats for a strong magnetic effect.
- Spray Chalkboard Paint: Perfect for smooth, non-porous surfaces like glass, metal, and plastic. Provides an even, professional finish with minimal brush strokes. Quick-drying but requires plenty of ventilation during application.
- Tinted Chalkboard Paint: Available in various colours beyond the traditional black or green. Great for creative projects and decorative use on walls or furniture. Works on most surfaces, including wood, plaster, and MDF.
- Outdoor Chalkboard Paint: Formulated to withstand weather conditions, UV rays, and moisture. Ideal for garden walls, outdoor play areas, and signage. Often oil-based for added durability.
Chalkboard paint varies by manufacturer and the type of surface it’s designed for. While some all-in-one options claim to work universally, it’s best to choose a formula tailored to specific materials for better durability.
Available in various colours, black remains the most popular, followed by dark green, due to its classic chalkboard look. Some brands offer pastel shades, though colour options are limited by pigment strength. A unique alternative is clear chalkboard paint, which retains the original surface appearance while adding a writable finish.
Chalkboard paint works on many surfaces, including walls, doors, cupboards, furniture, glass, metal, and wood. When applied correctly, it creates a durable and stylish writable space.
How to Prepare Surfaces for Chalkboard Paint
Chalkboard paint comes in different formulas for various surfaces, so always check the label to ensure compatibility before purchasing.
Proper preparation is key for a smooth, long-lasting finish. Most surfaces need sanding and priming, especially porous materials like plaster and softwood or smooth surfaces like metal, glass, and ceramics. If painting over an existing wall, primer is usually unnecessary unless repairs are needed.
Fill any cracks or holes, sand them flush, and prime if required. Chalkboard paint highlights imperfections, so ensure the surface is smooth. Lightly sand the area, wipe away dust, and clean thoroughly before applying your paint. Learn more about surface preparation here.
5 Best Creative Chalkboard Paint Ideas
Chalkboard paint offers endless possibilities for creative and practical projects. Whether you’re updating home décor or adding a functional touch, here are five top ideas to inspire you.
1. Chalkboard Mug
Upgrade ordinary mugs with a writable chalkboard surface. Simply tape off the area, apply chalkboard paint for ceramics, and let it dry. Perfect for labelling drinks, leaving notes, or adding a fun touch to your kitchenware.
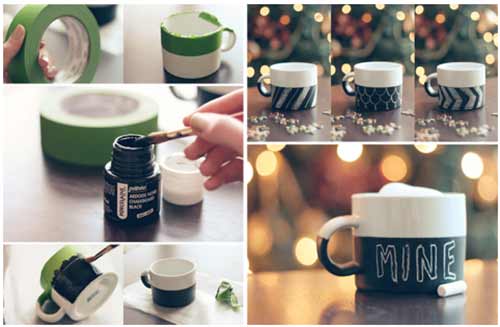
Transform a plain mug into a custom, writable design with painter’s tape and chalkboard paint – Image courtesy of Pinterest
2. Chalkboard Storage Jar Labels
Turn glass storage jars into stylish, reusable containers. Chalkboard labels make it easy to change contents without messy stickers. This works well for food, office supplies, or home organisation.
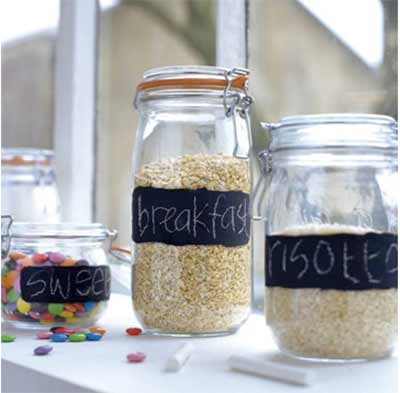
Glass jars with chalkboard labels for easy food organisation – Image courtesy of Pinterest
3. Chalkboard Serving Tray
Revamp an old tray with chalkboard paint for a unique serving experience. Label food, write messages, or add creative designs. Works beautifully with wood, glass, or ceramic trays.
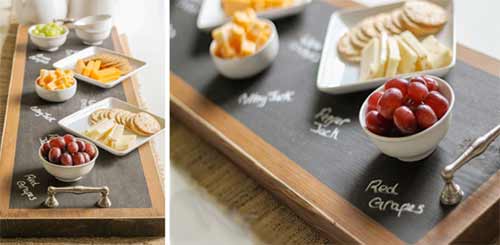
Serving tray with chalkboard paint for labeling food and drinks – Image courtesy of Pinterest
4. Chalkboard Kitchen Splash-back
Add a functional chalkboard section to your kitchen splash-back. Perfect for jotting down grocery lists, recipes, or reminders. If a full chalkboard wall is too bold, a small section adds style and practicality.
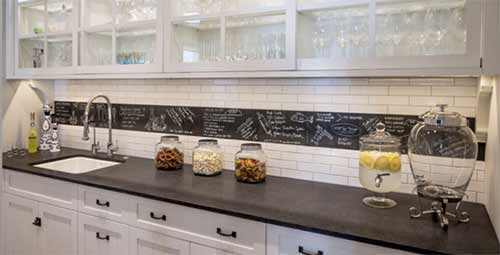
Chalkboard kitchen splash-back with white subway tiles – Image courtesy of The Spruce
5. Free-standing Blackboard
Create a movable chalkboard using an old mirror, frame, or MDF board. Great for messages, to-do lists, or kids’ creativity. Adjust the size to fit your space and needs.
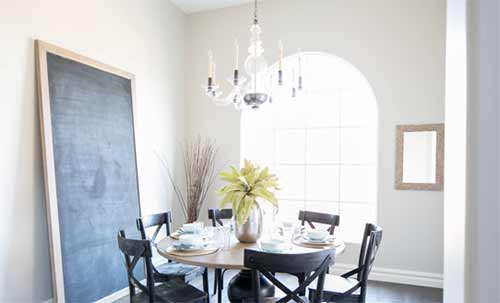
Portable chalkboard for flexible use around the home – Image courtesy of The Spruce
Chalkboard paint is a fun, practical way to transform everyday items. Try these ideas or come up with your own – the possibilities are endless!
How to Apply Chalkboard Paint
Chalkboard paint is available in standard cans, spray cans, and small bottles for craft projects. It can be applied with a bristle brush, foam brush, or roller, depending on the surface size.
For large, flat surfaces like walls or MDF, a roller ensures smooth, even coverage. A smaller 4-inch roller or foam brush is ideal for detailed work, as it prevents visible brush strokes.
Spray chalkboard paint is another option, but just be sure to apply it in even strokes and work in a well-ventilated area.
Step 1: Prepare Surface to be Painted
The very first job to complete is to correctly prepare the surface you’re going to be painting.
If timber or plastic and the likes, give the surface a sand over and smooth off using a medium grit sandpaper (120 grit or more).
If glass, metal, tiles or similar apply a coat of primer as due to the fact these surfaces are not porous, they will need the primer to aid adhesion.
For walls, brick, concrete, plasterboard and similar surfaces, look over them carefully and fill any holes with a suitable filler and once dried, sand it off flat.
Despite the surface-type, applying a coat of primer is generally a good idea anyway and certainly won’t hurt, so if you can, go ahead with this!
Once you have sanded, primed etc. and it’s fully cured, wipe over the entire area to be painted, removing any remaining dust, grease and grime.
Finally, mask up any edges or parts that you don’t want the paint to get on – See our project on masking up for help with this.
Step 2: Apply Chalkboard Paint
For a smooth, durable finish, apply at least three thin coats of chalkboard paint.
Each coat will dry with a slightly uneven, matte texture, so layering is essential. Some surfaces may need just two coats, while others might require four or more, depending on the material, paint brand, and desired finish.
Ensure full, even coverage before moving to the next step for the best results.
Step 3: Allow Paint to Dry
Chalkboard paint requires patience and rushing can ruin the finish. Always let each coat dry fully before applying the next.
For small projects, wait 1–2 hours between coats. Larger surfaces, like walls, need at least 24 hours.
After the final coat, allow 24 hours for crafts and up to 2–3 days for bigger projects to fully cure. This ensures a smooth, durable writing surface.
Step 4: Prime the Surface
Once the chalkboard paint has fully cured, priming the surface is essential to prevent ghosting and make erasing easier.
To prime, take a piece of white chalk and rub it sideways across the entire surface until fully covered. Let it sit for about an hour, then wipe it clean with a dry cloth or eraser.
This thin layer of chalk dust creates a smooth base, ensuring future writing and drawings can be erased without leaving marks.
Future Maintenance
Over time, chalk marks may become harder to erase or leave behind shadows. To refresh your chalkboard, wipe it down with a warm, damp cloth and let it dry completely.
Once dry, re-prime the surface by rubbing white chalk across it, then wiping it clean. This helps maintain a smooth, easy-to-use writing surface.
Choosing the Best Chalk
For blackboard paint, soft chalk is ideal. It erases easily and won’t scratch the surface like hard chalk.
Chalk markers offer bold, ink-like lines but may be harder to remove. Test them on a small area first to ensure they erase cleanly.
If using chalk markers for semi-permanent labels or signs, check their removability before full application.
Happy painting!