Decking is a popular choice for UK gardens due to its versatility and ease of construction. Unlike raised patios, a raised deck requires less groundwork and blends seamlessly with natural elements like trees and fences.
However, decking is still a form of carpentry, so basic DIY skills are needed for a professional finish.
This guide focuses on designing and building a simple raised deck. Whether your deck is slightly elevated or raised, we will go through all you need to know to arrive at a successful finish.

Building a decking frame to support the deck boards
Can You Build Decking Over a Patio?
Yes! If your patio is solid and level, you can build a decking frame directly on top. However if you are, align the frame with the patio’s slope to prevent water pooling against the timber.
Before starting, draw a decking plan to determine post placement and timber requirements. Using larger timbers allows for wider post spacing, ensuring a sturdy structure.
When building over an existing patio it’s essential that you know where the posts are going to go, so you can be sure that where they fall, will be solid enough to support the weight of the deck above it.
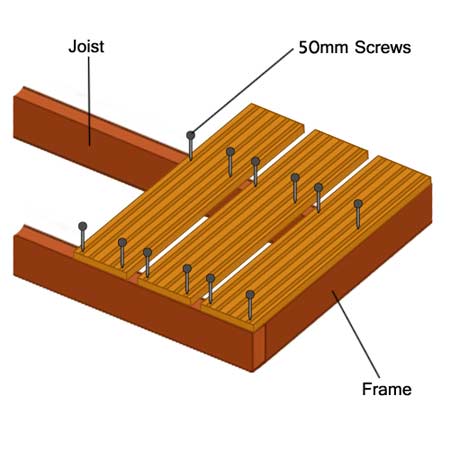
Deck boards are screwed to a deck frame
What Timbers Should be Used to Build a Deck?
Choosing the right timber is crucial for a long-lasting, durable deck that can withstand the UK’s unpredictable weather. The best decking timbers are strong, rot-resistant, and low maintenance. Here follows some of the most common choices.
Softwood Decking (Affordable and Popular)
Softwood is the most common decking material in the UK due to its affordability and ease of use.
It is usually made from pine or spruce and is pressure-treated to protect against rot, fungi, and insects.
Hardwood Decking (Strong and Long-Lasting)
Hardwood decking, such as oak, teak, or iroko, is naturally dense and durable, making it highly resistant to moisture and decay.
Composite Decking (Low Maintenance & Eco-Friendly)
Composite decking is a modern alternative made from a mix of wood fibres and recycled plastics. It requires little upkeep and is resistant to moisture, mould, and fading.
For 225 x 50mm frame and joist timbers, space support posts no more than 2m apart. However, you can extend up to 4m between frame ends if joists are spaced 450mm apart.
This allows you to build a 4m x 4m deck (12ft x 12ft) with just eight posts.
For maximum stability, we recommend using 100mm square posts.
The timbers forming the deck are simply proprietary timbers with grooves already cut into them. These grooves should always be laid to a slight fall to help water run off the deck.
Where Should I place the Posts?
One of the most important points to consider when building a deck is where the posts are going to go so that the deck that’s constructed above it gets the correct, adequate support in the right areas.
The easiest way to position posts is to build the frame first. Once constructed, lay it on the ground and mark post locations on the ground below. Once the locations are identified, move the frame out of the way and then install all the posts where needed.
The image below shows a white line indicating the frame beneath the decking boards.
Once confirmed, set the posts in the ground using the same method as concreting fence posts. Follow our concreting guide for best results.
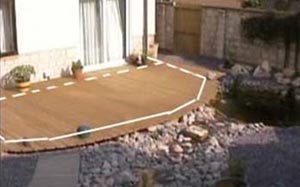
Building a deck – the white line shows the position of the deck frame underneath the deck
Where Should I put my Decking?
Choose your deck location carefully to maximise usability and comfort.
A shaded deck may stay damp, promoting lichen and algae growth if it lacks sunlight for long periods.
This can also lead to rot, decay and premature failure of decking timbers, especially if they are softwood, as even treated softwood will rot over time.
If you prefer sunny spots, position the deck where it gets the most sunlight in your garden.
This may not always be near the house, so consider when and where you’ll use it most.
Do You Need Planning Permission for a Decking Area?
One common question when planning a garden decking project is: Do you need planning permission? In the UK, decking can often be built without the need for formal permission, but there are some situations where it may be required.
When Planning Permission is Not Required for Decking
As we have said, in most cases, you don’t need planning permission for garden decking in the UK, provided certain conditions are met. These include:
- Height Restrictions: If your decking is no more than 300mm above the ground (not raised), planning permission is generally not required.
- Size Limits: Decking that covers no more than 50% of your garden space (including other structures like sheds or patios) typically doesn’t need permission.
- Boundary Distance: Decking built away from property boundaries is usually permitted, as long as it doesn’t exceed the height or size limits mentioned above.
When You Might Need Planning Permission
While many decking projects don’t require permission, there are certain cases where you will need planning permission. These include:
- Raised Decking: If your decking is over 300mm high or becomes a raised platform, you will likely need planning approval.
- Listed Buildings or Conservation Areas: If you live in a listed building or a conservation area, stricter regulations apply, and you’ll need to apply for permission even if the decking is lower than 300mm.
- Planning Restrictions: Some properties have planning restrictions that require permission for any external structures, including decking.
Can Decking Timbers Overhang Posts?
Yes, decking timbers can overhang the frame by a reasonable amount. You can determine this by testing the boards with your weight to ensure stability.
This feature allows for creative shapes that blend seamlessly with your garden. Plan the shape first, and then adjust your frame to fit it.
In the example below, we curved the edges of a deck in Somerset, with one side extending around 400mm over a pond. This provides enough space for the curve and adds a natural flow to the deck’s design.
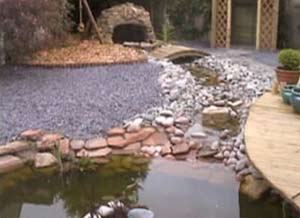
The deck edges have been curved and extends over the garden pond
How to Build a Basic Deck
Whether you want an area for relaxing, entertaining, or dining outside, decking can transform your garden with minimal effort.
Below, we run through the steps involved in building a basic decking area in your garden.
Step 1: Plan Your Decking Area
Start by choosing the location and measuring the space:
- 1. Use string and pegs to mark out the decking area.
- 2. Measure carefully to ensure it fits your garden’s layout.
- 3. Decide whether you want a ground-level or raised deck. A raised deck will require support posts, while a ground-level deck can sit on concrete pads or gravel.
Step 2: Prepare the Ground and Lay a Base
A strong, stable base is essential for long-lasting decking:
- If you’re building a ground-level deck, clear the area of grass and debris.
- Lay a weed membrane and cover it with gravel or concrete pads to improve drainage and prevent sinking.
- For a raised deck, dig post holes at least 300mm deep and secure the posts using postcrete (quick-setting concrete).
Step 3: Construct the Deck Frame
The frame is the foundation of your decking:
- 1. Build a rectangular or square frame using pressure-treated timber joists.
- 2. Fix the frame together using galvanised or specialist decking screws to prevent rust.
- 3. Use a spirit level to check that everything is even before securing it in place.
Step 4: Install the Decking Boards
Once the frame is complete, it’s time to lay the boards:
- Start from one side and lay boards perpendicular to the joists for strength.
- Leave a 5mm gap between boards to allow for expansion and drainage.
- Use decking screws to secure each board, drilling pilot holes first to prevent splitting.
- For a professional finish, stagger joints and trim any overhanging boards neatly.
Step 5: Finishing Touches and Maintenance
To keep your decking looking great for years to come:
- Apply a decking oil, stain, or paint to protect against the elements.
- Sweep regularly and clean with a decking cleaner to prevent mould or algae buildup.
- Re-treat the wood annually to maintain durability and prevent warping.
One point to note is that for decks over 300mm from the ground may require a handrail. The posts for the rail can be bolted to the side of the frame.
If you are digging to place posts in concrete then take care, as you may be near drains etc. in your garden.
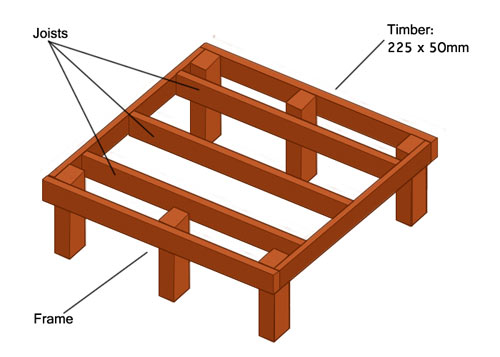
Components of a decking frame
Basic Decking Maintenance – Looking After Your Deck
Proper deck maintenance is essential to keep your deck in great condition year-round. Neglecting it can lead to damage, rot, or even make it unsafe!
- Check for splinters, nails, rot, and mould. Treat the deck before it turns black or green, as mould can stain the wood permanently.
- Use a deck treatment liquid or wood preserver to prevent slime, bacteria, and mould build-up. Choose one that also kills algae and soaks well into the timber.
- Apply a good-quality wood preservative in Spring and Autumn to protect against fungi, rot, and insect damage.
- Inspect end grain timbers for rot, especially where wood is cut or in contact with the ground. Treat with decking oil or suitable exterior treatment.
- To maintain the natural look of your deck, apply a high-quality decking oil regularly.
Important: Keep children and pets away from treated areas. Avoid letting chemicals come into contact with plants or ponds.

The right garden furniture can really enhance your deck.
Decking Preservative
Decking requires regular cleaning and treatment. Clean with specialised cleaners, then apply a deck preserver or decking oil annually to maintain its water resistance and appearance.
You can select various finishes for decking stains, including clear options. Just ensure no preservatives spill onto plants or into fish ponds.
Also, treat the bare ends of timbers and exposed posts with preservative to prevent damage.
Note: Always dispose of treated timber at the tip, not by burning, as it can be hazardous when ignited.
Final Points to Consider
Before wrapping up, here are some key considerations to keep in mind for your decking project.
Garden Furniture
Wooden garden furniture requires care to prevent weathering and rot. In poor weather, cover it or store it indoors, and keep cushions dry to avoid mould. Treat natural wood furniture with oil in spring and autumn for protection.
Alternatively, consider modern, low-maintenance materials like metal, resin, or plastic that resist fading, rot, and insect damage, offering long-lasting durability. There’s a wide range of furniture available for any style or budget.
Decking Problems and Solutions
Decking is prone to weathering, which can lead to stains and potential rot. Its reaction to rain and sun depends on the timber type, preservative treatment, and assembly method. Here’s a breakdown of common decking issues and how to tackle them:
Softwood Decking
Softwood decking, typically made from pine, is cost-effective but less durable. It may turn grey over time unless oiled regularly with decking oil or wood treatment. You can buy pre-treated timber or treat it yourself.
Hardwood Decking
Hardwood decking (e.g., oak, teak, or iroko) is more durable and resistant to rot and insects, but it’s heavier and more expensive. It still requires regular oiling to maintain its appearance and prevent greying.
Fungi and Mould Growth
Mould and fungi break down dead wood in nature but can damage your deck. Treat your decking twice a year, in spring and autumn, with a suitable preservative to prevent mould growth.
Damp and Rot Prevention
If your deck or supports are in contact with the ground or areas prone to water pooling, protect them from rot using decking oils or timber treatments like Cuprinol 5 Star or Everbuild Lumberjack.
Smooth or Ridged Decking Planks
Choose a smooth or grooved finish based on your style preference. Grooved planks are slip-resistant when wet, but may be uncomfortable for bare feet.
Deck Fixings
Screws are better than nails for fixing decking, as they provide a cleaner finish and allow easy removal if needed. Screws prevent nails from loosening due to timber expansion and contraction, especially in decking frames.
Sustainability
Always use timber from sustainable sources, verified by an FSC label. Ask your supplier about the wood’s origin to ensure it’s ethically sourced.
Constructing a decking area can really make an out door space come alive, but to ensure it lasts it has to firstly be constructed correctly and secondly properly maintained all year round.