The float valve or ball valve or ballcock as it’s also known is a type of valve found in many homes across the UK in toilet cisterns and heating systems.
Over time they can become worn and fail and when this happens they need to be replaced so read on below to find out how.
What is a Float Valve?
The float valve is a true tried and tested type of water inlet valve that has been used across many different water-based appliances over the years, most commonly in toilet cisterns and central heating header tanks.
To work, they utilise a plastic ball that’s screwed on to the end of the valve arm. As the water level in the toilet cistern or tank drops it lowers the ball and arm which in turn opens the valve and allows water to flow.
The most common type of float valve or ballcock valve is the plunger or piston type valve. As the arm raises or lowers it moves the piston or plunger allowing water to flow or cutting it off and stopping it.
The float valve is an extremely versatile type of valve that’s ideal for controlling water flow depending on the level of water in the given tank or cistern.
Despite how effective float valves are they are now being phased out for use in toilet cisterns due to they’re size. As being more efficient in the way that resources such as water are used, typically to house a float valve and float arm the cistern has to be quite large and thus more water is needed to fill it.
Today toilet cisterns are made to be a lot smaller and more efficient and therefore the cisterns can be a lot smaller and use less water.
Despite this, float valves are still used for central heating systems that use a header tank.
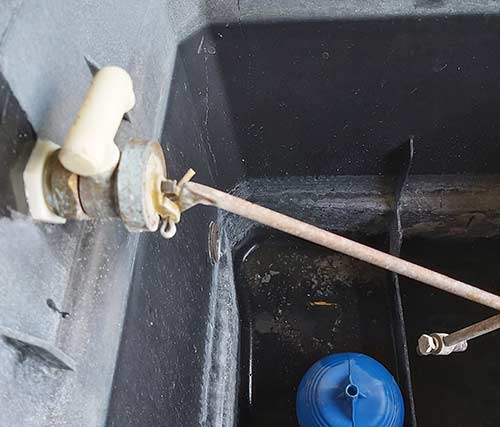
Float valve in central heating header tank
Types of Float Valve
Before you can think about replacing or even repairing a float valve or ball valve it’s important to learn about the different types of float valve so that you know exactly what type of valve you need to get as your replacement. Essentially there are 3 main types of float valve; The Part 1 float valve, the Part 2 float valve and the Part 3 float valve. There are also a few different variations of the Part 3 valve.
The particular float valve we are looking at in our example below is known as a “Part 1” type float valve. These are the oldest and most original type of float valve and feature either a plunger or piston mechanism in the valve to control water flow.
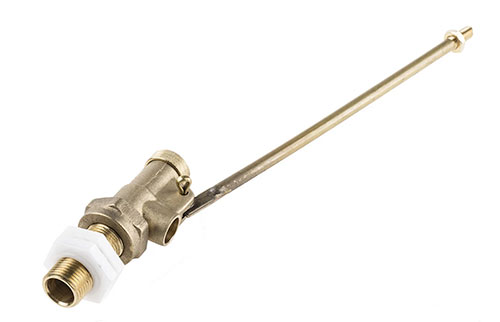
Part 1 float valve
Today Part 1 type float valves are no longer used on toilet cisterns. As we have mentioned, to reduce the size of toilet cisterns and the volume of water they use Part 1 type float valves have been replaced mostly by Part 3 type cup float valves.
Part 3 cup float valves are much smaller in size and as opposed to featuring an arm there is a small cylindrical cup that is pushed upwards or downwards that opens and closes the inlet and allows water to flow or not.
Part 3 cup valve
You may be thinking what happened to the Part 2 float valve? Well this is a good question as we have leapt straight from Part 1 to Part 3.
In answer the Part 2 float valve is exactly the same as the Part 1 float valve in appearance only where the Part 1 valve is made of brass the Part 2 float valve is made of plastic. Both Part 1 and Part 2 float valves are designed for use in either cisterns that already feature them or central heating header tanks.
Coming back to Part 3 float valves, as we have mentioned there are a few different variations:
- Cup Float Valve: These are the new go-to solutions when it comes to toilet cisterns. The incoming water flow is managed by a cup-shaped float that sits over the main upright of the valve and it moves up to close of water and drops to open the inlet valve. The valve is also adjustable via a small plastic screw that raises or lowers the float
- Internal Float Fill or Quietfill Valve: These are a newer variation of the cup float valve and features an internal float inside the valve head that allows it to operate much more quietly than traditional valves. It can be adjusted by raising or lowering the valve head
- Floatless or Pressure- Activated Valve: As you may guess from the name these valves don’t have a traditional float that opens and closes the valve rather they detect how full a cistern is by the amount of pressure in it
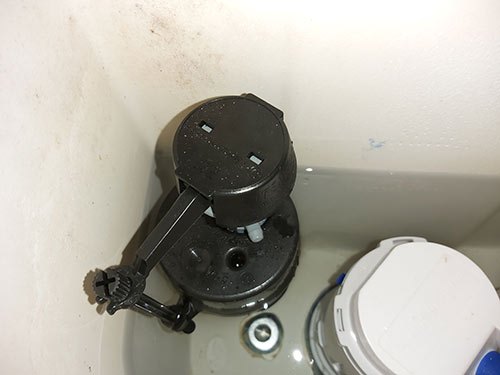
Part 3 type float valve in toilet cistern
How do Float Valves Fail?
When a float valve becomes faulty it’s almost immediately noticeable in that the appliance it’s feeding will either run dry or overflow.
If the float valve fails in an open position or the arm or ball breaks off there won’t be anything to close the valve off and stop water flowing when it needs to.
Similarly, if the valve seizes up in the closed position, regardless of whether the arm raises or lowers the valve won’t open and no water will flow so the appliance will run dry.
Additionally if the plastic ball itself becomes punctured it can fill with water and due to the weight it will sink again holding the valve open and potentially causing a flood.
How to Fit a Float Valve
If you are experiencing any of the above issues that we have detailed it is likely that your float valve has failed and needs to be changed for a new one. Follow the steps below to do so.
For the purposes of this example we are going to change the float valve in a central heating header tank. The particular float valve we are replacing is a plunger-type float valve.
Isolate Water Supply
Before doing anything the first job is to isolate the water supply to your cistern or header tank. If you’re lucky there may be an isolation valve just before your float valve. If so simply turn the valve to the off position.
If not then you will need to turn off your water supply at your mains stop tap. The location of your stop tap can vary but it’s normally in the kitchen at the back of one of the cupboards, in the bathroom, under the stairs of in a utility room.
Once you have found it turn it all the way to the off position, this should be clockwise.

Mains stop tap located in kitchen base unit
Tip: If you don’t have an isolation valve before your header tank or cistern then now is a good time to fit one. See our project here on fitting isolation valves for more help.
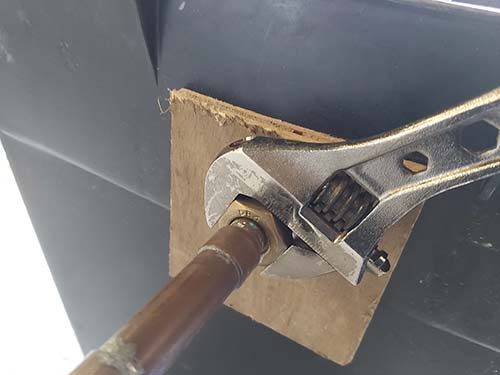
Disconnect Water Feed
Once the water supply has been isolated the next job is to disconnect the water supply pipe that’s connected to the float valve.
Using an adjustable spanner or the correct sized spanner, place it on the compression nut on the end of the valve and then using a pair of pump pliers, grip the body of the valve.
Turn the spanner and loosen the compression nut and then once loose use your fingers to undo it all the way. Once undone pull the supply pipe out of the end of the valve.
Loosening compression nut on float valve to remove water supply pipe
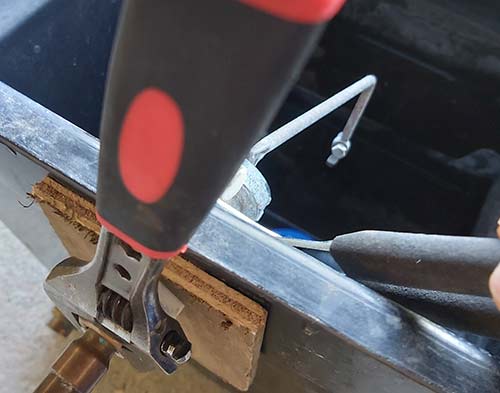
Remove Retaining Nut
Once the water supply pipe is out of the way the next task is to remove the retaining nut holding the float valve in the header tank of cistern.
Again using an adjustable spanner or the correct sized spanner, place it on the retaining nut and again hold the body of the valve with a pair of pump pliers while you undo it.
Once undone remove the old valve from the cistern of tank and dispose of it.
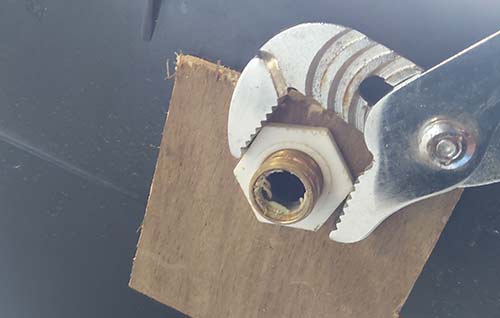
Undoing the retaining nut holding the float valve in place
Insert Replacement Float Valve
With the old valve out of the way pop your new float valve in place. Once in place screw up the retaining nut finger tight and then fully tighten with an adjustable spanner, holding the body of the valve with pump pliers whilst you do so.
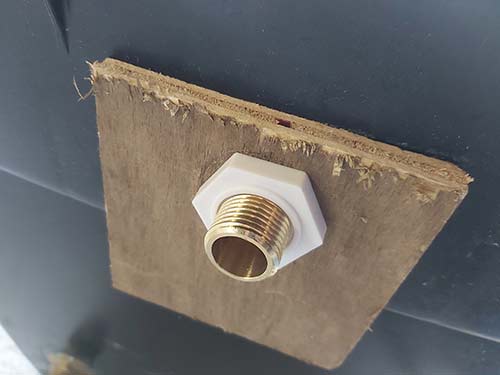
Screwing up new valve retaining nut and tightening
Attach Water Feed
With the new valve now fixed firmly in place you can now pop the water supply pipe back into the body of the new float valve. Push it up firmly until it hits the end of the body of the valve
Just before tightening anything up it’s a good idea to just check the olive over and make sure it’s not damaged. If it was previously over tightened it may have crushed it and reusing it may result in leaking.
If it is damaged you will need to replace it. In most cases it will be tricky to get off the supply pipe so you may find it easier to cut a section of pipe out and rejoin with a new piece using a compression pipe connector or even easier a push fit pipe connector.
Once the feed pipe is in place in the valve wrap a little PTFE tape around the thread of the valve (find out how to use PTFE tape in our project here) and then screw up the compression nut.
Once finger tight pinch it up using an adjustable spanner, holding the body of the valve as you go. Don’t tighten it too much as over tightening will cause it to leak.
Reconnecting the water supply pipe to the new float valve
Reattach the Ball
The final job to do now just before testing is to screw the ball back on to the end of the arm.
Simply unscrew it from the old valve and then screw it on the end of the new one!
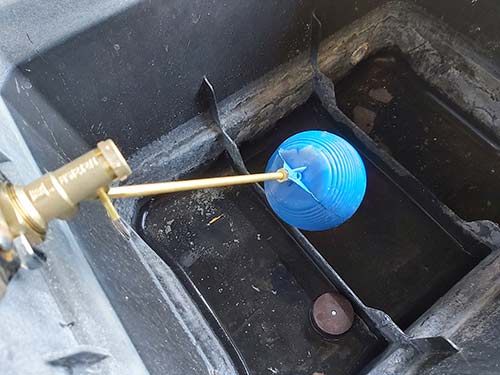
Ball screwed on to end of float valve arm
Turn on Water and Test
With everything now connected up properly the last job is to turn the water on.
If the water is turned off at an isolation valve turn the valve back on using a screwdriver or handle if it has one.
If you isolated at the mains stop tap then turn the water back on here.
Once back on get back to the header tank or cistern quickly and check everything over for any leaks. If there are any tighten compression nuts and little each time until the leaks stops.

Turning water back on at stop tap
Adjust Water Flow
In some instances the new float valve arm may be slightly different to the old valve that you have removed e.g. it may be a different length, bend down at the end etc. and if so it may effect the volume of water that is allowed to enter the cistern or tank.
If the valve is considerably different then this may mean that it fills the appliance to the point that it might overflow and leak everywhere or even the opposite where it doesn’t fill enough, this is obviously not ideal!
If this is the case then the valve will need adjusting to either allow more or less water to flow in.
As there is no actual adjustment on this type of valve the only way to adjust it is actually to bend the arm itself as follows:
- Increase Water: Bend the arm upwards to allow more water in
- Decrease Water: Bend the arm downwards to decrease water flow
as the cistern or tank refills watch the water level and ensure that it stops before the appliance overflow and if not it will simply keep running and waste a huge amount of water. If it’s still overfilling or not filling enough then adjust the arm again.
How to Repair an old Float Valve
As it’s always better to repair something than simply throw it away and buy a new one, you can actually repair piston or plunger type float or ballcock valves.
In the majority of cases when inlet valves such as these fail it’s due to the fact that the piston or washer has failed and this has either causes a constant flow of water or it has blocked and resulted in no water flowing.
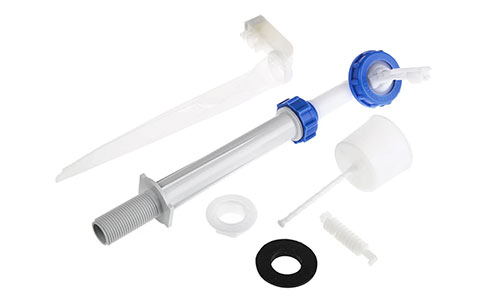
By simply dismantling the valve you can then replace the internals using a ball valve or float valve repair kit available from most DIY stores.
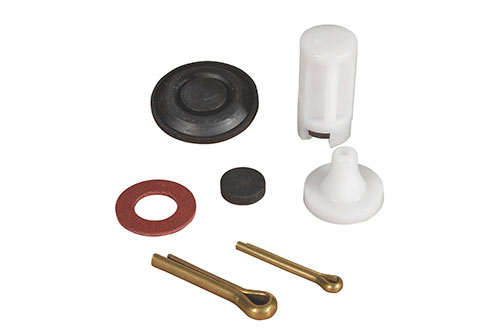
Ball valve/float valve repair kit
To repair a plunger-type float valve work through the following steps:
- Turn off the water and remove the valve from the cistern or tank and place it on a flat work bench
- Flatten the split pin that is holding the arm in the valve body with a pair of pliers and withdraw it
- Unscrew the cap on the front of the float valve body
- Remove the float valve arm by lifting it up and then gently pulling it forwards out of the hole that the cap covered. This can be a little tricky to do but if you wiggle it gently it should come free
- Lever out the plastic plunger inside the valve body. Use the valve arm by inserting it back into the valve body and then using it to work the plunger forwards
- Once the plunger is removed, remove the cylindrical plastic cone that is also within the valve body.
- Replace the cylindrical plastic cone in the body and then also replace the plunger ensuring that the slot in the plunger is correct so it will engage with the arm once it’s back in place
- Next replace the float arm back into the valve body and ensure it engages with the slot in the plunger
- Push the split pin back into the hole and bend the 2 pins away from each other to lock it in place
- Screw the cap back on the front of the valve
- Replace the valve back in the tank or cistern and fix it in place and reattach the water supply. Turn the water back on and test the valve
Repairing, replacing or fitting a float valve or ball valve is quite a straight forward job as long as you take your time and make sure that once the valve is fitted back in place there are no leaks and the valve works as it should do.