Lagging pipework is a fantastic DIY project which will immediately make a difference, especially in winter. It is relatively quick and easy to do, and doesn’t need any specialist tools. If you have pipes that do need lagging, we recommend that you give it a go!
Why do Pipes Need to Be Insulated?
Lagging, or insulating, your pipes will ensure that the heat in your hot water it is not lost before it gets where it is needed. There are three main reasons to lag pipework:
- Reduce heat lost from the pipes and minimise energy wasted
- Ensure that the water that is delivered through your hot water pipes arrives where it is needed still hot
- If the water in pipes gets too cold it can freeze, which expands often enough to burst the pipe
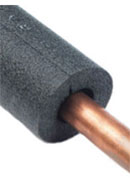
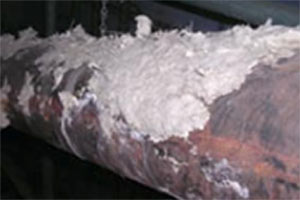
Split Foam Insulation around Copper Pipe
The materials required to lag pipework is relatively cheap and as you will soon save more money on your hot water bills this should quickly repay the cost of the lagging. You only need to save one burst pipe save yourself considerably more that the cost of fitting insulation to the pipe.
Which Pipes Should be Lagged?
If you understand the three main reasons to insulate your pipes we describe above, you will probably be able to work out which pipes should be lagged. Here’s a quick guide to the pipes you should and shouldn’t lag:
Outside Pipes
These are often leading to outside and garden taps (you can learn how to install an outside tap here).
Exposed external pipework in likely to freeze in winter when the air temperature drops below freezing and this can cause the pipes to burst.
Pipes in Lofts
If your loft in insulated the heat from your living space will not rise into the loft warming it and the pipes that run through it.
To prevent heat loss from any hot water pipes, or worst, any of the pipes freezing and potentially bursting they should be lagged.
All Hot Water Pipes
All pipes from your boiler or cylinder to the radiators or hot taps should be insulated to prevent unnecessary heat loss so that the maximum amount of heat is delivered to its required destination. These include:
- Pipes in the airing cupboard – the hot water pipes running to and from the cylinder
- Pipes from the boiler
- Central heating pipes – all central heating pipes should be lagged as they go to the radiators. Eg pipes under wooden floors
- Hot water pipes under sinks and behind bath panels
You shouldn’t lag pipes underneath your tank in the loft, or in fact put any insulation under the tank at all, as you need the heat from the room below to keep the water warm and flowing.
Types of Pipe Insulation for Lagging
You might see different types of pipe insulation, but typically the most cost effective option that you will be able to buy is the polyethylene foam type. You should be able to get this at any DIY shed.
As we mentioned you will typically use the foam type insulation which have already be cut with a slit so that it can easily be fit over a pipe:
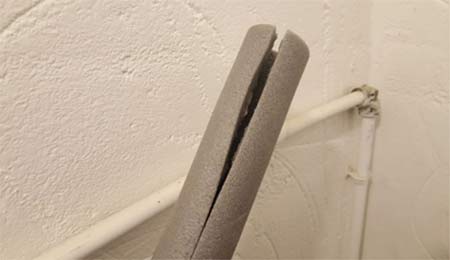
Split Polyethylene foam pipe insulation
There are other options which can also be used, although we will concentrate on the split foam type in this project. These other options are relatively self-explanatory to fit once you have the concept of fitting which we explain below.
These other options include:
- Pipe wrap insulation tape: This is an insulating tape that you wrap and stick to the pipes
- Felt or Wool pipe insulation; These are “sleeves” or rolls of natural insulating materials which can be wrapped around the pipes to insulate them
- Asbestos Insulation; this is one to watch out for rather than use. Older types of lagging used to contain asbestos, so handle with care. For more information on dealing with asbestos see here
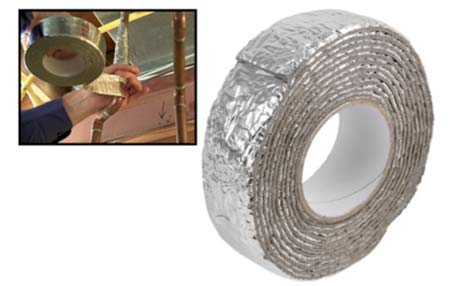
Pipe Wrap Insulation Tape – Image courtesy of Stormguard
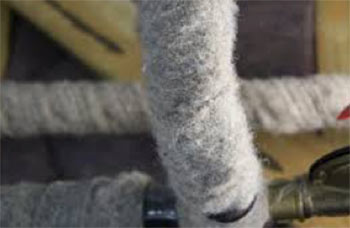
Wool Pipe Insulation – Image courtesy of Terrralana
Amosite pipe lagging which can contain asbestos – Image courtesy of the HSE
Getting the Right Size Pipe Insulation
Generally you will find that there are two numbers written of the lagging. These refer to the size of the relevant sizes:
- The diameter of the pipe that this insulation will fit around. In the example below this is a 15 mm pipe. The most common sizes are 15, 22 and 28 mm
- The thickness of the insulation. In the example below this is 13mm insulation. The other commonly used thickness is 9mm, but obviously the thicker it is the more insulating it is
- The length of the insulation: Generally the insulation will come in 1 or 2 metre lengths but this can vary depending on retailer. Chose which suits your project best, but remember as you cut and bend it to follow the pipes you’ll use more than you expect
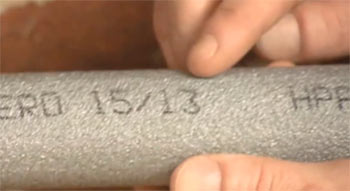
Numbers that indicate the pipe diameter and insulation thickness of pipe lagging
How to Fit Pipe Insulation
The process of applying the lagging to your pipes is relatively straight forward, especially if you have the right tools for the job. However before you start it is worth making sure you are safe to start.
When working in loft ensure that you have the correct safety gear (mask, gloves, etc) and that you are supported where you work. You don’t want to accidently put a foot through the ceiling!
If you are lagging hot water pipes, make sure that the central heating is off and the pipes have cooled down.
It is worth wiping down the pipes so that they are clean before you start too.
In terms of the tools you are going to need, here are the likely ones that you will need for fitting pipe insulation:
- Pipe lagging
- Utility Knife
- Duct or insulation tape (and/or cable ties)
- Tape measure
- Pen – to mark where to cut the foam insulation; pencils aren’t so good.
- Mitre block (if you want to get really accurate cuts)
Top Tip: Use a bread knife of similar serrated knife for cutting the foam insulation as it is much easier. Sturdy scissors can be helpful for notching out insulation (see below how to insulate bends in pipes).
When you have all the tools you’re ready to fit the insulation to the pipes. Using this split foam insulation this is relatively easy; split the insulation and feed it around the pipe so that the pipe is surrounded by insulation:
Insulation around an outside pipe
Behind the pipe push the insulation so that each side of the split meets around the pipe. Then to ensure that it cannot become dislodged you should tape in in place. Sometimes people prefer to use cable ties, but it doesn’t really matter so long as the insulation is kept snugly fit around the pipe:
Tape or tie the insulation in place around the pipes
In principle this is all that there is to is, however there are a number of areas that might cause you difficulties. Here’s how to deal with them:
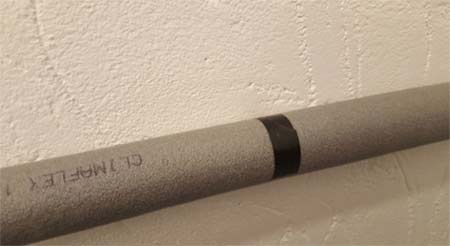
Joining lengths of insulation
Periodically you will need to join two pieces of the insulation. You should tape the join so that there is an tight seal. Some people advocate using specialist insulation tape, while this cannot hurt you can use duct tape just effectively so long as you make sure that the joints are snug and the two pieces of insulation are pushed firmly together before taping.
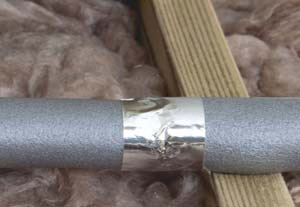
Joining pipe insulation on pipes in a loft
Working around Pipe Clips
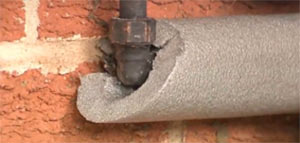
Where the pipes are fixed to the wall with clips this will get in the way of fitting the insulation. There are two options to deal with this:
- Cut the insulation and make a join at each clip
- Notch out the insulation for the clip as seen in the below image
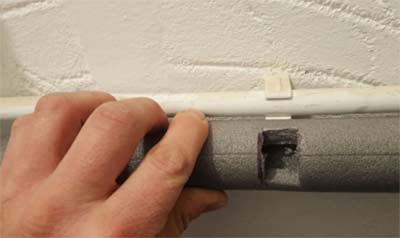
Cutting notches in insulation to fit around a pipe clip
Right Angles in the Pipe
When you get to a 90° bend in the pipe you should cut the pipe insulation at 45o on each side of the bend. They will then join making a perfect join.
To get this accurate you can use a mitre block, although the foam is very forgiving and once taped you should be able to get away without if you don’t have one.
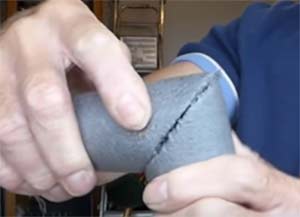
A right angle join in pipe insulation before taping
Bends in the Pipe
Occasionally you will get bend in the pipe which you will need to follow with your run of insulation. The easiest way to deal with this is to notch our 30° cuts from the inside of the bend in the insulation.
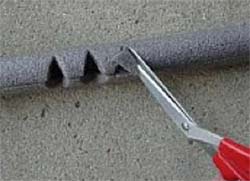
Notching the inside of pipe insulation to create a bend
T-Junctions in Pipes
When you come across a T-join in your pipes that you need to insulation you can get over this by cutting a 45o notch out of the pipe in the top of the “T” and then shaping the end of the joining insulation to fit into this:
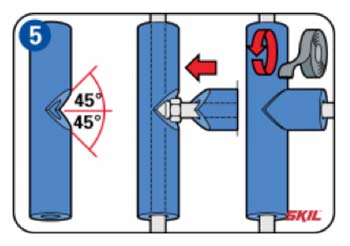
How to create an effective T-join with pipe insulation – Image courtesy of Skil
All joins and junctions in the insulation should be thoroughly taped.
Make sure that you insulate the whole length of the exposed pipe work, including any couplings, joins and event taps.
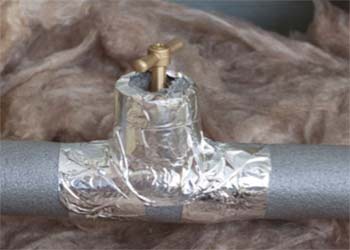
Insulating an isolation tap in a loft – Image courtesy of B&Q
Further Projects to Consider After Lagging Pipes
Having lagged your pipes, there are a number of other projects that you might consider. If you have been insulating pipework outside then you should consider fitting a tap kit to protect the tap from the cold weather.
In your loft, you should consider insulating your tank so that the water inside does not freeze. If you hot water cylinder is not insulated you should get a jacket for this too.
We have lots of projects all about insulation and draught proofing should you need more advice here.
As we have mentioned lagging pipes is a very rewarding and cost effective DIY project and one you will curse yourself for not doing should you be unlucky enough to experience frozen pipes. Pipe insulation is relatively cheap and fitting it is very manageable even for an inexperienced DIY enthusiast.