
Complete install of a modern wetroom
Wet Rooms on the Ground Floor
For years wetrooms and shower rooms were limited to ground floors and had to be sited on a concrete, or at least screeded, base.
With new technologies, particularly around ways to manage the expansion and contraction of all materials used in modern house construction, it is possible to put a wetroom anywhere in the home, including the loft and providing the work is done properly it does not matter if it is a wooden floor in the room you wish to use.
Preparation for Wet Rooms
The first thing to understand about a conventional wet room is that it will only ever be as waterproof as the surface used to line it. This surface, be it porcelain tiles, ceramic tiles, tile backer boards, liquid rubber membranes or some other kind of latex or vinyl waterproof covering, will not remain waterproof if the surface it is stuck (or otherwise fixed) to is not completely sound.
The first step therefore, when creating a wet room or shower room is to make sure that the floor is not loose in any way and the walls are a) not loose and prone to excessive movement and b) have not got a flaky surface. Surfaces must also be entirely free from dust, debris and grease.
Different Ways to Construct a Wetroom
Although all of the possible ways to complete your project we mention on this page are great ways of achieving your dream, they can all be very easily spoiled by lack of preparation.
As you will read from our ceramic tiling project, or even see on the DIY Doctor YouTube channel, when tiling a bathroom under normal situations, it is not necessary to tank the walls or provide any kind of tile backing board.
The tiles themselves, if laid properly, will give you a waterproof surface. However; when constructing a wetroom the tiles (although they should still be laid properly) are more for form than function. There is simply too much water in a wet room to depend on the tile grout proving a completely waterproof area for very long.
To construct a great wet room or shower room the floor is the most vulnerable area.
Gravity will ensure that all water heads downwards and if your wet room floor has not been properly prepared and treated, you may have problems.
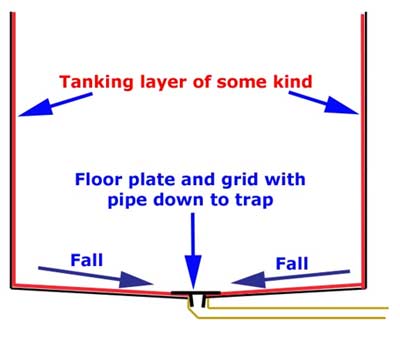
Take a look at the diagram below and the text afterwards will explain how this type of wet room can be achieved with both a concrete floor and a timber floor.
How to tank the walls and floor of a wetroom or shower room
Wetroom Formed on a Concrete Floor
The hardest thing about forming a wetroom floor when working on a concrete base such as a ground floor slab, is installing the drain pipe which takes the waste water away.
Usually this is achieved by using a concrete breaker to dig a channel through the floor, with a large hole at the point where the waste outlet will sit.
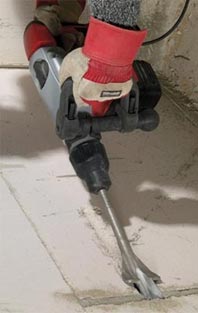
Using a concrete breaker to dig a drainage channel in a concrete floor
The channel needs to go directly towards an outside wall to avoid digging up any other floors in other rooms. Once outside the building the drain can be laid to an existing manhole.
The top of the new drain should be laid flush with the finished level of the concrete floor so any tanking can overlap the drain ensuring the water runs straight into the drain and cannot seep between the edge of the floor and the upstanding drain pipe.
The pipe should also be trapped in the normal way to avoid foul gas running back into the wetroom. In a concrete floor it is usual to see a horizontal waste traps as shown in the image below
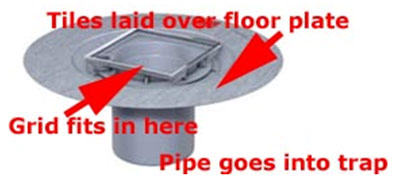
Fitting a wet room floor grid, grill or floor plate
Leading down, directly into the trap, sits the floor grid or outlet plate. This sits on top of the tanking and directs the water into the trap while holding hairs and other debris for cleaning. Should any water seep under the grid, it will of course go directly into the trap.
The pipe should also be trapped in the normal way to avoid foul gas running back into the wetroom.
In a concrete floor it is usual to see a horizontal waste traps as shown in the image below.
The drains should be laid in accordance with Building Regulation instructions and any alterations to existing drain runs or access chambers, manholes etc…. should be notified to the Building Control Department of your local council.
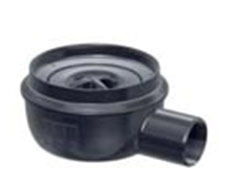
Fitting a horizontal waste trap to a wet room floor
The channel housing the drain is then concreted over and a fall is constructed into the floor by using a self levelling floor compound, thickened slightly with sharp sand.
There is no need for a steep slope to the floor. Water will find its way to the lowest level at any angle of fall. A fall of 10mm over 2m is plenty.
Some wet room installers use a thicker bed of adhesive under the floor tiles to create the fall on the floor. We do not suggest that is a good idea as it means that the adhesive is not of a uniform thickness. Any cement or adhesive compound which varies in thickness stands a good chance of cracking at the thinnest point. This could lead to movement in the floor which cannot end well!
The floor plate (see above) is positioned so the pipe goes down into the trap. The tanking is applied over the plate as are the tiles. A grid (or sometimes a channel) is then fitted into the top of the floor plate.
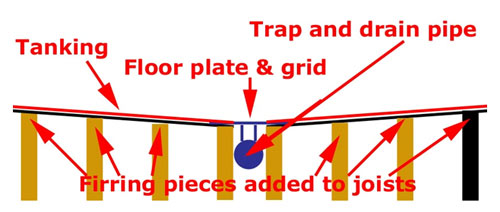
How to put a wetroom shower tray into a timber or wooden floor
To put a wetroom into a room with a timber floor, it is first necessary to take up the existing floorboards. The lowest point of the floor needs to be chosen and then the joists around that low point need to be raised a little (the same amount of fall as with the concrete floor applies) using strips of timber caled firring pieces. If you measure these timbers, your local joinery shop will cut them for you.
Making sure the joists are absolutely solid (strengthening timbers (called noggins) can be placed in-between the joists if necessary) the plywood (minimum 25mm thickness is recommended here) must be screwed down to the joists and noggins at a minimum of 300mm centres.
The screw heads must be countersunk under the surface of the plywood (see our project on countersinking screw holes) so the tanking, which is glued to the plywood, cannot be pierced.
The drain pipe must run between the joists unless it has to be notched or drilled through them as it runs at 90 degrees to them. Do try to avoid this but if you do have to drill or notch joists please read our project on notching floor joists to ensure you do not cut too much of the joist.
Running Pipework Through a Timber Floor
The pipework can then be put through the wall to run (via a boss clamp) into an existing soil and vent pipe if one is available. We have a project on how to fit a new soil and vent pipe which also includes how to connect into one.
Tiling on a Timber Floor
Once tanked, by whichever system you choose, you can tile over the tanking to finish off your wetroom and enjoy.
Use a flexible adhesive and waterproof grout to complete your tiling and pay a great deal of attention to the joints.
Clearly if the tile joints leak it does not mean, with the tanking underneath, that your floor will leak, but without solid joints your tiles may become loose which will make all your hard work look a mess.