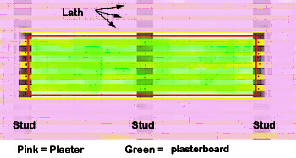
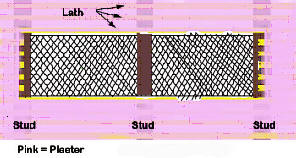
Although the plaster is missing from the photograph below you can see how difficult repairing lath and plaster walls can be.
Cut Back Laths And Plaster To Nearest Studs
There are two ways of making this repair and in either case you will have to cut back laths and plaster to the nearest studs either side of the hole to make the repair as can be seen in the second image below.
Lathe and plaster wall showing plaster removed and laths behind
Fix Plasterboard Over The Hole
Once you have cut back the laths and plaster, you can then place a section of plasterboard in the hole and fix it with galvanised plasterboard nails. You may also like to take this opportunity to use the hole that you have created to add some fixings for shelves, coat hooks, TV bracket etc…. as you now have the ideal access to create a firm and solid mounting for any number of things. For further information on the types of fixings that can be used see our fixings project.
Lath and plaster wall showing replacement plasterboard inserted
Fill Gaps Around Edge And Plaster Over
The gaps around the edges (shown in red) can be filled with polyfiller, one coat plaster or flexible filler depending on their size (polyfiller and one coat plaster for larger gaps, flexible filler for smaller gaps). Once they are filled the surface can be plastered with skim plaster.
You will need to coat the new plasterboard and the edges of the existing plaster with PVA adhesive. Skim plaster goes hard very quickly and even more quickly when its applied to a very porous surface such as the old plaster. Coating with PVA will remove this porosity and make plastering a little more easy. For more information on how to plaster see our plastering project pages.
Using EML Instead Of Plasterboard To Repair Lath And Plaster
Instead of using plasterboard as outlined above you can also use a galvanised mesh called Expanded Metal Lathing, or EML for short and simply nail this between the studs, keeping it a tight as possible and plastering over the top.
This is the method preferred, and used by most conservation and heritage groups as it keeps the integrity of the wall and allows for the same, slightly uneven finish, associated with lathe and plaster walls. The EML in it’s various purchased forms can be seen below.
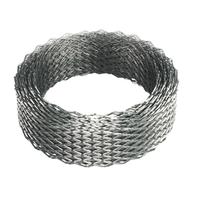
EML Roll
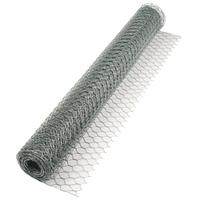
EML Mesh
Fixing EML Over Repair Holes In Plaster And Lath
EML needs to be cut using tin snips and can be cut to the shape of the hole and can be easily fixed with galvanised staples. The roll of EML is 60mm wide and ideal for small repairs as it can be applied in rows. More than 2 rows will almost always need reinforcing with extra noggins inserted horizontally between the existing studs to support from the back.
The mesh can be used for larger repairs or even new walls. Using ordinary staples and/or nails can lead to rust developing which will show through to the surface very quickly and probably spoil any decoration you have applied, so make sure you use galvanised.
EML Mesh fixed to wall in hole in lath and plaster wall
As mentioned above, if there is too much slack in the EML repair then it may be easier to insert a new timber noggin to give the repair greater strength. New noggins can be inserted easily by cutting a length of timber to fit between the horizontal studs and screwing at an angle into the noggins and down into the studs.
Finally, with the hole covered with the mesh you can now apply your plaster. This can be done by applying a suitable base coat plaster and then a skim layer on the top.
For base coat plaster it will be best to talk to your local builders merchants as there are quite a few plaster varieties about these days. Make sure you tell them that the plaster is to be applied to EML. For smaller repairs there is a One Coat Plaster available, which is called Universal One Coat Plaster but in DIY stores generally comes in smaller bags than the 25kg usually available from any builders merchants. This can also sometimes be known as Patching Plaster.
Which ever method you choose for repairing lath and plaster, be it using plasterboard or EML mesh make sure that you take you time and pay attention to ensuring that your chosen material is fixed correctly using galavnised mails, screws or staples. This way you can then be confident that your repair will be a long lasting one.