Timber is attractive and versatile, but it doesn’t always last as long as modern building materials. Over time, wood can weaken, rot or suffer insect damage.
When this happens, you have two choices: repair the affected timber or replace it completely. In this how-to guide, we’ll explain the best repair options to restore structural strength and extend the life of your wood.
Why Do Timbers Need Repair?
Timber is strong and versatile, but it isn’t indestructible. Over time, wood can weaken through age, excess weight, insect attack or rot. When this happens, the choice is simple: repair or replace.
Age is one of the biggest factors. Even centuries-old beams in barns or period homes eventually show signs of wear. Surprisingly, modern timbers can also fail sooner, as fast-grown wood is often less durable than historic hardwoods.
Overloading is another common issue. For example, a roof truss designed for lightweight slates may struggle if replaced with heavy concrete tiles, leading to sagging or buckling.
Insects also pose a serious threat. Wood-boring pests such as woodworm and longhorn beetles eat through the fibres, leaving timber hollow and fragile.
Finally, damp conditions create the perfect environment for dry rot and wet rot. Once fungi take hold, the wood can quickly lose strength and stability, making timely repair or replacement essential.
Types of Damage to Structural Timbers
Structural timbers can fail in several ways, each affecting their strength and lifespan. Common issues include natural ageing, insect attack, excess weight and moisture-related problems like wet or dry rot. Understanding these types of damage is the first step in knowing how to repair or protect your timber effectively.
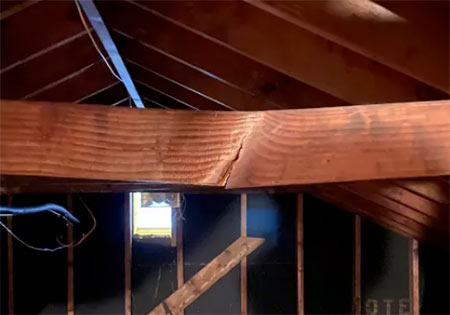
Load Stress (splits, bending, deflection)
Load stress happens when timber carries more weight than it was designed to handle. Instead of breaking immediately, the pressure often causes the wood to bend, sag or split over time.
For example, a ceiling joist that is too small to support the floor above will gradually bow under the load and, in severe cases, may even crack or fail completely.
Broken roof joist due to too much weight
Wet and Dry Rot
Rot is one of the biggest threats to timber, caused by damp, mould and fungi. Prolonged moisture weakens the wood fibres, stripping the timber of its strength until it eventually fails.
Moist, dark conditions also encourage mould growth and fungal attack, which speed up the decay process. Left untreated, timbers can quickly lose stability and become unsafe. Learn more about wet rot here.
Despite the name, dry rot still needs moisture to start. Once established, it spreads aggressively across brick, plaster and timber, often travelling unseen. In advanced stages, it causes wood to crack, crumble and disintegrate. See our guide to identifying dry rot here.
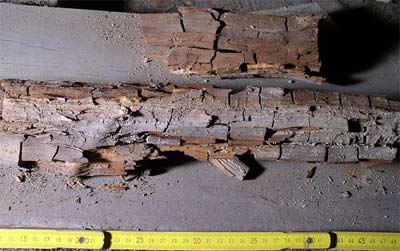
Dry rot damage to timber
Insect Attack
Timber can also be weakened by insects like woodworm and other beetles. These pests bore tiny channels into the wood and as their numbers grow, the timber loses strength and becomes structurally unsafe.
Even small infestations can escalate over time, making early detection crucial to prevent serious damage. Learn more about treating woodworm and insect damage here.
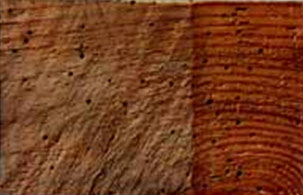
Damage to timber caused by woodworm
Splits and Cracks
Not all splits or cracks in timber mean serious damage. Some minor cracks are natural and add character, showing the timber grain and distinguishing it from uniform materials like steel or concrete.
Timber integrity is only a concern when cracks are large, deep or run across most of the beam, which may require repair or replacement.
Cracks, shakes and warps usually occur as timber loses moisture and shrinks. This can happen during initial drying or later changes in the wood’s moisture content. Inside buildings, timber typically has an Equilibrium Moisture Content (EMC) of 9–14%, while softwoods reach fibre saturation at around 28%.
Snapped reinforcing timber in roof – Image courtesy of hometalk.com
Spreading
Spreading happens mainly in roof timbers or load-bearing joists when they carry too much weight.
A roof truss is designed to transfer the weight of coverings like timber or tiles down to the wall plates and foundations. When the load is too heavy, the truss can be crushed, causing the ends to splay outwards and compromising structural stability.
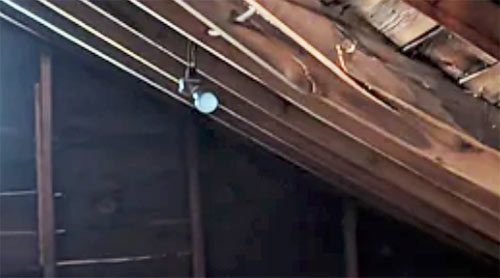
Joist Ends
Joist end failure is usually caused by moisture, rot or sometimes insect damage.
Joist ends rest on the wall plate to support rafters, trusses or other joists. Over time, water can seep through masonry, the roof or other sources. Untreated timber exposed to moisture is vulnerable to rot, fungi and mould.
This weakens the joist ends, reducing their ability to support the weight above. In severe cases, this can lead to partial or complete structural collapse.
Timber Treatment
Whenever timber is used in construction, treated wood should always the choice. While no timber lasts forever, treated wood resists moisture, decay and insect attack far longer than standard and untreated timber.
For non-structural work, like stud walls, treated timber may be unnecessary. But for structural elements such as roofs, joists and load-bearing frames, treated timber should always be used without exception.
You can add extra protection with specialist products such as Cuprinol 5 Star Wood Treatment, or by coating joist ends that sit in masonry with bitumen or a tar-based sealant. These treatments help block moisture and extend the life of your timber.
British Standard BS EN 335-1 sets out four main classes of treated timber use:
- Class 1: Dry, internal use (e.g. stud walls).
- Class 2: Dry but occasional moisture risk (e.g. floor joists, bathrooms).
- Class 3: Wet exposure without ground contact (e.g. decking, cladding).
- Class 4: Wet exposure with ground contact (e.g. fence posts, landscaping).
Traditional Timber Repair Methods
Repairing structural timber with traditional methods has always been costly and disruptive. Whether it’s a timber lintel in a Georgian terrace or a huge tie beam in a barn, the process usually means splicing, bolting or full replacement.
In many cases, bolting on a new section requires such a large overlap that it’s almost the same as replacing the entire beam. Full removal often involves taking apart ceilings, floors or even roofs—something most homeowners want to avoid.
These repairs not only demand heavy labour but also long timescales and high costs. For roofing timbers, scaffolding and even roof removal are often unavoidable, adding even more stress and expense.
Because of these challenges, modern timber repair products and techniques have been developed to make the job faster, more affordable and far less invasive. Below, we explore some of the most effective solutions now available.
Modern Timber Repair Methods
Now that we’ve covered the main types of timber damage, let’s look at some of the most effective modern repair techniques. Many common problems can be solved with just a few proven methods, saving both time and money compared to full replacement.
Epoxy Fillers and Mortar – Repairing Splits, Cracks and Holes
One of the simplest and most reliable solutions for damaged timber is epoxy filler (also called epoxy mortar or putty). It’s ideal for non-structural splits, cracks and holes, restoring strength while keeping the repair neat and long-lasting.
For cracks over 5mm wide, mouldable epoxy mortar can be pressed into the gap. If the crack goes deeper than 30% into the timber, it should be reinforced with dowels or epoxy-glass rods to “stitch” the wood back together securely. The type, size and spacing of these rods should be confirmed by a Structural Engineer.
Reinforcing bars can be made from glass fibre, carbon fibre, steel or stainless steel, but epoxy-glass or epoxy-coated steel set in resin are often the most effective choices.
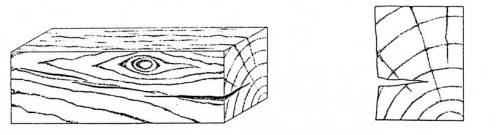
Example of splits in a timber section
Basic steps for epoxy timber repair:
- Step 1 – Clean and Fill: Open up the crack with a saw blade, remove dust with a vacuum, then fill with mouldable epoxy mortar.
- Step 2 – Drill Small Holes: Once the mortar has set, drill 6mm holes through the epoxy into the timber behind the crack, and clear away all dust.
- Step 3 – Inject Epoxy: Inject epoxy resin into the drilled holes until it flows from the next hole. Cap off each hole with epoxy mortar.
- Step 4 – Finish: Sand back excess filler, blend the colour to match the timber, and if needed, add epoxy-glass or steel rods for extra strength.
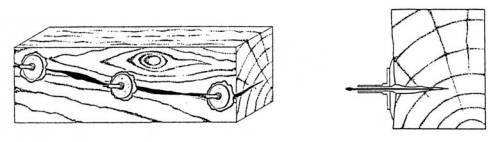
Timber splits repaired with epoxy filler and resin injection
Structural Epoxy Resin and Reinforcing Bars – Splits, Cracks, Rot and Strengthening
For serious damage such as deep splits, heavy warping, snapped beams or timbers weakened by rot and insects a stronger repair method is needed. Structural epoxy resin combined with reinforcing bars offers a reliable solution, restoring strength without full replacement.
This method works best when enough solid timber remains for the bars to anchor into. The reinforcing bars are inserted into slots cut into the wood, and then the voids are filled with structural resin to bond everything together.
Step-by-step epoxy and bar timber repair:
- Step 1 – Remove Damaged Wood: Cut away all loose, rotten or weakened timber using a saw, chisel, drill or grinder. Vacuum out dust and debris.
- Step 2 – Cut Slots: Create one or more slots in the timber where the reinforcing bars will sit, then clean thoroughly.
- Step 3 – Insert Reinforcing Bars: Place steel, glass fibre, or epoxy-glass rods into the slots at suitable spacing.
- Step 4 – Mix Resin: Prepare the structural resin according to the manufacturer’s instructions.
- Step 5 – Pour Resin: Fill the channels, ensuring the resin completely covers and bonds the bars. It will self-level as it sets.
- Step 6 – Finish: Once cured, sand the resin flush with the surface for a clean, strong finish.
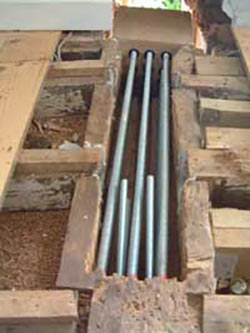
Reinforcing bars installed into timber
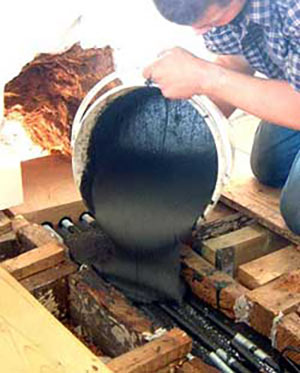
Pouring resin into timber slot
Finished resin timber repair
This technique is especially effective for large beams, joists and rafters where replacement is costly or impractical. See our full guide to structural timber repair here.
Timber Splicing
Timber splicing is a fast, cost-effective way to repair damaged beams, joists and rafters without replacing the entire length. Using modern timber-resin splice systems, only the weakened section is cut out and replaced, leaving the rest of the structure intact. In many cases, the repair is even stronger than the original timber.
This method works in-situ, meaning repairs can be made with minimal mess or disruption. New, treated timber is joined seamlessly to the old section, secured with reinforcing rods and epoxy resin. It’s a simple yet highly effective repair solution.

Joist repaired using a timber resin splice
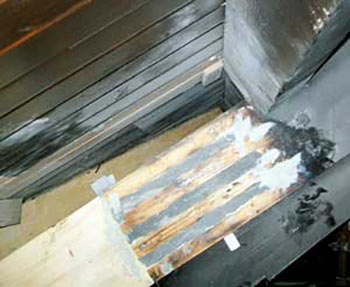
Access will vary depending on the timber type – floor joists are often easiest from above, while rafters are usually reached from below. Below is an example of repairing a rotten floor joist:
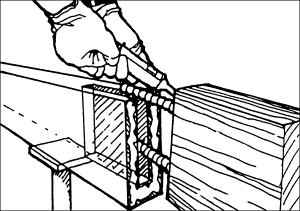
- Step 1 – Cut Slot: Drill or cut a slot into the solid, healthy part of the timber to hold reinforcing rods.
- Step 2 – Remove Rotten Timber: Cut off the damaged end of the joist squarely, leaving a clean joint face.
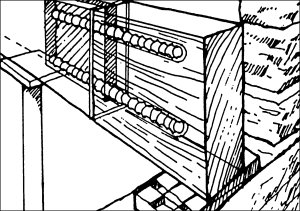
- Step 3 – Fit New Section: Treat the new timber with bitumen or preservative, apply quick-setting paste, and position it so the reinforcing rods sit securely in the slot.
- Step 4 – Pour Resin: Mix and pour epoxy resin into the slot to bond the rods and timbers together. Ensure no gaps remain.
- Step 5 – Finish: Once cured, sand if necessary and reset the joist into its position. Cement or finish as required.

Slot drilled into solid timber joist

Rotten end of joist removed
New section joined with reinforcing rods
New joist section secured in wall
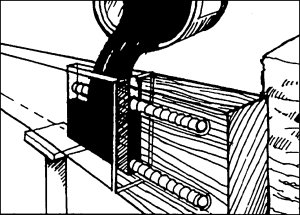
Epoxy resin poured into joist slot
Another option is joist support plates, where L-shaped steel brackets are fixed either side of the old and new timber sections. While quick and strong, this method leaves visible brackets, which may not suit period or listed buildings.
For a full breakdown of timber repair techniques, see our structural timber repair guide here.
Joist repair plates used to join timber sections
Load Stress, Strengthening and Spreading
Structural timber often shows clear signs of stress or spreading. Common symptoms include cracked or broken beams, bowed or bent timbers, and visible sagging in parts of a roof or floor. If left untreated, these issues can quickly weaken the structure.
There are several proven methods for strengthening or correcting load damage:
- Larger Timbers: Replacing a weakened beam with a stronger, larger section. This usually requires a structural engineer’s calculation and significant installation work.
- Doubling Up: A quicker option is to bolt a new timber alongside the damaged one, effectively reinforcing it. This adds strength but is not always suitable for every situation.
- Tie Beams: For spreading roofs, a tie beam can be installed between two joists at the base of the truss. This creates a triangle shape, greatly improving stability and preventing further movement.
Important: Always seek professional advice. A structural engineer should assess the damage, specify the correct repair method, and ensure all work meets UK building regulations and safety standards.
Once this has been done, it should be more than possible for any repair of this nature to be successfully carried out.
Undertaking any timber beam repairs while the beam or timber is still in situ is a big job, but on the whole simpler than actual replacement, however with todays modern epoxy repair substances, this is certainly more than possibly in pretty much any situation.