Using concrete fences posts and concrete gravel boards when you are building a panel fence has a number of advantages, but many people shy away as they are harder work to install and can be more expensive that using timber posts.
The advantages of Using Concrete Posts for a Panelled Fence
The big advantages of conctrete post centre around durability; they include:
- Concrete posts and gravel boards last longer than timber as they don’t rot.
- They don’t break so easily, even in high winds, so don’t need to be replaced so often
- The posts or gravel board does not need to be treated and regularly maintained, like timber
- Slotted concrete post don’t require fixings – the panels simply slide in
- Slide in panels can easily be replaced making maintence and repairs much easier
Of course the downside is that getting them installed in the first place is considered a more challenging job. While they are heavy they are not something to be aftriad of. This project is all about encouring you to consider using concrete post next time you tackle a fence job.
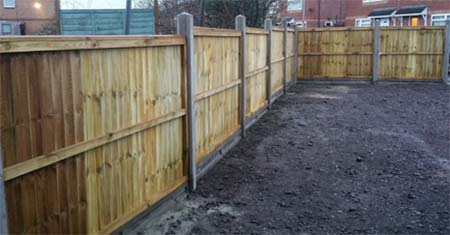
Completed run of fencing constructed using concrete fence posts
Installing Concrete Fence Posts for Your Panel Fence
With the right tools, concrete posts (apart from being much heavier) are no harder to work with than timber posts, plus also the fact that they last forever!
There might be environmental reasons not to use them, but other than that they are definitely worth considering.
If you are putting up a 6ft high fence, you will need 8ft high posts as 2ft of the post needs to go into the ground.
See our project on fencing on the DIY Doctor website to understand how deep the post holes need to be. If however, you are putting up a 4ft high fence, you will only need 6ft long posts.
But heres the thing. 6ft concrete posts are more expensive in most places than 8ft posts!! Why? Because not so many are used which means not so many are made which means they are scarcer. Which means they are more expensive – Crazy eh!
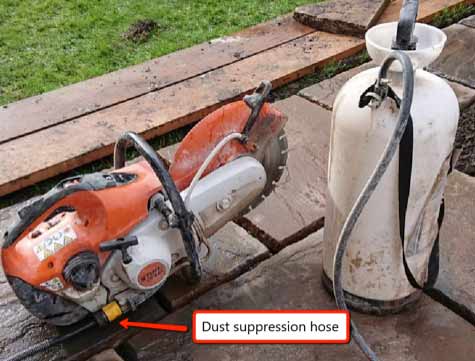
Petrol powered disc cutter with diamond cutting disc
This is easily overcome with the right tools and by hiring, or borrowing, a decent power disk cutter, an 8ft post can easily be trimmed down to the right size.
It is important that your powerful cutter is supplied with a dust suppression water bottle. The bottle is filled with water. The handle is pumped to build up pressure in the bottle and the hose is then connected to the cutter, the cutter started and the water turned on.
A fine jet of water is then trained automatically onto the blade as it cuts through the concrete and the dust is kept to a minimum.
Cut the bottom off the post, rather than the top as the top is shaped. More on this below.
Different Types of Concrete Fence Post
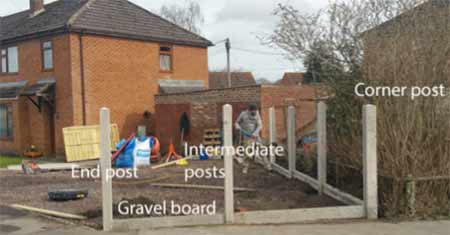
Starting at the beginning, work out which type of posts you need. There are three types:
- Corner posts
- Intermeadiate posts
- End posts
The corner post, as you can see, accepts two panels, ar right-angles to each other, to form a corner in your run.
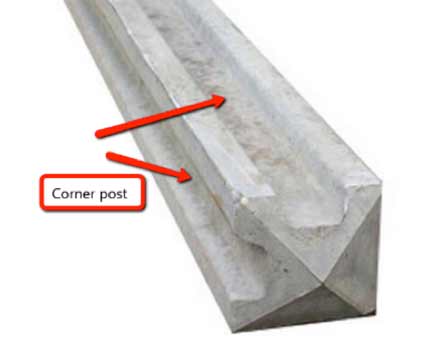
Concrete corner post accepts two fence panels at right angles to form a corner in the fence run
Then come the intermediate posts. Each one of these also accepts two panels but end-to-end.
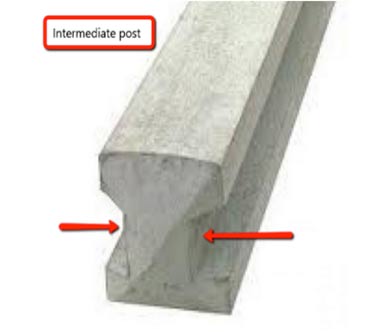
Intermediate fence posts are used to joint two fence panels end-to-end in a straight fencing run
Finally comes the end post. This post only has one groove to accept the last panel in the run.
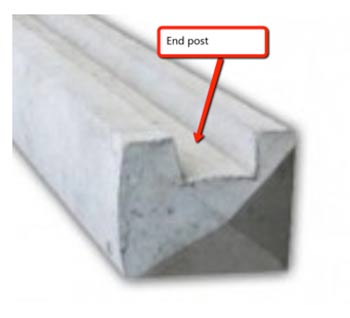
Concrete end post used to complete the end of a run of fence panels
When you buy your posts they will be 2.4m long unless you want to pay extra for the shorter posts at 1.8m. You now have to work out how much to cut off the posts.
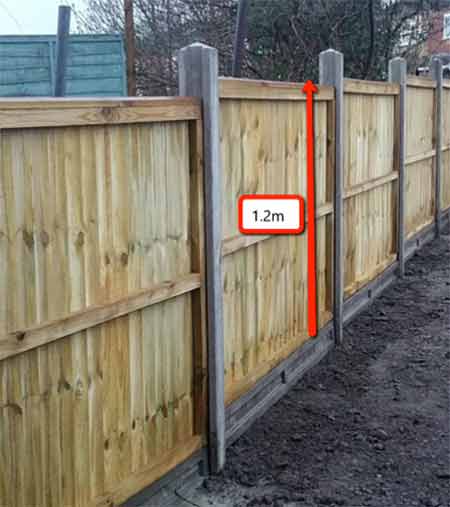
Measuring the height of your chosen fence panels
Measure your fence panel height. The fence panel height in this project is 1.2m.
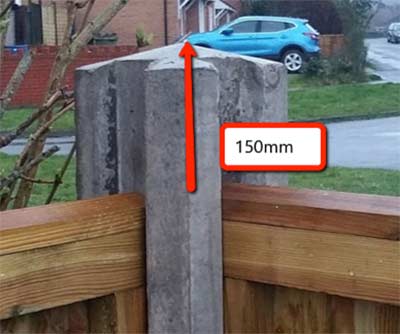
Add to this the depth of the gravel board you want to use. In our exmaple pictured we are using nice strong concrete gravel boards at 150mm deep.

After measuring height of fence panel, add the depth of your chosen gravel board
Now add the height of the fence post that you would like to stick up above the fence panel. We have gone for a 150mm upstand.
This is purely down to your preferance and many people like to have the panels flush with the top of the post.
Height of fence post sticking above fence panel
Now add the depth of post which is to be concreted into the ground, in this case, 500mm. Using the DIY Doctor project pages on fencing and also our project on digging the right size hole for your post, dig your first fence post hole at one end of your fence “run”.

Add together the total height of teh fence panel, post and gravel board to work out how much to chop off of post
Adding the depth, to the gravel board, to the panel, to the upstand, gives us exactly 2m.This means we had to cut 400mm off each post (remember your measuerments might be different so you might be cutting off a different amount).
Make sure you cut the 400mm from the right end of the post i.e.the bottom. It’s easy to see which is the top because it will be shaped in some way whereas the bottom will be square.
Make sure you don’t cut the wrong end of the post off. Only cut teh bottom of the post
Be careful when using the cutter, they are very powerful indeed. If you decide to use an electric disk cutter you may find that each cut takes you an hour, and you wear out a disk for every post.
By using a 12-inch petrol cutter with a diamond blade, it only takes about 20 seconds. The typical cost of hire, for one day (as of March 2019) is about £25 plus VAT.
Now dig your first hole. The depth, in this case is 500mm. Look at our project on how to concrete fence posts using Postcrete and put your corner post in.
Keep your level against the post, in both planes, until the Postcrete has gone hard. A post level can be a useful tool to ensure that you are level in both planes:

Use a fence post level to ensure the post is level on all sides
Next, place a gravel board into the slot and dig your second post hole at the end of the gravel board. This allows you to dig the hole in exactly the place you need it which saves you wasting any concrete.
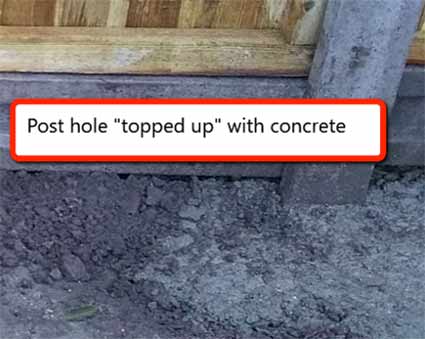
Fix your next post and so on to the end post, slotting the gravel boards in as you go. The Postcrete will go hard very quickly but one bag is not likely to fill the hole up.
You can always top up the hole with some ballast and sand mixed as shown in our project on mixing concrete.
Make sure you use a string line, or straight edge to keep your fence as straight as possible.
All the different types of fence post used to construct a fencing run
All that remains is to drop your fence panels in and you are now a master of the concrete fence post!

Once all fence posts installed and concrete cured, drop in your fence panels to complete the job
While it might seem daunting to attempt to fence with concrete posts and concrete gravel boards, it is not a great deal more difficult as you have hopefully seen.
Compared to timber post, concrete posts last much longer and are much easier to maintain so that little extra effort up front will pay you back in the long run.
We hope that you will consider using precaste concrete fence posts and gravel boards on your next panel fencing project.