Pointing and repointing brickwork is the process of replacing the damaged mortar that sits between the bricks or blocks that holds you home together.
Repointing damaged mortar is highly important to ensure that water and moisture is kept at bay and your home remains standing for many years to come. Read on to find out how.
Why Does Pointing Fail?
There are various different reasons why mortar can fail and need repointing and the most common of these include freeze thaw action, movement and settling of the property and the way in which some climbing plants attach themselves to walls in order to climb.
With freeze thaw action, this commonly occurs when cracks appear in the mortar due to movement or another reason and moisture is allowed to penetrate. When it freezes it expands and makes the crack larger. As this happens over and over the crack gets larger until the mortar breaks apart and falls out.
Another very common cause is general settlement. With brand new properties things will take time to settle and also with older properties, ground movement over time can put a fair amount of stress on mortar joints and they can easily crack and crumble.
Finally, if climbing plants such as Ivy are allowed to take root and climb their way up a building, if there are any slight cracks then the Ivy roots can dig their way in and claw the mortar out plus allow moisture in that can then cause freeze thaw and make the situation 10 times worse.
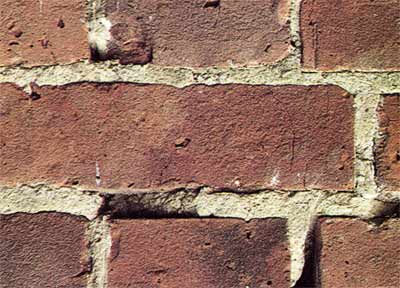
Old brickwork with broken and missing mortar in joints
What Happens if You Don’t Replace Broken Pointing?
If you neglect any broken or cracked mortar and just leave it this can lead to a whole host of issues, not just for the fact that the longer any damaged mortar is left the worse it will get (how much crumbles and falls out), but also for the fact that as mortar is the glue that holds your home together, if it starts falling out then in extreme situations this can lead to structural failure.
Another major issue is that if there are cracks present and they penetrate all the way through this can allow water and moisture into the cavity area which can then cause havoc with damp and the various issue associated with this. More can be found on tracing the cause of damp in our project here.
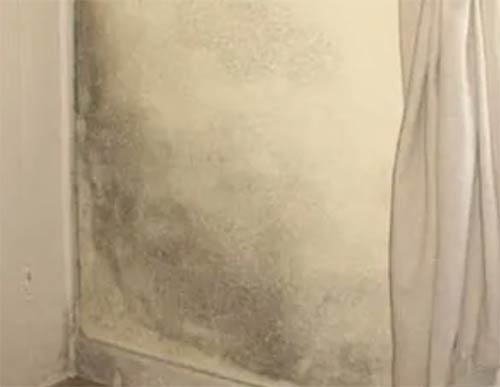
Mould on internal wall caused by damp
What’s the Best Mortar Mix for Repointing?
When mixing mortar to repoint a wall, the best mix to use for a standard brick and block is 3 sand to 1 cement or 3:1, however if you’re working on a period property or stone wall that uses lime then you would use a mix of 1 1/2 – 2 lime to 3 sand. In this mix the lime replaces the cement as a binder.
If you have mixed mortar before to build a wall then you may know that the mix used is normally 1 cement to 5 sand. With this in mind you might be thinking, why the difference?
The main reason for this is when building a wall you want the mix to stay more flexible but for pointing, you’re only replacing the first 10 – 15mm of mortar and you want this to be able to resist the effects of the elements, so you would use less sand to create a stronger mix that will cure faster.
Coming back to the point on lime, if the existing mortar uses lime, it’s essential that you’re new mortar does also. This will ensure that it is allowed to breath correctly and any water and moisture can easily evaporate out.
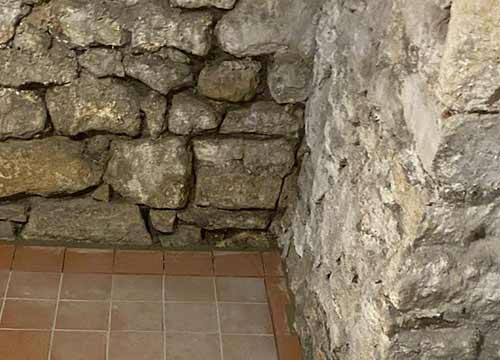
Old stone wall in need of pointing with lime
Matching Mortar Colours
Unless you are doing all of the walls anew, it might be necessary to match the mortar you are using to the existing mortar.
If you only have a little mortar to replace in a fairly new wall then generally the years of weathering won’t have discoloured it too much so you may be able to get away without colour matching.
However if you’re working on an older period property, then repointing bits here and there as needed will stand out like a sore thumb so it’s then necessary to colour match your newly pointed mortar.
There are various techniques for matching mortar colours including extracting the original sand used, using dyes, tints and tones or even using a specialist mortar colour matching service.
For full help and advice on matching mortar colours, see our project on matching sand and cement mortar colours here.

Filling joints with new mortar
Different Styles of Pointing
Before pointing anything it’s important to first decide what type of pointing you’re going to do or look at any remaining existing pointing to see what was originally used as there are several different styles.
Once you have filled any joints, you can then choose the type of finish of pointing:
- Bucket Handle (aka rubbed, grooved or keyed)
- Flush
- Weather Struck or Cut
- Recessed Pointing
- V-Groove
- Tuck
- Beaded
Bucket Handle Pointing
Bucket handle pointing can be done with a metal pointing tool or with a short length of chopped off hosepipe run through the joint.
This type of joint appears as a concave shape that’s set in slightly from the face of the brick or block work. This is probably the most commonly used style of pointing.
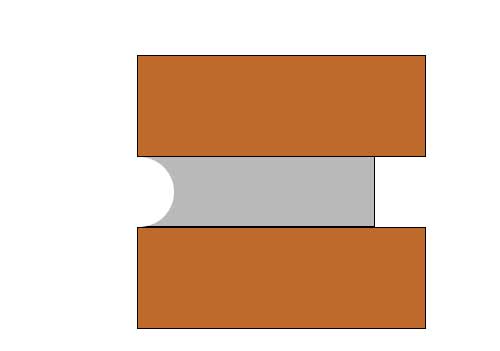
Bucket handle pointing
Flush Pointing
As you may guess from the name, flush pointing finishes flush with the face of the wall.
Done by cutting off surplus and rubbing over with back of the trowel
Flush pointing
Weather Struck Pointing
Weather struck pointing appears as an angled finish, with the angle pointing down and out from the top of the joint to the front face of the wall. It’s named as such due to the angle and the fact that it channels water out and away from the joint.
It’s created by using a pointing trowel at an angle which is then dragged out to the front of the joint.
Weather struck pointing
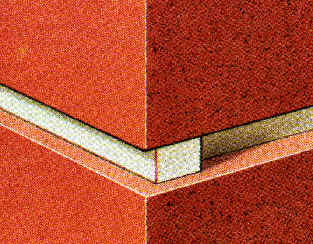
Recessed Pointing
Again as the name suggests, recessed pointing is recessed in from the front face of the bricks or blocks.
It’s achieved by flush filling the joint and then raking out mortar with a mortar rake
Recessed pointing
V-Groove Pointing
V-groove pointing is very similar to bucket handle but as opposed to having a smooth concave shape it’s a sharp V shape.
It’s created using a V-shaped metal rod or specialist plastic tool.

V-groove pointing
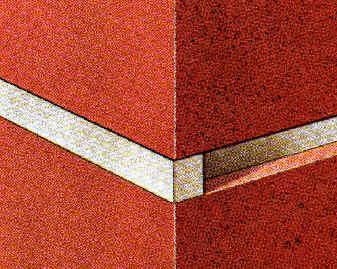
Tuck Pointing
Tuck pointing uses two different colours of mortar in the same joint, one that closely colour matches the bricks or blocks used and the other that contrasts this, normally a lime-based mortar. This creates the effect of having a thin mortar joint.
To achieve this finish, a thin channel is created in a recessed pointing finish and it is then packed with a lime or other mortar that protrudes slightly from the first mortar bed.
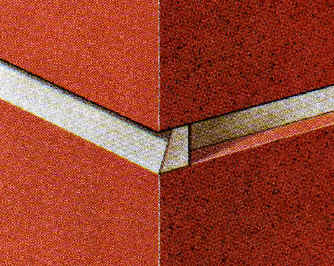
Bead Pointing
Bead pointing is similar to tuck pointing but as opposed to only a thin bead protruding beyond the face of the wall a larger concave bead features.
To create it, the mortar joint is packed full with excess spilling out and then a special concave tool or piece of metal is run over the excess to create the bead.
Bead pointing
How Deep Should Repointing be?
When repointing bricks or blocks you should aim to rake out at least 10mm of mortar, preferably 15mm or 20mm and any remaining old lose mortar as this will cause any new mortar to fail long before it’s time.
However when you are repointing natural stonework, any old mortar should be taken back to at least 30mm, preferably 40mm.
Can you Repoint Over old Mortar?
Yes you can repoint over old, existing mortar, however you must ensure that it is cut back by at least 15mm, preferably 20mm to allow the new mortar to bond properly in the joint. You also must ensure that any lose mortar has been fully removed so that it doesn’t affect the new mortar.
How Long Does Repointed Mortar Last?
When a wall or structure has been properly pointed it will ensure that any and all moisture is kept out of the property. When done correctly, mortar pointing can last a huge number of years, potentially all the way up to 100 years, certainly for at least 50 or 60 years.
Tools and Materials Needed for Pointing and Repointing
To point or repoint a wall you will need the following tools and materials. If you are repointing a wall you will need a few additional tools.
- Hammer
- Small chisel or plugging chisel
- Hand brush
- Wire brush
- Long handled stiff brush
- Hawk
- Pointing chisel
- Mixing bucket/cement mixer
- Bucket trowel
- Cement (of the right colour)
- Sand (of the right colour)
- Lime (if needed)
- Ladder or scaffolding
- Clean water
- Pointing tool of choice
How to Point and Repoint Walls
In the majority of cases, unless you live in a period home or some sort of show home with specialist pointing features, when doing any form of pointing it will likely be bucket handle or keyed pointing, so for the purposes of this example this is what we will be doing.
Step 1 – Clean Wall off
The first job before doing any form of pointing or raking out is to clean the wall down that you’ll be working on to remove any and all dust, cobwebs, leaves etc.
Before starting, lay down sheets that butt up to the wall to catch any debris and also mortar that gets dropped.
Using a long handled stiff brush, brush the whole surface over and get rid of any large objects and then using a small hand held stiff brush, go over the surface in a little more detail to remove any small objects and dust.
Pay particular attention to the mortar joints and scrub as much rubbish out as possible.
Step 2 – Remove Loose and Damaged Mortar
The next job is to remove any and all mortar from the mortar joints. Very loose stuff can simply be raked out with a screwdriver, chisel or similar but for more stubborn stuff you will need to use a plugging chisel and hammer.
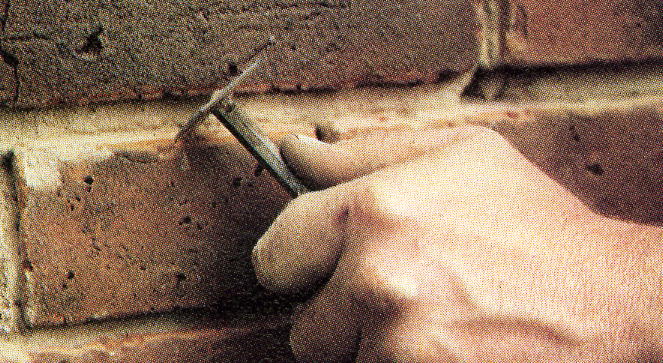
Rake out old joints to at least 15mm minimum
Knock the chisel through the joint clearing out the mortar as you go. Clear it to a depth of at least 15 or 20mm. All mortar will need to be cleaned out as you can’t mix old and new mortar.
Once all the joints are clear, scrub them out using a wire brush to remove any remaining dust and debris.
Take care working around windows and doors. knocking out mortar holding the frames or likewise knocking mortar into a joint that compresses the frames can alter now a window or door opens.
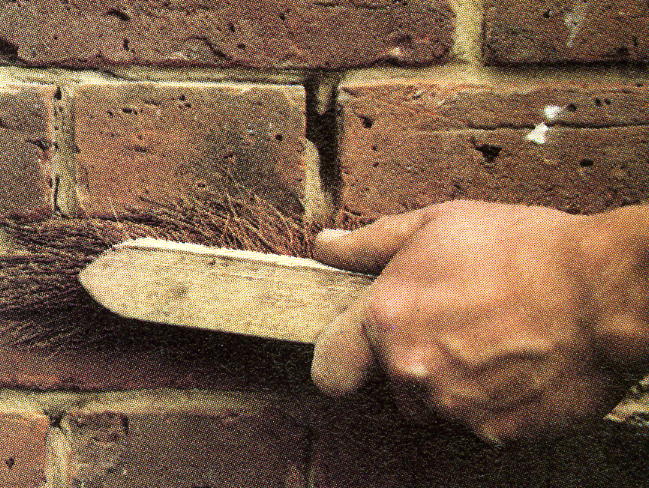
Clean off any remaining loose mortar using a wire brush
You may find that some of the faces of the bricks have been damaged as a result of water getting into the joints. This can be remedied in our replacing bricks project.
Step 3 – Clean Away Dust
Once all of the old mortar has been removed and the mortar joints are free from any large pieces, use a soft hand brush and run it along all of the joints and sweep out any and all dust.
If you are lucky enough to have a compressor and ait attachment this can be a very handy tool to use.
If dust is present in the joints when trying to repoint, it can prevent the new mortar from bonding to the inside of the joint correctly and if it doesn’t then it can fail long before its time.
Step 4 – Mix up Mortar
Next, mix up a batch of mortar using the correct quantities of materials for the mix you’re trying to achieve. In most cases this will be a 3:1 mix of 3 sand to 1 cement.
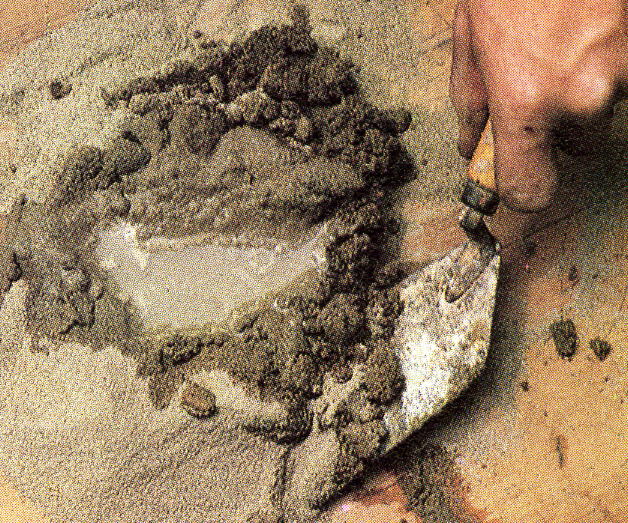
Mixing up mortar for new joints
Once mixed to the right consistency, not too wet or dry and self-supporting, scoop up 2 dollops on to a plasterers hawk ready for applying to you empty mortar joints.
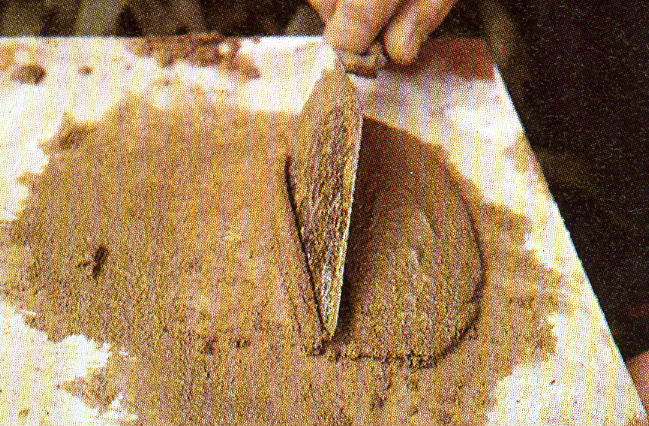
Place on hawk ready for easiest way to repoint
For information on how to mix sand and cement for your new mortar joints see our mortar mixing project.
Step 5 – Fill Horizontal Joints
In terms of where to start, pretty much all professionals agree that it is easier to start at the top and work your way down to the base.
Most professional bricklayers and builders will also point and fill any and all joints as they work their way along the wall, however if you are new to this then you may find it easier to fill horizontal joints first and then the smaller vertical ones afterwards.
Using this principle, scoop a little mortar on to the edge of your pointing trowel and then push it into the joint, forcing it in so that it fills the void entirely.
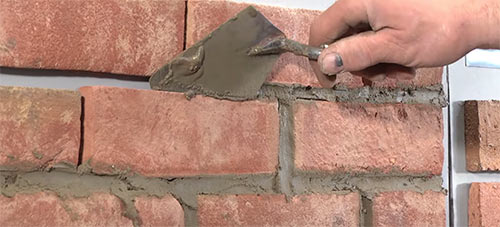
Pointing mortar joint in brick wall using a pointing trowel
Step 6 – Fill Vertical Joints
If you have chosen to fill all horizontal joints first, work over 2 brick courses at a time. Once you reach the end of the horizontal pointing of the second course, go back to the start and fill all the vertical joints.
For the vertical joints, fill these in exactly the same way. Scoop some mortar on to the trowel edge and then force it into the joint ensuring that it’s totally full.
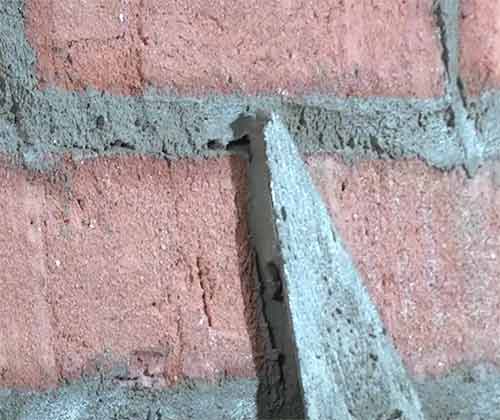
Filling vertical mortar joint
Step 7 – Finish Joints
The final job is to finish each joint. So that the mortar doesn’t cure before you’ve had a chance to finish it, this is best done every 2 courses along with your vertical joints.
How you finish the joints will very much depend on what finish you’re going for. In this example as we’re doing bucket handle finishes, run your jointing tool or section of cut off hose pipe through the joint, smoothing and compressing it.
If any excess mortar spills out of the joint, use you pointing trowel to scrape it off and then pop it back in the bucket or on your hawk.
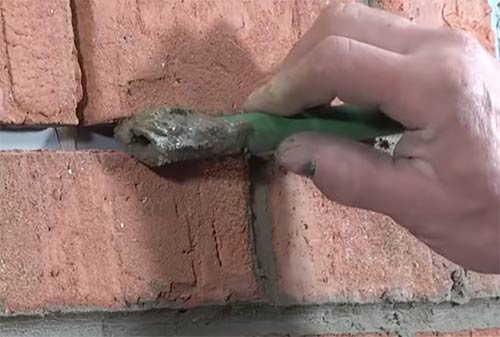
Finishing mortar joint using section of hose pipe
Once finished each joint then needs brushing down and for this it will need to be left to harden off a little, roughly 30 minutes should do. If there are any hard lumps of mortar on the surface, cut them off using your pointing trowel.
Using a 2 – 3 inch paint brush, brush each joint, ensuring you get the brush right down in the joint. This is done to close the surface of the joint up and prevent any water ingress. This will also neaten everything up
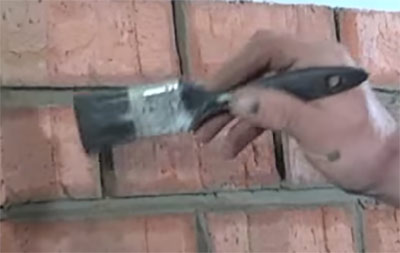
Brushing over mortar joint to close up surface
Pointing brickwork isn’t a tricky job once you have had a little practice in getting the mortar in the joint, however it is a very time consuming job and one that needs to be done properly to prevent water ingress that can cause huge problems and also ensure that it doesn’t fail before it’s time.