A washing machine is an essential appliance in any home and also in many cases so is the dishwasher. In order for either to work correctly once they have done their washing job, they need to be able to get rid of any waste water correctly and this needs to be done via a waste trap.
Fortunately waste traps for both machines are the same so in this guide we look at how to install a washing machine trap to deal with washing machine or dishwasher waste water.
What is a Waste Trap?
A waste trap is a clever device that stops the foul air from the drains escaping back into the room space by using a water barrier that sits in the base of a U-shaped pipe.
There are many different objects in the home that use such a device including basin’s, baths and toilets and although they differ slightly in appearance they all work in essentially the same way.
Washing machines and dishwashers, once installed, must deliver their waste water to the foul drainage system for your home. This is the same system which takes the toilet and basin waste. It is illegal to put this waste water into your surface water system which is the water collected by your gutters.
The waste outlet for your appliance runs into the waste trap and then via pipework to your foul drain.
To find out more about how waste traps work, see our project here.
Types of Waste Trap for Washing Machines and Dishwashers
There are 3 types of waste trap that are generally used for appliances, with 2 being used much more regularly than the third. The main types are the standpipe waste trap and the sink and appliance waste. The third fairly uncommonly used type is the self sealing waste trap.
Sink and Appliance Waste Trap
The sink and appliance waste trap is fairly commonly used where just a washing machine is installed. This type of trap merges the standard sink waste with an additional outlet that a washing machine waste can be connected to.
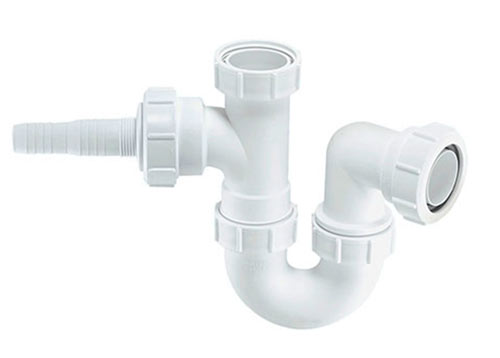
Sink waste trap with integrated appliance waste trap
Waste traps such as these are generally easy to access and use as they are installed under the kitchen sink, however there are some drawbacks with them as they can take up a great deal of room in your under sink cupboards and the hoses usually need to be extra long which means they have a tendency to sag and allow stale water to sit in them.
Another problem is that the only way to connect a washing machine or dishwasher hose to this type of outlet is by sliding the end over the tapered nozzle and then securing it in place using a jubilee clip. As both washing machine and dishwasher waste water is under quite a bit of pressure when it is expelled by the machine, this could force the hose off.
Standpipe Waste Trap
The standpipe waste trap is the best solution in terms of waste traps for both washing machines and dishwashers. The main reason for this is that it has its own purpose made outlet that takes waste water from the machine into the remaining foul pipework or its own specific foul waste if needed.
Most washing machine waste hoses usually come with a pre set bend which takes the hose into the top of the stand pipe about 200mm.
When installing the standpipe it should be clipped to the wall at least twice in its vertical length and at every 400mm along its horizontal length. Any sagging of the pipework can lead to puddles of stagnant water in the pipe which can cause horrible smells.
In terms of the height, the top of the standpipe should be 100mm under the underside of the worktop. If there is no worktop then the top of the waste pipe should finish at approximately 50mm down from the top of the washing machine or dishwasher.
On the whole we believe it is much better to spend a bit more time getting the waste pipes done properly by installing a standpipe so any waste can be taken via its own trap to the main drainage outside.
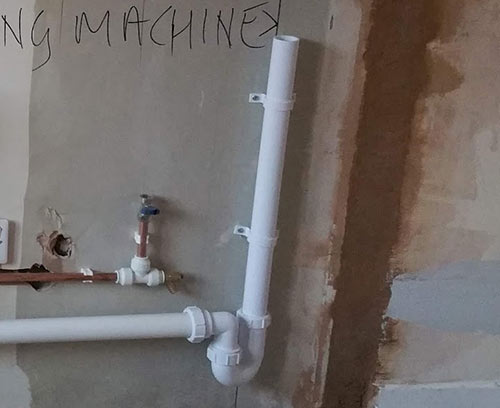
Standpipe waste trap installed for washing machine
Self Sealing Waster Trap
The third and final way of connecting a machine waste is by using an in-line, self sealing waste trap. These little marvels are a tube shape, about 250mm long which fit onto a standard 40mm pipe with a compression fitting. They contain a thin membrane which opens to allow the waste water through but immediately closes again to stop foul air getting back in. This type of waste is also known as a HepVO self sealing waste valve.

self-sealing waste trap
Self sealing waste traps can be put in horizontally or vertically and can be used in bathrooms as well as kitchens. Bends and adapters can be ordered with the fitting so it can be applied in almost any situation.
Installing a self sealing vent, because it reduces negative pressure in the waste system, can be used to remove the noises associated with gurgling pipes and basins. It also removes the need for air admittance valves.
Positioning Appliances and Waste Outlets
One other very important factor to consider when it comes to waste trap installation is where the appliance is to be installed.
Ideally any washing machine, dishwasher or similar should be installed as close to a foul drainage point as possible, this is normally around the sink area.
This is due to the fact that any new pipework that will need to be installed for any wastes can be kept to a minimum, especially if using a combined sink and appliance waste trap as the appliance waste hose is only a set length.
However this isn’t always possible due to the position of existing appliances or kitchen units so it may end up having to be installed some way away from any easily accessible drainage points.
In some cases like this it may be possible to extend the waste pipe hose on the appliance to reach a little further but this should only be done if the manufacturer allows it and you use the correct extension kit stated by the manufacturers and that it doesn’t exceed a total length once extended of more than 1.5 metres.
One final important point is that the length of waste pipe for both washing machines and dishwashers should not exceed 3 metres in length. This includes the waste hose running from the machine.
Do You Have to Install a Waste Trap?
In the UK the Building Regulations Document H states that any object or appliance that discharges into a foul waste system must be fitted with a waste trap to prevent any foul odours from escaping into the room area.
In terms of the waste trap itself the document states that it should be at minimum 40mm in diameter and the depth water in the trap to form an effective seal should be at least 75mm.
So, in answer to the question of; do you have to install a waste trap? The answer is a definite yes!
Tools and Materials Needed for Installing a Waste Trap
Which ever machine waste trap you are going to install you will need a number of tools and products to get the job done correctly.
We always prefer to use solvent weld or compression fittings when it comes to waste pipes because once it is made, it stays together and there is no chance of any leaky joints.
- Chosen type of waste trap – sink and appliance trap or sink waste and 40mm UPVC pipe for standpipe
- Required 40mm UPVC pipe joiners, adapters, bends etc.
- Pipe brackets
- Drill/driver
- 40mm screws
- Wall plugs
- Suitable lengths of 40mm waste pipe
- 52mm core drill and SDS drill (if installing new waste through wall)
- Long, thin drill bit
- Hacksaw, reciprocating saw or large UPVC pipe cutters
- Suitable pen for marking plastic e.g. Sharpie
- Tape measure
- 240 grit sandpaper
- UPVC glue
How to Install a Waste Trap for a Washing Machine or Dishwasher
As you have now learnt about the different types of waste trap and where a washing machine or dishwasher should be sited, to make installing an appliance waste trap as easy as possible, it’s now time to go through how to actually install one.
Installing a Standpipe
As we have mentioned, installing a standpipe to use as an appliance waste is the best solution and can be done fairly easily, as long as you have good access.
Step 1 – Access Existing Waste Pipes
Depending on what’s in the way, this may be easier said than done. Luckily in our example here we are installing wastes for both a washing machine and dishwasher in a property that’s being renovated so there is nothing in the way.
However you may not be so lucky and there may be 2 or 3 kitchen units in the way. Ideally these will need to be moved so that you can access the rear, but if it’s a sink unit with the sink installed, disconnecting all the water feeds, waste etc. may be too much to take on, so it might not be possible.
In this situation the only real solution is to knock the thin hardboard section out of the back of the unit so you can access the service gap (the space at the rear of a kitchen unit between the back and the wall to run water or waste pipes) and then cut holes in the sides and feed any new pipes through.
Once done you can then build a thin batten frame in the rear of the unit and then re-fix the back board in place. This isn’t ideal but will work if there is no other way.
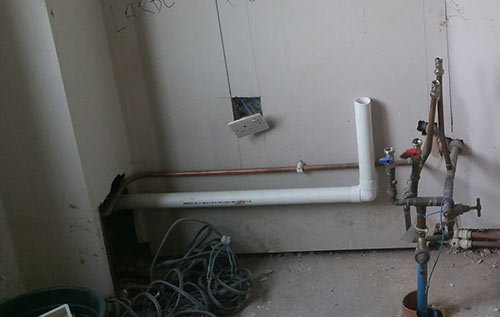
Kitchen units removed to access waste pipes
Step 2 – Run New Pipe From Existing Waste
Using a suitable pen such as a Sharpie, mark a perfect circular line around the existing waste pipe using a piece of cardboard wrapped around at the end of the pipe around 6 inches (150mm) before any existing adaptors and then use a hacksaw or reciprocating saw to cut through the pipe.
Using a piece of finer 240 grit sandpaper, sand off the cut end to smooth it off and remove any burrs.
If compression joints have been used simply unscrew them to remove as opposed to cutting away.
Place a joiner on the end of the existing pipe and glue it in place. Add any further pipe joints to remake any waste outlets that you cut away e.g. sink waste etc.
Next, using a tape measure, measure from the new pipe joint over to where the new standpipe will be positioned and cut a piece of UPVC pipe to length, remembering to measure from inside the collar of the joint where the pipe will butt up to. Tidy up the end with a piece of sandpaper.
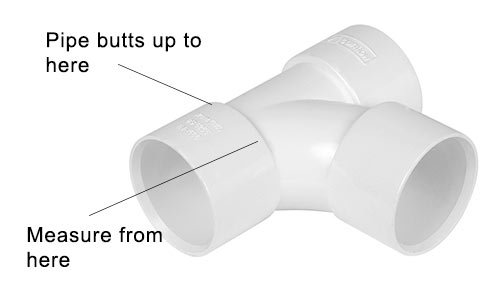
UPVC plastic pipe joint
Add glue to the end of the pipe and joint collar and glue the pipe in place in the joint.
Finally add pipe clips at least every 600mm. Screw to the wall securely using wall plugs. Remember to retain the correct fall for waste pipes so any water flows as it should, minimum of 1:40. Ensure this slopes towards the waste outlet.
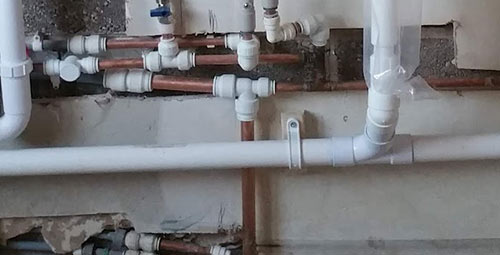
Waste pipe clipped to wall using pipe clips
Step 3 – Run Waste Pipe Through Wall (if above not possible)
In some instances, running a new waste pipe from an existing waste isn’t going to be possible or there may be a convenient drain or soil pipe just the other side of the wall that would be much easier to run a waste to rather than removing kitchen units or trying to alter them.
In this case you can simply drill a hole through the wall and run the appliance waste through it out to the drain or connect to the soil pipe using a strap on boss.
This, as its name suggests, straps onto the soil pipe and the waste pipe from the washing machine or dishwasher and pushes inside the rubber collar. A hole is made in the soil pipe to allow free passage of waste.
If you use this system you must allow access to the waste pipe for clearing any blockage. This is done by means of an access fitting as shown on the diagram below:
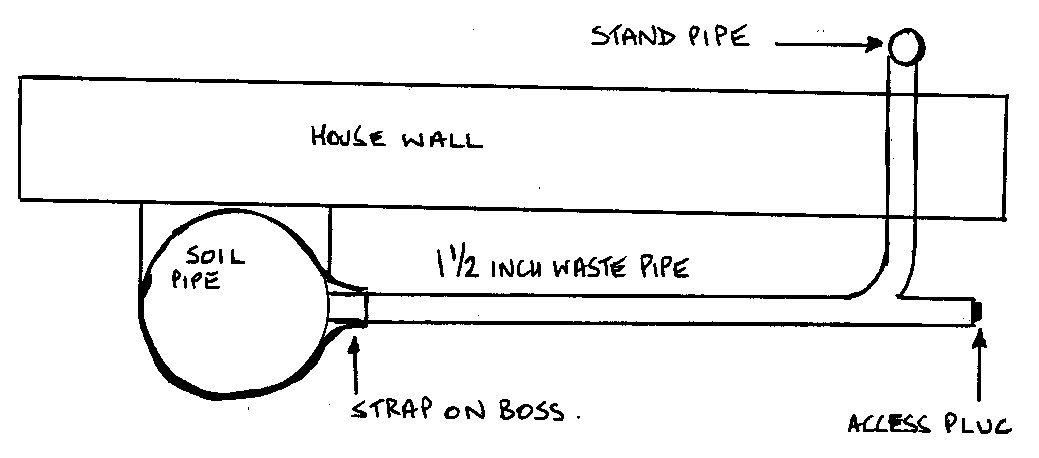
Running a standpipe waste pipe through a wall to a soil pipe
Inside the property, use an SDS drill and a long drill bit to drill through the wall in the position that you will install the waste and where it will exit the property. Ensure it is high enough so that once the pipe runs through you get the required minimum of 1:40 drop to ensure correct drainage.
Next, use a 52mm core drill bit to drill through the wall from the inside first (see our project here on using core drill bits for more information). Once three quarters of the way through move outside and drill back through. This will save blowing the outside face of the wall off.
With the hole drilled cut a length of pipe to run from the hole to the drain or soil pipe and glue a 90° joint to the end and then slip on 2 pipe clips and position them at around a third of the length of the pipe each. This will ensure the pipe in the next step is the right length to run through the wall.
Next cut a length of pipe to run through the wall from the 90° bend and ensure there is around 75mm clear from the face of the wall to allow for the compression joint on the trap. When cut, glue this into the 90° joint.
Once all prepared, slip the pipe through the wall and mark the pipe clip fixings and then fix them in place using screws and wall plugs.
Finally use a good quality external silicone sealant to fully fill the gaps around the pipe running through the wall to stop any heat loss.
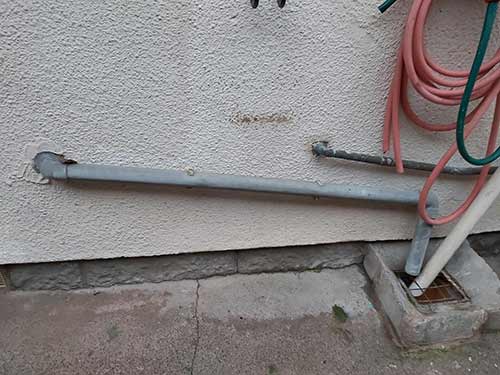
Waste pipe for standpipe running through wall to external drain
Step 4 – Connect Waste Trap
Once the waste pipe is secured in place, take your waste trap and unscrew the compression nut on the outlet end and take the screw cap and slip it on the pipe followed by the plastic washer and then the rubber seal in that order.
Slip the body of the compression waste over the end of the new horizontal run of pipe (or pipe through wall if running externally) until it hits the end of the collar and then slip the seal and washer down to the end and then screw the cap up tight, ensuring the inlet is pointing directly 90° upwards.
To learn more about compression wastes, see our project here.
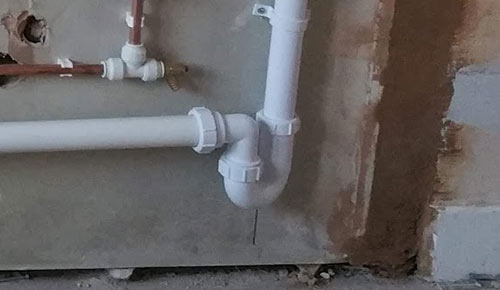
Waste trap fixed to waste pipe
Step 5 – Connect Stand Pipe
Unscrew the screw cap from the other end of the trap and then put to one side.
Measure the height of the appliance from the ground and mark it’s height on the wall. Use a tape measure to measure from the base of the collar of the compression joint up to the line on the wall defining the appliance height.
Next, take off 50mm and mark on the wall and this will define the length of pipe you need to cut for the standpipe.
Once cut, add the screw cap, seal and washer to the base of the pipe and push it into the compression waste and then push the washer and seal down and screw the screw cap up tightly.
Pop 2 pipe clips over the pipe and fix them to the wall using 40mm screws and wall plugs, ensuring the pipes totally vertically level using a spirit level.
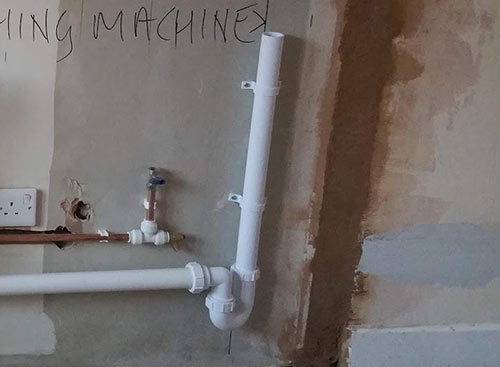
Standpipe fixed in place to wall
Step 6 – Install Appliance Waste
Pop the appliance in position and then position the waste into the standpipe. This will either involve dropping the hose down the standpipe, ensuring that there is at least 100mm between its end and the water in the trap or hooking the hook of the pipe over the top.
Once in place and you have connected up the water supply and plugged it in, turn the machine on and run a test to make sure all is well and working.
Once it’s completed its cycle, check all the pipework over and ensure there are no leaks.
The final jobs to do now are to put everything back in place if you have had to remove items such as units or unit backings.
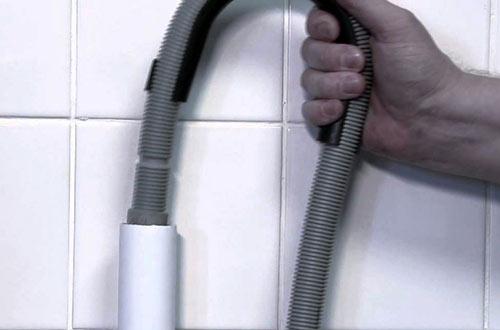
Insert waste pipe into standpipe
Installing a Sink and Appliance Trap
If the hassle of installing a proper standpipe is just too much or you don’t have the funds to pay for a tradesman to do it for you the other option is to replace the existing waste outlet under your sink with a new one featuring an appliance nozzle.
In this example we have assumed a basic sink setup, with a single sink and no strainer and an overflow that runs back to the waste outlet. However this won’t always be the case as there are infinite different ways that a sink can be plumbed in.
If your sink has a strainer then it may be connected in a similar way to the image below, in which case you can simply replace the 90° joint with a T-joint and screw on 40mm appliance compression nozzle.
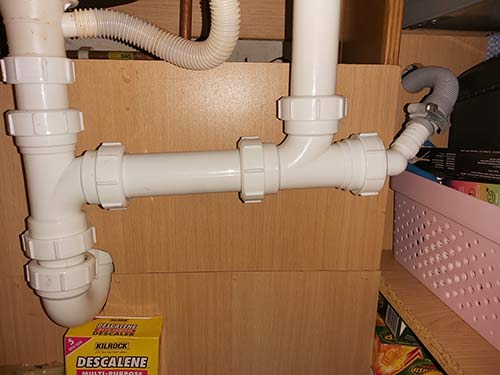
Sink plumbing setup for sink and strainer
Note: To make things as easy as possible, source a new sink waste and appliance trap that is the same size/shape as your existing one as it will then be a straight swap with no tricky re-aligning to do.
Step 1 – Clear Space to Work
As the cupboards under kitchen sinks are notorious for storing items that don’t fit anywhere else the first job is to clear some space to work in.
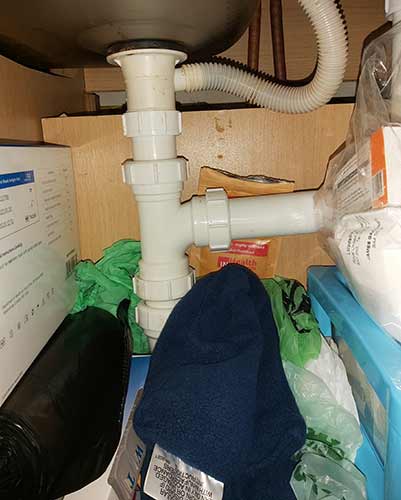
Clear space under sink for area to work
Step 2 – Lay Towels and Bowl
As there will be water and waste in the trap you are removing, place some old towels or clothes over the area and also a bowl underneath to catch any waste water.
Quite often there is some nasty sludge in there also and you don’t want that getting everywhere either.
Step 3 – Disconnect Old Waste Trap
The next job is to remove the old waste trap. This is a fairly easy task and just involves unscrewing the 2 compression nuts holding it in place.
Once unscrewed, pull the body of the trap away and place it in the bowl.
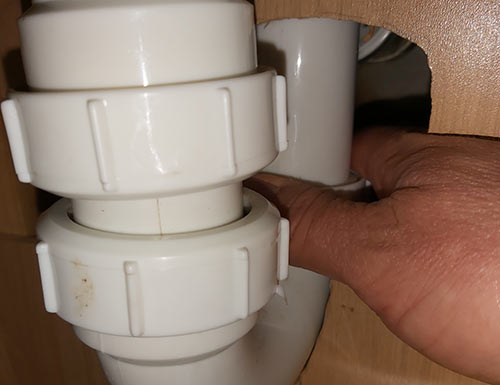
Unscrew existing waste trap from under sink
Step 4 – Connect New Waste Trap
With the old waste out the way, unscrew the compressions nuts and remove the washer and seals for the new one and slip them over the ends of the pipes.
Pop the new waste trap in place, making sure the pipes that it connects to are pushed right down to the collars and move the washers and seals into place and screw up the screw caps nice and tightly.
Run the cold tap for a few seconds and then check the trap to ensure no leaks.
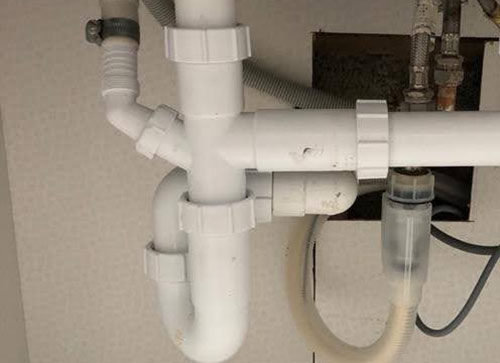
Waste trap with appliance waste connected up
Step 5 – Connect Appliance Waste
The final job to do once the trap is in place is to then connect up the appliance waste pipe.
To do this, loosen the Jubilee Clip, if there is one and then push the waste pipe over the tapered nozzle all the way down as far as it will go.
Once in place, tighten the Jubilee Clip all the way to hold the pipe in place. Once this is done, you’re all finished.
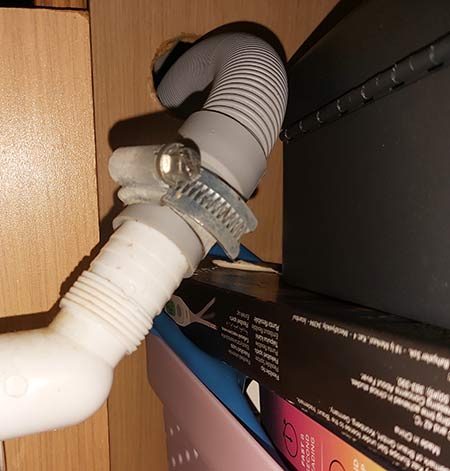
Appliance waste connected to waste trap nozzle
Cleaning and Maintaining Waste Traps
Due to the nature of the areas in which sinks tend to exist, waste traps can over time fill up with all sorts of unmentionable substances.
Normally appearing as a grey or black sludge, this can easily build up in the “U” of the trap and totally block it up so every once in a while it’s a great idea to clean them out.
For traps that are easily accessible this is fairly simple and just involves unscrewing the compression fittings and removing and cleaning it and then putting it back together again.
But for traps that are more difficult to get to, such as dishwasher or washing machine wastes, this is a little trickier. Obviously the best method is to access and remove them but if impossible then pouring a good quality drain cleaner down the standpipe or trap will help to keep it clear.
If you do this, make sure that you run your machine empty the next time you use to clear out any unwanted chemicals in there.
Installing a washing machine trap to remove waste water for a washing machine or dishwasher does involve a fair bit of work to do it properly, but to avoid any future issues it’s certainly something that needs to be done correctly.
Further Help
To assist you further with doing this project you may also want to checkout these project pages:
along with 3 projects on the different types of waste pipes you can get to do the job an how they can be joined:
- Joining pipework using solvent weld
- Push fit pipework and fittings
- Plastic compression joints and waste removal

