In todays modern homes, steel stud partition walls are increasingly popular due to their numerous benefits over traditional timber or brick partitions. Here’s why they might be the right choice for you:
- Lightweight compared to timber or brick partitions
- More precise installation
- Resistant to splitting during cutting or fixing
- Faster to build and install
- More cost-effective than timber or brick
- Better fire resistance than timber walls
Steel partitions can optimise space efficiently and, with careful installation, minimise damage. This makes future removal easier and less costly. Find out how to correctly install one below
Steel Partition Wall Installation Methods
The installation method for steel partition walls depends on your room’s condition and your specific needs. Here’s how to choose the best approach:
For a permanent partition with a solid floor, brick or block walls are an option, provided you have the time, budget, and space. However, if your ceiling or floor is uneven, timber might be better as it can flex to fit irregular surfaces, unlike the rigid steel.
In most homes, steel stud work is suitable as it adapts well to flat surfaces. You can use steel stud work in various ways:
- Full steel framework with top and bottom channels and vertical uprights
- Steel top and bottom channels with vertical timber uprights
- Timber top and bottom studs with steel vertical uprights
Choose your method based on surface flatness. Use a spirit level to check for gaps between the level and the following surfaces:
- Ceiling
- Floor
- Upright walls
Before you start, check with your local authority for building control approval. They can provide guidance on thermal, acoustic, and any fire safety requirements that your new partition will need to adhere to.
Advantages and Disadvantages of Steel Partition Walls
One of the most common methods of constructing steel partition walls is to use steel channels and timber uprights. This is the method that we suggest below.
However, as with all things, this method has its advantages and its not so great, disadvantages. Here follows the most prominent of these:
Advantages of Timber and Steel
- Easy to fix top and bottom channels in place
- Provides a solid base for construction
- Ensures perfectly vertical timber uprights when aligned correctly
- Timber uprights simplify door and window installation
Disadvantages of Using Timber and Steel
- Uneven surfaces may require additional packing
- Timber set in steel channels may need adjustment for the "lip" thickness when fixing boards
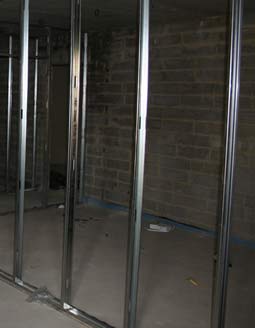
How to Build a Steel Partition Wall
The most common method when using steel in a partition wall in a domestic situation is to use two steel channels fixed at the floor and ceiling level of the room directly above each other and vertical timber studs usually at 400mm centres and boards (can either be plasterboard, timber or steel) fixed to cover both sides. To these ends the following instructions are geared towards using this method
The thickness of most partitions is either 52mm or 72mm depending on the width of the steel channel. This is the method that we have used below.
Step 1 – Finding Ceiling Joists to Fix To
To erect a steel partition, you first need to locate the ceiling joists hidden under plasterboard or plaster in the ceiling. This ensures the top channel is set accurately and fixed securely.
If the ceiling joists in the room run parallel to the partition, adjust the position to sit under one of these joists for easier fixing. If they run across, the channel must be screwed to individual joists.
Wondering how to find hidden joists? Use best trick is to use a stud finder. Learn more about using a stud finder in our guide.
For parallel joists, mark the joist centres at both ends, draw a straight line, measure the steel channel’s width, and mark its centre. Position it directly on the line to fix to the joist’s centre.
For joists running across, mark the start and finish of each joist along the line to ensure proper fixing.
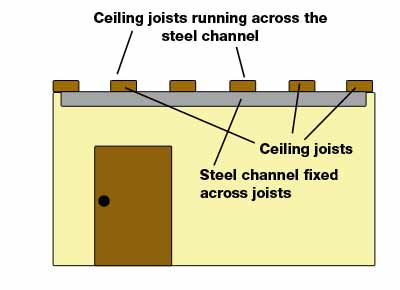
Steel channel fixed across joists
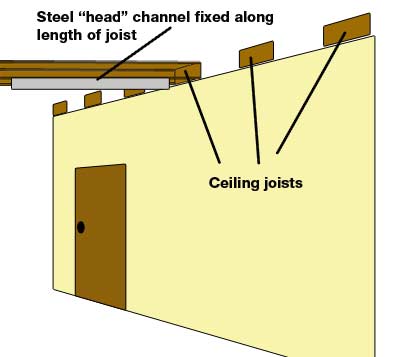
Steel channel fixed along joists
Step 2 – Fixing the Head Channel
Secure the head channel to the ceiling at 400mm intervals for parallel fixing, or to all available joists for cross-fixing. Use a plumb bob to align the floor channel. Hold the plumb bob at the bottom edge of the head channel and mark the corresponding spots on the floor.
Position the bottom channel on these marks and fix it at both ends. Before completing the fix, ensure both channels are perfectly aligned. Use a plumb bob or a long straight edge with a spirit level for this. This is absolutely key!
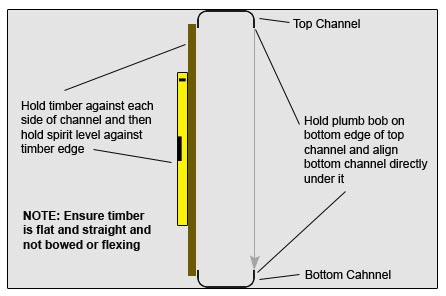
Aligning top and bottom channels directly above each other
If the floor is uneven, use packers or install a sole plate for better stability.
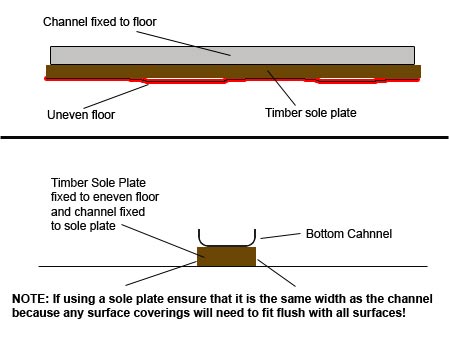
Using a sole plate
Step 3 – Fitting Vertical Studs
Set vertical studs 400mm apart, and place timber noggins between them for added stability.
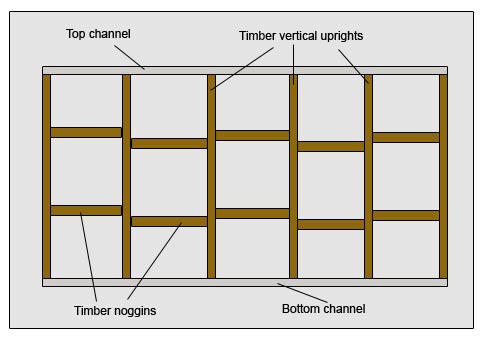
Upright vertical timbers fixed and noggins added
Cut each stud to fit snugly between the head and floor channels, adding 1-2mm for a tight fit. Cut each stud individually, as measurements across the room can vary, sometimes by quite a bit.
Ensure each stud is perfectly upright and vertically level using a spirit level before fixing it in place. Depending on your steel channels, either screw through pre-drilled holes or create your own. Countersink screw heads to allow surface boards to sit flush.
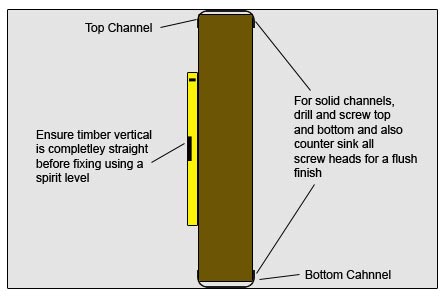
Fixing vertical timbers
Step 4 – Fitting the Boards
Fix boards to one side of the studs, ensuring a close fit against the ceiling. Any gap at the bottom can be covered by skirting board.
Align board edges to meet at the centre of vertical studs, staggering them to avoid fixing both sides to the same stud.
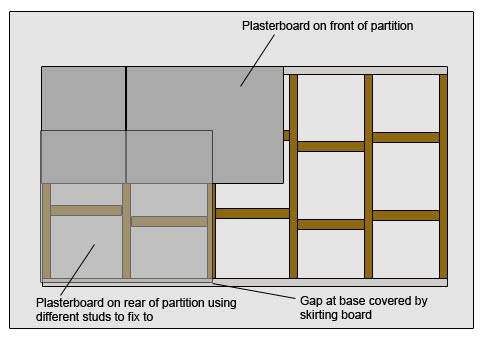
Fixing plasterboard front and back of stud framework
If your steel channels have a "lip", attach timber strips (matching the channel width) to the face of the uprights and noggins to create a level surface.
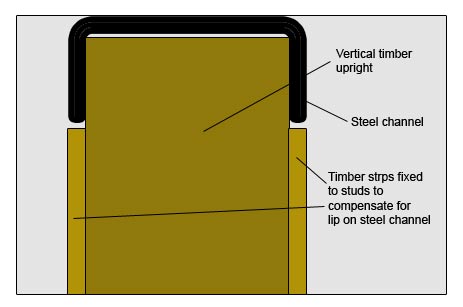
Timber strips fixed to stud to compensate for lip
After securing the plasterboard to both sides, ensure it’s flush with the stud framework. Finally, you can then tape and skim with plaster to finish it off. see our project on how to skim plaster for full information on how to do it yourself.
Step 5 – Fitting a Door or Window
When building a stud wall, you’ll likely want to include a door or window to access your new room. Here’s how to do this.
Fitting a Door
To fit a door, start by cutting a length of floor channel to the width of your door opening. Align the channel on both sides of the opening using a spirit level or straight edge to ensure accuracy.
Secure the cut floor channel to the floor, making sure it is level and aligned with the top channel. Next, install vertical upright timbers as described earlier, including an upright flush with each end of the opening to form the door frame.
For noggins, fix them only outside the doorway. Inside the doorway, fit a "header" slightly higher than the door height, and then install noggins from the top channel to the header.
Regularly measure the door gap’s width and height throughout the process. This ensures your door fits perfectly once everything is in place.
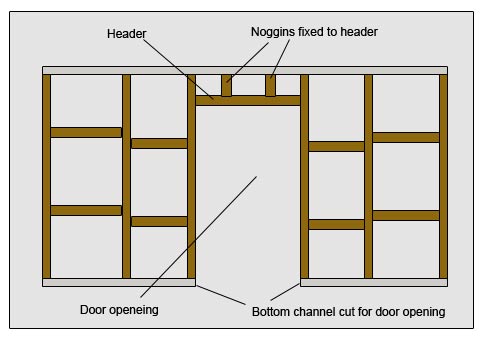
Making an opening for a door in a stud wall
Fitting a Window
To fit a window, follow a process similar to fitting a door, but you typically won’t need to cut the steel channels. Start by marking the window’s location within your framework. Remove a section of a timber upright to create the window space.
Install a header above the window and a base below it, ensuring the height between them matches the size of your window frame. Adjust the timber noggins as needed to fit around the window area.
If the created space is wider than your window, add upright noggins to adjust the width to fit the window frame securely.
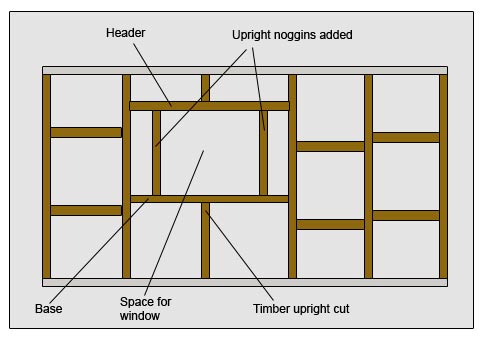
Making an opening for a window
Steel partition walls offer versatile construction options, combining steel and timber frameworks.
This DIY guide covered building a steel partition wall using steel channels for the top and bottom with timber uprights. Depending on your room’s condition, you may find other methods more suitable. Apply the principles and processes outlined here to your chosen construction method and you will be sure to get a professional finish.