The close coupled toilet is a fairly modern iteration and was meant as a replacement for the older and less efficient low level toilet. This is a problem in itself as the two types of toilet suite are very rarely interchangeable due to their size and layout. To see how to get over this problem go to our project on changing toilets
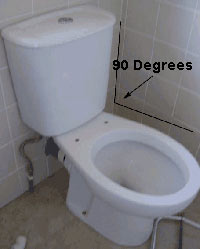
Once installed, the next problem a lot of people encounter is that, the first time they flush a newly fitted close coupled toilet cistern, it leaks. This is such a common problem and 99% of the time the answer is the same. The cistern needs to be fitted at exactly 90° to the toilet pan. This allows the large rubber ring washer, or doughnut to create a proper seal.
This is the most likely root of the cause, however there can be others so read on to learn about how to resolve leaks with close coupled toilets.
Why is my Close Coupled Toilet Leaking When I Flush??
As we have discussed, the most common cause of close coupled cistern leaks is that cistern isn’t sitting at 90° on top of the toilet pan. If the cistern is leaning over, even a little, one side of the doughnut lifts and, with a lot of water pressure, the leak is exposed.
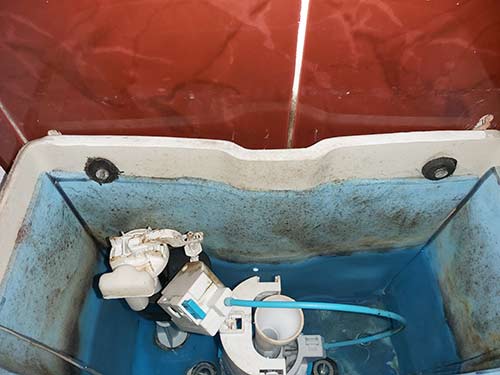
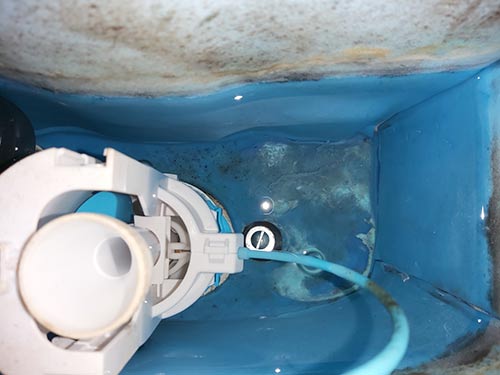
Close coupled toilet cistern unit
If you have swapped a low level toilet for a close coupled it may be necessary to box out the back of the cistern wall to make sure the unit is square.
This essentially means constructing a timber frame that is then faced with sheet timber such as ply wood that the cistern is fixed to in order to level it so that it sits at 90° to the toilet pan beneath it.

Boxing built behind low level toilet cistern so that it sits at 90° and level to the toilet pan
Although we have established the most likely cause of a newly installed leaking close coupled cistern above, occasionally the same type of leak will occur with a toilet that has previouysly had no issues, most of the time for years, so why would it suddenly start leaking?
Well in most cases this will be due to the fact that the coupling plate or low level cistern bracket as it’s also known has corroded over time and now failed.
Once this bracket fails it will then no longer hold the cistern down level or at 90° to the toilet pan and as we know from above once this happens then leaks occur.
Additionally as the bracket is designed to pull the cistern down on to the pan and crush the doughnut to create a seal this is also a failure point.
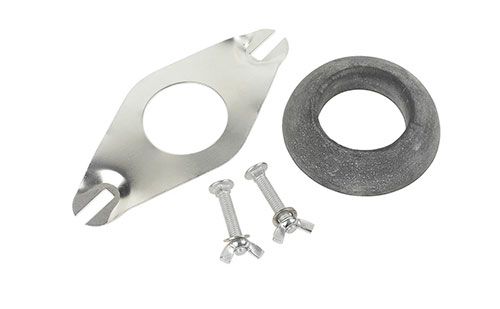
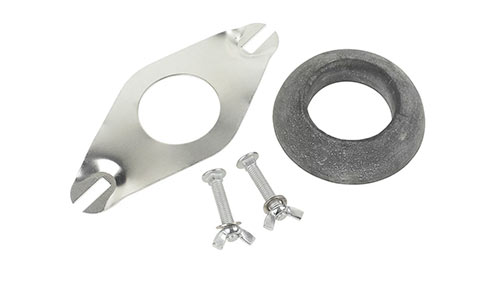
Close coupling toilet cistern kit for holding cistern on toilet pan
In the above point the bracket itself has failed over time and this can also be the case for the doughnut.
If you have ever seen an old and aged piece of rubber then you will know that it looses it’s flexibility and essentially dries out and becomes brittle. At this point it will have lost it’s ability to form a decent seal and will then start to leak.

Low level cistern rubber doughnut
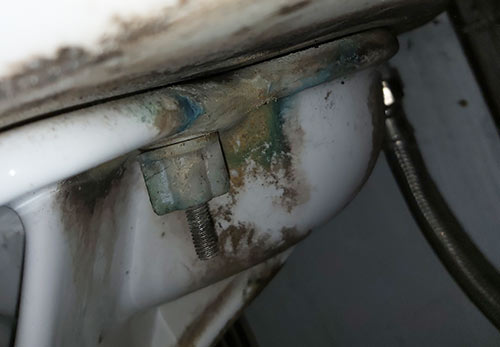
One final area to check is the through bolts that run through the base of the cistern and are used to secure it to the toilet.
When screwing up these bolts once they are inserted down through the toilet pan, if you don’t tighten them evenly and together so that the cistern is pulled down straight and level then this can also be a cause of leaks as the cistern will sit at an angle and not seal the doughnut correctly.
Other Causes of Leaks From Close Coupled Toilets
As we have established above, the most likely cause of leaks with a close coupled toilet when it’s flushed is that the cistern is not sitting correctly and the rubber doughnut is not forming a complete seal and when the flush is engaged water simply pours out and down the back of the toilet.
However, if you have noticed that there is water on the floor around the toilet area but haven’t yet established where it’s coming from it’s worth checking a few other locations also to ensure there are no other leaks.
Through Bolt Sealing Rubbers
This is especially important if the leak is with a newly installed close coupled toilet! The through bolts, as stated above, secure the cistern to the toilet by running down through holes in the base of the cistern and top of the toilet.
To stop water running out of the cistern through these holes the fitting kit is supplied with 2 conical rubber washers. The thinnest end plugs down into the hole and as the bolts are done up, a metal washer on top crushes the rubber into the hole creating a firm seal.
If these rubber seals are not installed correctly and aren’t actually creating the required seal they’re supposed to, no matter how slight a gap there is, water can easily leak down through.
As these bolts are in pretty much the same area as the doughnut and bracket, sometimes it can seem like these are the cause when in fact the root issue lies with the fixing bolts, so be aware of this!
In terms of repair you would need to empty the cistern, loosen the bolts and re-seat the seals and then tighten everything back up. To test, tip a small amount of water into the cistern, leave for a while and then check for any leaks. For repeated leaking, apply some Plumbers Mait and this should create a final seal.

Bolt through fixing kit for securing cistern to toilet pan
Leaking Incoming Supply
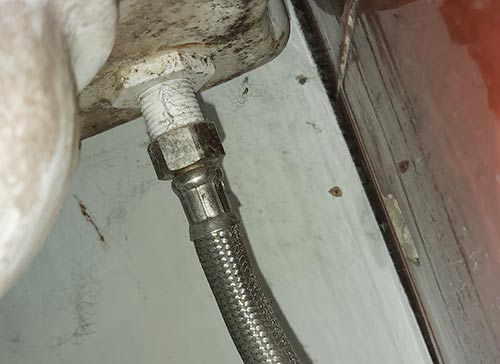
Again if this is a newly installed toilet and you have just noticed a puddle of water on the floor then it may be coming from the incoming water supply and where it’s attached to the toilet fill valve or flush valve as it’s also known.
To allow water in to fill the cistern, normally a flexi hose connector is attached to a water supply pipe and then screwed on to the base of the fill valve. In some instances a flexi hose isn’t used and copper pipe runs straight to the valve.
If Plumbers Mait or a similar sealant isn’t used or the screw cap on the hose isn’t done up tight enough onto the fill valve then water can easily leak up through the threads.
However this issue would not just become apparent after flushing the toilet, there would be a constant leak.
As for repair, turn off the water and loosen off the flexi connector and apply some Plumbers Mait to the threads. Better still, wrap some PTFE plumbers tape, roughly 3 or so coats around the threads and tighten the hose connector pinch tight. Finally turn the water back on and monitor for leaks.
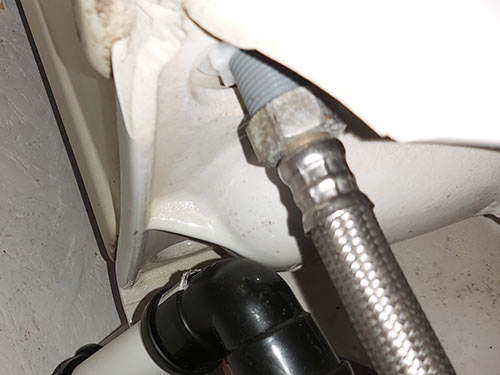
Incoming water supply for toilet fill valve
Leaking Waste Outlet
If the actual 4 inch waste outlet for the toilet was leaking then this would also result in water pooling behind the toilet and in the area of the connection itself.
As the issue would also only present itself after the toilet is flushed then this could potentially appear as a failed seal between the cistern and pan. This would also coincide with a newly installed toilet.
However as this water would be foul water e.g. water mixed with waste it wouldn’t be clean like fresh water and it would also stink!
If you have a leaking waste outlet then you will need to remove the toilet entirely and check the seal on the connector to the drain outlet as it may be damaged.
Also line the toilet up with the connector and drainage outlet and check that the waste outlet on the rear of the toilet is perfectly aligned with the drainage outlet. If it’s higher or lower then unnecessary pressure may be being placed on the sealing ring causing the leak.
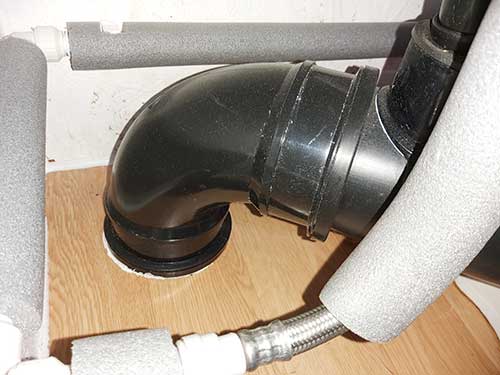
Main waste outlet of a close coupled toilet
How to Repair a Leaking Close Coupled Toilet
After performing the necessary checks and inspection to establish the cause of your leaking close coupled toilet and you have confirmed your suspicions and found the leak is coming from the joint between the cistern and toilet pan it’s now time to get it sorted.
Turn off Water Supply to Toilet
Before doing anything, the first task is to turn off the water supply to the cistern so that you can safely disconnect the flexi hose or other means of connection.
If you are lucky enough to have an isolation valve, it can be turned off here. However if not then you will need to turn off the mains stopcock.
Note: If there is no isolation valve installed then now is an ideal time to install one. See our project on how to fit an isolation valve for help on how to do so.
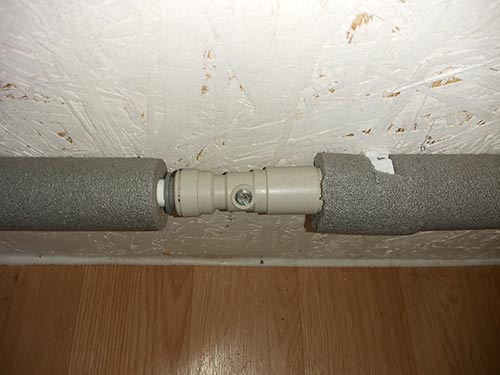
Isolation valve used to cut water supply to toilet
Disconnect Water Supply Pipe
With the water turned off you can now safely disconnect the supply pipe. Before you do so though, place some old towels under the area surrounding the pipe and an old tray of some type. There will spillage so you will need to catch it all.
using the correct sized spanner or an adjustable spanner, undo the water supply pipe and allow it to drain and then tuck it out the way.
Water supply pipe to toilet cistern
Remove Cistern Wall Fixings
Take off the cistern lid and disconnect the push button or similar flush mechanism and put the lid safely to one side.
In almost all cases there will be at least 1 screw holding the top of the cistern to the wall or surface behind. Along with the through bolts, these will hold the cistern firm and level.
Using preferably a hand held screwdriver, loosen and remove any screws present.
As the cistern is porcelain and can crack very easily it’s best to stay away form power tools.
Screws used to hold cistern to wall or surface behind
Remove Cistern
With the wall fixings removed the final job before removing the cistern is to loosen and remove the through bolts holding the cistern to the pan.
Using a spanner if there are nuts present or your fingers if there are wingnuts, unscrew each nut and then carefully lift the cistern free of the toilet pan.
Through bolts holding cistern to toilet pan
Remove and Replace Bracket, Doughnut and Clean
With the cistern removed now remove the bracket and rubber doughnut. Once removed use a suitable cleaning solution to thoroughly clean everything including the top of the toilet pan where the doughnut sits and the base of the cistern. Remove any trace of debris and the slightest bit can result in leaks.
Once fully cleaned fit a brand new bracket and rubber doughnut. Even if the old ones seem to be in perfect order, there was still a leak present so to eliminate these from list, get them changed.
Note: There are several different sizes of doughnut so make sure that you get the right one. Measure the diameter of the base of the flush valve in the cistern and then you will know what size doughnut you need to ensure it fits correctly.
Close coupled cistern fitting kit
Refit Cistern
With everything cleaned and ready refit, pop the brand new doughnut down on top of the toilet cistern in it’s recess making sure that it is sitting correctly and flat on the toilet pan.
Next, turn the cistern on its side and slip the bracket in place over the through bolts. Ensure the through bolt rubber seals are still sitting correctly in holes in the base of the cistern.
Before dropping in place wrap 3 or so layers of PTFE tape anti clockwise around the very end of the inlet valve. It’s easier to do now then when the cisterns back in place.
Pick the cistern up and then gently lower it down on to the toilet pan ensuring that the through bolts go into their respective holes as they should and that the doughnut is still sitting in place on the pan and hasn’t moved.
Refit the 1 or 2 screws that secure the cistern to the surface behind but don’t tighten them too much, leave a little wiggle room. This is just to help hold everything in place and ensure nothing moves out of place.
Finally, screw a nut or wingnut (include washers) up on to each through bolt until they touch the cistern. Use a spirit level to check the cistern is level and then screw both through bolts up at the same time, keeping an eye on the level. If you need a second pair of hands to help screw them up, find some as it will help to ensure all sits square.
Don’t do them too tight as this in itself can cause leaks.
Toilet cistern through bolts screwed back up holding cistern in place
Connect Water Supply and Test
With everything fixed back in place, screw on the water supply flexi pipe or other supply and screw it up finger tight. Use the correct spanner of adjustable spanner to then do it up a few more pinches.
Next, reconnect the flush mechanism to the flush valve and then refit the cistern lid.
Finally have a good clean up around the under side of the toilet and floor, removing any water that could cause make you think there are leaks but there aren’t and then flush the toilet. If all is well after any inspection all should be clear and you should now be leak free.
If however you find that you still have a leak then you will need to remove the cistern again and apply some Plumbers Mait all around the doughnut, top and bottom. Once reassembled this should now fully resolve any leaks.
Fixing a leaking close coupled toilet is fairly straightforward and something that can easily be done by even a DIY novice as long as you take your time and work methodically.