If you don’t have an existing radiator in your bathroom that you can swap out for a towel radiator fed from your central heating system then your other option is to install an electric towel rail.
Fitting an electric heated towel rail is a fairly straight forward job but if it is a brand new install e.g. a new supply has to be run for it, this can only be done by a Part P registered electrician as bathroom are considered special locations (more on this in our Part P project here).
In light of this the steps for installing an electric towel rail detailed below are only as a guide to how a professional electrician would carry out the job, just so you know the steps that they would follow and to help you decide on a realistic location for your new towel rail.
Types of Electric Towel Radiators and Rails
There are two types of electric towel rails; thermostatic or variable heat and non-thermostatic or single heat.
As you may have guessed from the naming a thermostatic electric towel rail has a thermostat built into it which allows you to adjust the heat output. If your budget allows then you should certainly go for this option as adjusting the heat and turning the radiator down when only a gentle heat is needed will certainly save on your electric bill.
With a non-thermostatic electric towel rail, you only have the ability to turn it on or off. When on it only operates at one set temperature.
Some of the more expensive offerings also have a built in timer that allows you to program the rail to turn on and off at set times in the day.
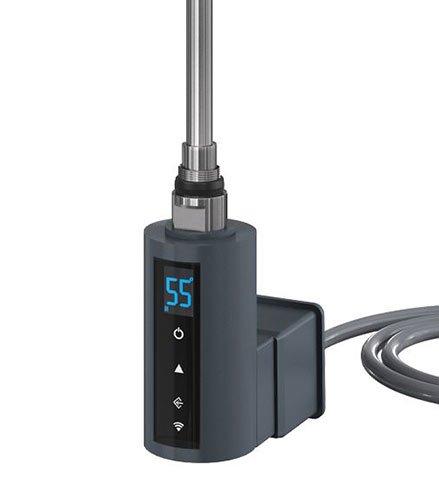
Thermostat for an electric towel radiator
How do Electric Towel Radiators Work?
An electric towel rail works by heating the fluid within the radiator rails using an electric thermostat that is connected to the mains. The heating element heats the liquid which in turn heats the radiator using convection (heated liquid rises, cooler liquid sinks, is heated and rises in a self perpetuating motion).
In terms of what liquid is used, this can vary greatly. Some electric towel radiators use an oil-based substance, some use a thermodynamic fluid such as Glycol that retains heat very well and some are filled with deionized water.
In most cases, certainly for water and Glycol-bases radiators an inhibitor is also included (normally 10-15%) as this helps to prevent rusting, limescale and other forms of sludge and buildup, keeping the system healthy and free flowing.
One point to note is that with water-filled system, sometimes these also need to be topped up, but instruction on how and when to do so should be stated by the manufacturer.
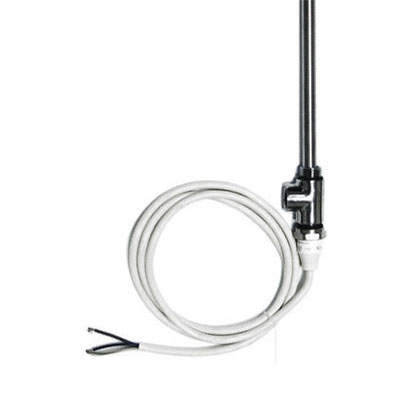
Heating element used in electric towel radiator
Can you Install an Electric Towel Rail Yourself?
The short answer to can I install an electric towel radiator myself is no, unfortunately you can’t.
This is due to the fact that bathrooms are considered to be “special locations” and therefore any electrical work must be carried out by a qualified Part P registered electrician that has the necessary knowledge to install the radiator safely and correctly, test that electrical connection and then issue a “minor works certificate” for the work carried out.
The electrician will also ensure that the towel radiator that’s being installed is safe and up to the job. Any electric towel radiator installed in a bathroom should be a minimum of IP44 rated for Bathroom Zones 1 and 2 and a minimum of IP67 for Zone 0.
In terms of the Bathroom Zones mentioned above, these zones define where certain electrical appliances can be installed due to the risks of water contact and what IP rating they need to be. More can be found about bathroom zones in our project here
On the contrary to this, if you have an existing electric towel rail that has been fully installed e.g. there is an existing power supply and cabling using the method stated below and your existing towel rail has simply come to the end of its life then you are able to swap this out for a new one yourself, but this has to be a like-for-like replacement.
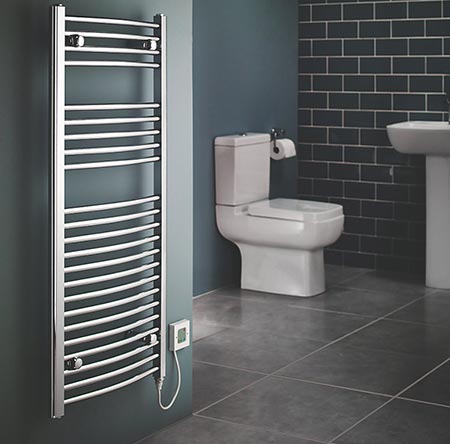
IP rated electric towel radiator suitable for zones 1 and 2
Can you Have an Electric Towel Rail in a Bathroom?
Yes you certainly can install an electric towel radiator in a bathroom but you have to ensure that it is rated correctly for the “bathroom zone” that it is going to be installed in.
As we have mentioned above, most electric towel radiators are installed in zones 1 or 2 so a minimum IP44 rated radiator will be required, whereas in zone 0 an IP67 rated variant would be needed.
For more on bathroom zones and what these mean, see the question above.
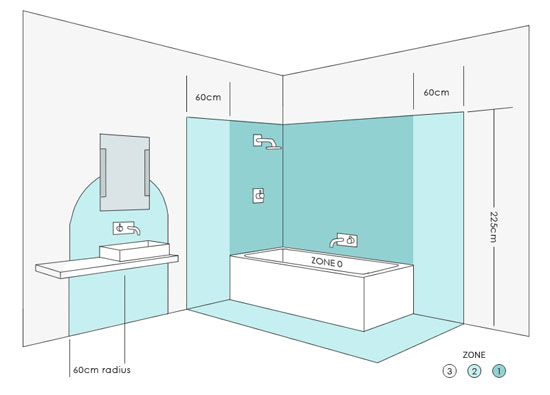
Electrical safe zones within a bathroom
What Size Electric Towel Rail do I need?
If you currently don’t have a traditional central heating supplied radiator in your bathroom and are looking for an electric towel radiator that will both heat your towels and the bathroom itself you will need to ensure that it outputs enough heat to do so.
Unfortunately both central heating supplied and electric towel radiators are not as efficient as a traditional standard radiator at heating a room space but despite this a decent sized electric towel rad will in most cases out put enough heat to do a decent job.
When it comes to heat output, this is measured in BTU’s (British thermal unit) and to ensure that your radiator produces enough heat you have to work out the volume of the space that needs heating and then choose a radiator that produces the required BTU’s.
There are many BTU calculators online and a simple search will bring up a huge list.
How Expensive are Electric Towel Rails to Run?
Traditionally electric towel rails were rather on the expensive side to run as they weren’t very efficient, however today they are much more efficient and with the huge rises in wholesale gas prices over the years and no sign that this is ever going to go down, electric variations are in some ways looking more favourable.
Coupled with the fact that domestic renewable energy sources such as solar panels have come down a lot in price over the years making them much more accessible, using an electric towel rail in place of a traditional radiator run off of a gas central heating system, some now believe is a more sustainable option for the future.
As with all things you get what you pay for so some of the cheaper, lower end offerings aren’t as efficient as the more expensive versions.
In terms of exactly how much it will cost you, it will depend on how many kilowatts (kW) it uses and what you pay per kWh for your electricity.
For example if your electric towel rail is 250w it would take 4 hours to use 1kWh of energy and if you are paying 0.17 pence per kWh of electricity you use, 0.17 / 4 = 0.425 so it would cost you roughly 4.25 pence to run the towel rail for an hour.
How are Electric Towel Radiators Connected?
Note: Before any form of electrical work is carried out, the electrical circuit that is being worked on is correctly isolated at the consumer unit by the electrician doing the work e.g. the circuit is turned off!
To connect or wire up an electric towel radiator you can take a spur or supply from an existing loop such as a nearby socket and power it from that. Socket loops are preferable to use as they are sure to be able to cope with the power requirements of pretty much all towel radiators.
It is technically possible to use a lighting circuit to power an electric towel rail as the circuit will be protected by the fused connection unit, but this is only really in instances where there are no other options.
This is very often the preferred method as running a separate supply from your fuse box to the radiator will often involve pulling up floor boards and running cables which can be expensive. However in most adjoining rooms or spaces there will be at least 1 socket so a fed can be taken from this and only run the short distance to your proposed installation location.
The supply cable will then need to be connected to the supply side of a double pole fused spur or fused connection unit which must be fitted in an “outside” zone (or zone 3). This is to ensure that in the event of any faults, power will be cut to the unit and prevent any risks of injury.
A supply is then run from the load side of the fused connection unit to a flex outlet faceplate located in the bathroom next to the towel radiator installation site and the rail is then connected to the faceplate.
This is the basic wiring setup for an electric towel rail.
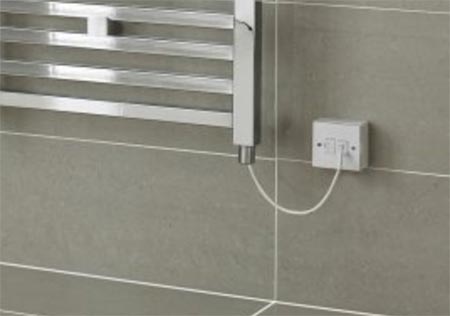
Electric towel radiator connected to flex outlet in bathroo
How to Install an Electric Towel Rail
As we have mentioned at the top of this project, installing an electric towel rail form scratch has to be done by a Part P registered and fully qualified electrician, however it is useful to know the process involved so that you can be sure that your radiator has been installed correctly.
Step 1: Find Location for Electric Towel Rail
In many bathrooms there will only be one or two clear walls at the most so in most cases your options will be a bit limited, however if you do have a choice then it’s best to opt for the wall that is closest or easiest to access an existing socket to run a power supply from.
Additionally if you have the choice then selecting an installation area that is in either zone 1 or 2 will in most cases mean that you don’t have to, in most cases, go for a higher rated radiator that’s suitable for zone 0.
Step 2: Locate Existing Socket Supply
As we have mentioned above, part of selecting a suitable installation area for your electric radiator should be ensuring that you can access an existing power supply e.g. an existing socket.
In most cases there should be an accessible socket in the next or adjoining room and if you are really lucky then there may be one on the opposite side of the wall, but this isn’t always the case.
Regardless of where a given socket is, a professional electrician will be well voiced in running a supply form it. In most cases if the wall is a timber and plasterboard stud wall then they will be able to use electrical fish tape or rods to pull a cable through the wall void.
In the case that you have solid brick or block walls this gets a little trickier. In most situations like this an electrical supply cable will either be chased through the walls or a sometimes easier option is to pull up some floorboards, chases the cable up to the FCU outside the bathroom and then back down, under the floor and up into the bathroom and then chased up to the flex outlet.
Step 3: Install Fused Connection Unit and Flex Outlet
For arguments sake for this example we are going to work on the basis that we are instilling our radiator in a property with stud walls. With this in mind the circuit that’s being worked on, in this case the socket circuit has been turned off.
A hole is then drilled in the wall behind where the FCU will be installed, normally above the bathroom door and a cable is then fished through the wall to the nearest socket and connected to the line, neutral and earth points.
At the other end a back box is inserted into the wall where the FCU is to be installed and the cable run in. Before connecting up another cable is then run from the FCU location down to where the flex outlet is to be placed and out through a hole created where it will be placed.
Carefully consider where the flex outlet s placed as this will dictate where your radiator is installed at the two need to be fairly close together. Normally the outlet is placed just below to the right of where the radiator will go as this is where the heating element is normally located.
Back at the FCU, the cable from the socket is connected to the supply side of the FCU as per the wiring instructions included with the fused connection unit itself (live, neutral and earth locations can differ between manufacturers).
The cable running to the flex outlet is then wired to the load side of the FCU, again as per the instructions stated by the manufacturer.
As the name states, a fused connection unit houses a fuse that protects the circuit it’s connected to. In terms of what fuse to use a 3amp fuse should cover pretty much all radiators you could potentially install. If specific fuses are required, this should be stated in the instructions included with your towel radiator.
At the flex outlet install locations, a back box is then installed and the cable run into the back box. The end of the cable is then stripped and connected into the supply side live, neutral and earth of the flex outlet.
Don’t screw the faceplate up quite yet as the flex from the radiator still needs to be connected up.
Remember: Any bare earth wires should be sleeved using earthing sleeve!
Step 4: Fix Electric Towel Radiator to Wall
One of the final jobs is then to fix the electric towel radiator to the wall. The radiator is held up to the wall where it is to be fixed and then level ed using a spirit level. Depending on the brackets that are included with your radiator this may differ slightly but with most, the brackets are fixed between the radiator rails in the same way as most central heating supplied towel radiators.
Once leveled up a line on the wall is drawn following the underside of the top rail and then marks are defined on eth line 70mm in from each side.
If the wall is tiled then a 6mm ceramic tile bit of masonry bit is used to drill through the tile and then into the wall behind and then 2 red wall plugs are inserted into the holes, each being pushed behind the tile and into the wall. If it’s plasterboard, plasterboard fixings are used instead, Redidrive fixings are generally best.
Washer are placed on 2 screws and then dropped into each bracket so they protrude out the bottom and then push each screw into the holed drilled or plasterboard fixing and they are then screwed, up using a spirit level to level them as they are fixed.
Bracket inserts are then pushes into each bracket and tightened using the small screw on each to hold it in place and then place the radiator is put back on the wall. 2 screws are inserted into the bracket heads and each screwed on to the brackets loosely to holding the radiator in place.
With the top brackets fixed, measure in 70mm on either side between the bottom 2 radiator rails at the centre between the very bottom rail and the one above it then remove the radiator, put it to one side and repeat the fixing process used in the step above. Depending on the size of your radiator there will be either one or two brackets at the base. If only one, this is fixed at the centre.
Once all the brackets were in place, put the radiator was then put back on and then each bracket head screwed up holding the radiator in place. Caps are then placed on to cover the screws.
Step 5: Connect Electric Towel Radiator to Flex Outlet
The flex is then pushed up into the outlet, this can be a little tricky as sometimes its a little stiff getting past the seal and it’s then pulled through holding the faceplate roughly in place, allowing enough slack with the flex that it hangs down in a loop.
It’s then cut off so that an inch and a half or so of cable is left inside the outlet or enough to allow you to easily run each wire to its terminal point. Strip the flex sheath off and the ends of each wire and connect each to it’s correct terminal inside the flex outlet, live to live and so on.
Once done screw the faceplate onto the back box
With everything now connected up the jobs pretty much done so the final tasks were to tidy up and then fully test the new circuit to ensure everything is as it’s supposed to be. Once all tested and confirmed to be well the circuit is turned back on again and the towel rail turned on allowing it to warm up.
As you can see, installing an electric towel rail is a fairly straight forward job, but one that needs to be done by a Part P qualified electrician.