Making sure things are level before they are fixed is an essential job for both DIY’ers and trade professionals alike and normally this is done using a spirit or laser level.
But what if you need to level items such as fence posts over a long distance, or indeed around corners, obstacles or other structures. If you don’t have funds for an expensive laser level or tool that can do this this is where the water level comes into its own. Read on to find out about this fantastic tool.
What is a Water Level?
A water level is exactly what it sounds, it’s a form of level that utilises a principle of physics that water will always find its own level wherever it is placed. Tip water onto an uneven floor and it will always find the low spots for you.
This device is really going back to basics, but to be honest sometimes the most simple of devices are best and cheapest. In basic form all you need is a length of clear pipe and some water. Gravity does the rest for you.
The tube is then filled with water, except for a few inches at either end and they will both settle at the same level regardless of how close or far they are apart.
Using water as a level in this manner has been done for many thousands of years and by many ancient civilizations including the Egyptians when building the pyramids so in terms of being a trustworthy method, it’s about as good and reliable as it gets.
The only issues arise when external influences such as wind and the similar come into play as this causes water to move and thus upsets any levels.
Tools and Products Needed for a Water Level
To make your own water level you will need the following tools and products:
- Required length of clear plastic tube
- Side cutters to cut tube if required
- Container for pouring water
- Clean fresh water
- Small funnel for help filling tube
- Food colouring to help water in tube stand out
- 4 or so screws for holding tube or tape if no drilling possible
- Drill/driver for inserting screws
To save the job of making your own, you can actually buy a pre-made water level from most DIY stores such as the one below. However it is likely that it will cost a bit more than making one yourself.
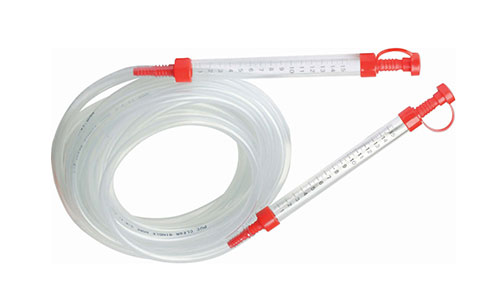
Pre-made water level kit available from many DIY stores
How to Make a Water Level
When it comes to making your own water level, the type of tube is of high importance. You will need to ensure that it’s the correct length for your needs, so 50 – 70 feet should suffice and a diameter of 8 – 10mm will give enough movement for the water and allow a level to be clearly seen.
Before you can actually start levelling items with your water level you will first have to make it, if you’re not buying one. Follow the steps below to do so:
- Step 1 – Work out Length – The first job is to measure exactly how long you need your water level to be. This doesn’t need to be exact as it’s a good idea to have a little extra length on the tube to play with. Once you’re sure on the length, purchase required amount of tube, making sure it’s transparent so you can see the water level
- Step 2 – Prepare Water – Fill A suitable sized jug with water and add several drops of food colouring to to dye it. This will help to make it more visible in the tube
- Step 3 – Fill Tube – Using a second pair of hands, have them hold both ends of the tube upright. Take the funnel and push it into one end of the tube and then pour the water from the container to fill it. Don’t fill all the way to the top, leave roughly 2 – 3 inches at either end. Once filled, hold them up together and they should both be at the same level
- Step 4 – Check for Bubbles/Blockages – To ensure your water level works correctly and is accurate there shouldn’t be any bubbles or blockages in the tube so check along its length and ensure this is the case. If there are they will need removing
- Step 5 – Move to Work Site – Plug each end of the tube using your thumbs or some bungs and move the water level over to your work site or objects that need levelling
How to Use a Water Level
Once you have made your water level it’s time to now put it to work and start levelling. The most common use for water levels is to level fence posts or posts for decking and so the example below is based on this.
The job of marking is best done between 2 people so that both ends can be marked, so bear this in mind.
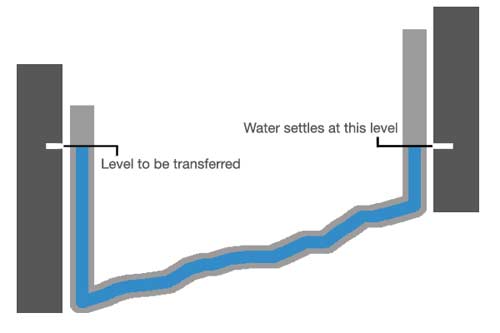
- Step 1 – Fix to First Object – First, hold the tube up to the first object and then using either tape or screws, tape it or position screws either side to hold it in place so the top of the tube is level with the top of the object
- Step 2 – Hold to Second Object – Holding your finger over the top of the tube, take the other end down to the object where you need to mark a level and hold in a "near enough" position towards the top of the object
- Step 3 – Allow to Settle – Before any marking can take place, allow the water level to completely settle so remove your thumb or bung from the end of the tube and let it level off until there is no movement at all
- Step 4 – Move to Level – Once it is settled you have achieved a level point between both ends of the tube, you can then move it up or down until the fluid meets the height required. The other end of the pipe will be at the same height. You can then place your mark
- Step 5 – Mark Level Points – Before you start marking, the fluid in the pipe will not be flat, it will be concave as in the image below. You should agree with your help whether you are marking at the low point of the concave or the high point
- Step 6 – Repeat for any Other Objects – Once you have marked your first item, this procedure can be repeated all around the room or building site, giving you multiple points at the same level. You can join these points with a crisp straight line using a chalk line
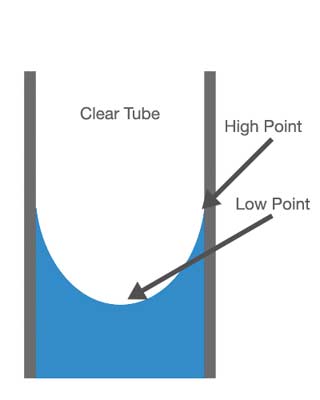
Marking high and low points
Marking a level using a water level
Although very old school technology, when it comes to marking level points on objects that are either far apart or hidden by obstructions, there really isn’t a tool quite as effective as the water level and considering it can be made for only a few pounds, it’s one that you should certainly have in your tool box.