Regulations and Rules for Enlarging Loft Hatches
Please note that if you plan to make your loft into any kind of living accommodation you must first get building regulation approval. There are many regulations governing the conversion of lofts. See our related projects on the right for more information.
Caution: Roof trusses, whether traditionally hand cut or pre-made as a unit, are designed specifically to carry the weight of your roof. If they are cut then the roof is weakened unless you follow the instructions below 100%. If you are in any doubt whatever please consult a professional though our Find a Tradesman service.
The same can also be said for traditional roofs (non trussed roofs) as in most cases they have been designed to cope with a specific weight and cutting or removing sections of roofing timber could cause catastrophic failure.
If you are in any doubt as to whether a particular timber is structural or not, please check with a professional.
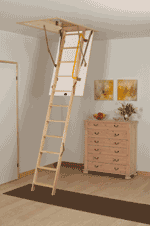
What Type of Loft Hatch are you Going to use?
When it comes to fitting a new loft hatch, whether it is a direct replacement or an entire new hatch you have two choices. You can either build your own bespoke hatch or you can now buy ready made loft hatches that you simply fix into your new opening.
There are a great many ready made loft hatches available on the market today so it’s well worth checking these out before you start as a pre-made solution could be the best way to go. Also consider an insulated loft hatch.
Depending on the size of the opening into your loft that the hatch will fit into will really dictate this as most ready made hatches are made to set sizes. If your new opening is going to be a slightly odd size then a bespoke build solution may be the only route you can take.
Additionally you may also want to think about the type of loft ladder you are going to use. You can also get all-in-one loft hatch and ladder kits as can be seen below.
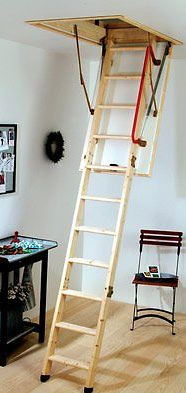
Loft hatch and ladder kit – Three section ladder with safe, spring loaded lowering mechanism and also insulated loft hatch
Check that the enlargement you would like does not involve cutting through any main supporting beams or timber lintels which may protrude into the loft space. As mentioned above, if in any doubt, seek advice from a professional.
As the information below is geared towards enlarging an existing loft hatch you should have something similar to the image below.
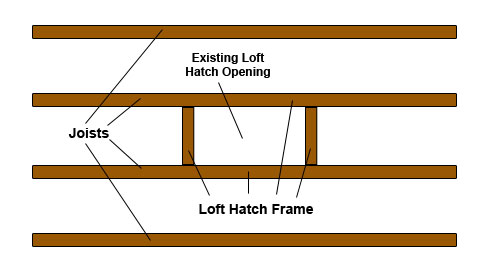
Existing loft hatch opening between joists
If you are starting from scratch e.g. you don’t currently have a loft hatch this may be for a reason so first check with a structural engineer or relevant professional. If they give you the all clear to go ahead and create a loft hatch you will first need access the loft area by cutting a hole in your ceiling.
Before you go about cutting holes, use a stud, pipe and wire detector run over the area you would like to cut to make sure there are no pipes and wires up there.
This will also detect your ceiling joists and dictate where you can create your access hole. Using a pencil, mark the edges of any joists on the ceiling, this will then create your access hole.
Use a drill and suitable drill bit to create enough holes in one of the corners to allow you to insert a saw and cut along the lines that you have marked out.
With your access hole created, follow the below instructions to create your loft hatch.
How to Enlarge a Loft Hatch
Using the diagram below, follow these steps.
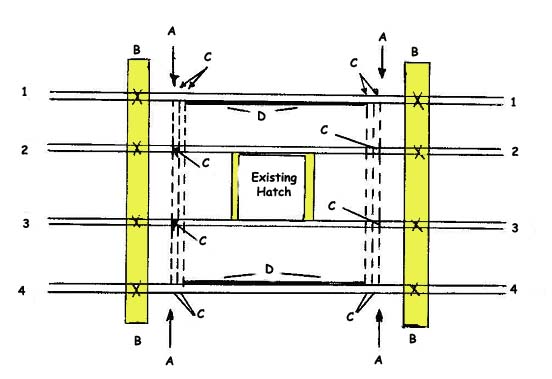
All cuts and new timbers that need to be made and fixed to form a new loft hatch
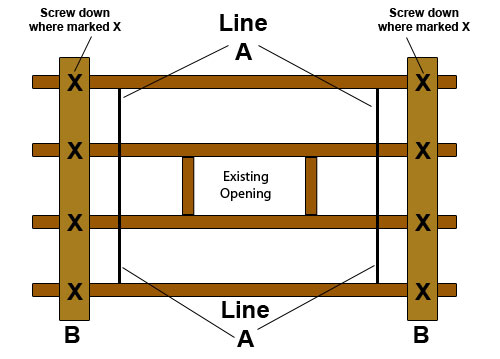
- Measure and mark the size of your new opening, plus 4 inches either side, on top of existing ceiling joists 1, 2, 3 and 4. These marks are indicated as A in the above and below images. The reason we have added 4 inches is that you will later need to add 2 timbers either side of your new opening. These timbers will need to be the same size as your current joists – in this case the joists are 2 inches and we need 2 either side hence the 4 inches. If your joists are wider then you will need to increase the gap you leave accordingly
- If your new hatch spans more than 2 joists (involving cutting more than two joists) you will need to contact a specialist such as a structural engineer to ensure that no structural integrity will be lost. You can also visit our loft conversion project for more information
- Place a 4 inch x 1 inch timber flat on the joists behind your lines marked as timber B in the above and below images. Screw this timber down using two and a half inch number 8 screws, into all positions marked by X. This is temporary support and can be removed later when you’re finished
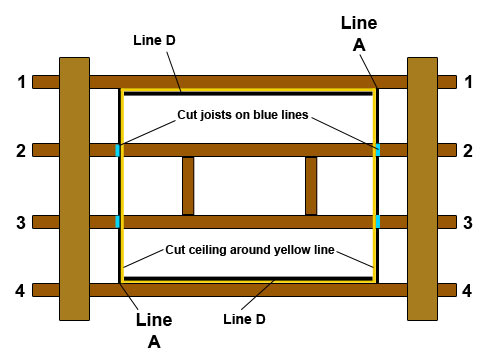
- first, check for cables and pipes using a detector and then cut the ceiling along lines A and D, marked in yellow in the below image. Once done, you should then be able to remove the whole section, creating your new opening. Now, cut through only joists 2 and 3 along line A leaving 1 and 4 intact, indicated in blue in the below image. You will now have created your new opening
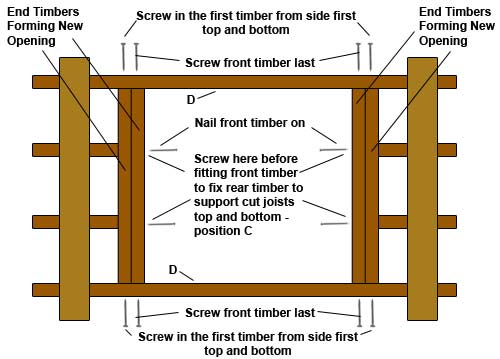
- In the image below you will see indicated the new "End Timbers Forming New Opening". These timbers will need to be the same width and depth as your current joists. The rule of thumb when dealing with roofs is that every timber you take out, you put 2 back. The first of each of the end timbers on both sides of the opening will need to be screwed to the ends of the cut joists using and also screwed through each side using 4 inch number 8 screws top and bottom (as seen in the below image). You will need to drill pilot holes for each screw first. When it comes to drilling and screwing in this environment, there is very little room so an angled drill attachment can come in very handy
- Once the first timber is fixed you will now need to fix the second timber to the front of the first. Using 3 inch wire nails, nail the second timber on to the first on each side of the opening. Once in place you will now need to screw the second timber through the sides both top and bottom as you did for the first timber
- You can then remove timbers B and line your new opening with 4 or 5 x 1 inch planed timber, into which your new loft hatch will sit. The cut underside of the opening can be covered by architrave
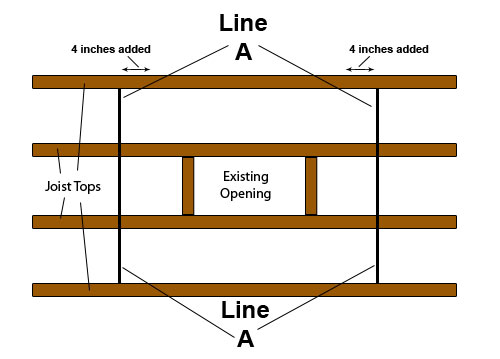
New opening marked on joist tops with 4 inches added either side to compensate for timbers
Screw down and fix in temporary supporting timbers
Cut away ceiling section and joists to create new opening
Fix facing timbers into your new loft hatch opening and screw them in place
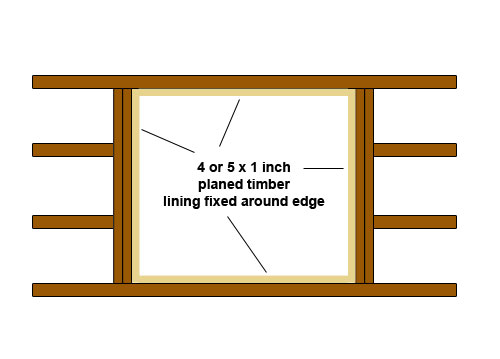
4 inch or 5 inch x 1 inch planed lining timbers fixed into new opening for supporting the new loft hatch
Finishing Touches for Your new Enlarged Loft Hatch
Preferably a loft hatch would have a maintenance free finish which could just be wiped down. The finger marks on a hatch can be really unsightly but are quite hard to remove from an old painted surface. Look for a loft hatch that requires a quick wipe over and no painting!
As mentioned above, look for a hatch with insulation material fixed to the back (preferably fire resistant). 35mm of insulation is standard but 50mm is better. 105mm is the ideal amount of insulation to comply with part L of the building regulations.
Find a hatch that does not need an enormous frame reducing the size of the opening you are trying to enlarge!
If you are thinking of renting out your house or just have very adventurous children, look for a lockable hatch.
Look for a hatch with draught seals. Lofts can be draughty places!
Loft Hatch and Ladder